Notice TAU K206MA
Produit concerné
- Morsetti 1 - 2: Attenzione a NON invertire la polarità.
- Se il jumper 6 non è inserito, verrà attivata la modalità basso consumo e, al termine di ogni manovra, le uscite 11-12, 12-13, 14-15, 16-17 e 16-18 verranno spente.
- Terminals 1 – 2: Careful NOT to invert polarity.
- If Jumper 6 is not plugged in, energy saving mode will be activated and, at the end of each manouvre, outputs 11-12, 12-13, 14-15, 16-17 and 16-18 will be switched off.
- Klemmen 1 - 2: Achtung: Nicht verpolen.
- Wenn der Jumper 6 nicht eingesteckt ist, wird die Modalität Energiespar aktiviert und am Ende jedes Manövers werden die Ausgänge 11-12, 12-13, 14-15, 16-17 und 16-18 abgeschaltet.
- Etaux 1 - 2: Assurez-vous de NE PAS inverser la polarité. Si le cavalier J6 n'est pas inséré, la fonction modalité consommation réduite sera activée et, à la fin de chaque manœuvre, les sorties 11-12, 12-13, 14-15, 16-17 e 16-18 seront désactivées.
- Bornes 1 - 2: Tenga cuidado en NO invertir la polaridad. Si el puente 6 no está insertado, se activará el modo de bajo consumo y, al final de cada maniobra, las salidas 11-12, 12-13, 14-15, 16-17 y 16-18 se desconectarán.
- Terminais 1 – 2: Cuidado NÂO inverter a polaridade. Se o jumper J6 não está conectado, ele irá alternar para o modo de baixo consumo de energia e, ao final de cada manobra, as saídas 11-12, 12-13, 14-15, 16-17 e 16-18 serão desligados.
ITALIANO
Avvertenze
Il presente manuale è destinato solamente al personale tecnico qualificato per l'installazione. Nessuna informazione contenuta nel presente fascicolo può essere considerata d'interesse per l'utilizzatore finale. Questo manuale è allegato alla centralina K206MA montata sulla barriera LUXE, LUXE-M o RBLO; non deve pertanto essere utilizzato per prodotti diversi!
Avvertenze importanti:
Togliere l'alimentazione di rete alla scheda prima di accedervi.
La centralina K206MA è destinata al comando di un motoriduttore elettromeccanico in corrente continua per l'automazione di barriere automatiche. Ogni altro uso è improprio e, quindi, vietato dalle normative vigenti.
È nostro dovere ricordare che l'automazione che state per eseguire, è classificata come "costruzione di una macchina" e quindi ricade nel campo di applicazione della direttiva europea 2006/42/CE (Direttiva Macchine). Questa, nei punti essenziali, prevede che:
- l'installazione deve essere eseguita solo da personale qualificato ed esperto;
- chi esegue l'installazione dovrà preventivamente eseguire "l'analisi dei rischi" della macchina;
- l'installazione dovrà essere fatta a "regola d'arte", applicando cioè le norme;
- infine dovrà essere rilasciata al proprietario della macchina la "dichiarazione di conformità".
Personale non qualificato o non a conoscenza delle normative applicabili alla categoria dei "cancelli e porte automatiche" deve assolutamente astenersi dall'eseguire installazioni ed impianti. Chi non rispetta le normative è responsabile dei danni che l'impianto potrà causare!
Installazione
Prima di procedere assicurarsi del buon funzionamento della parte meccanica e che l'asta sia stata correttamente bilanciata.
NB: si ricorda l'obbligo di mettere a massa l'impianto nonché di rispettare le normative sulla sicurezza in vigore in ciascun paese.
ATTENZIONE:
- non utilizzare cavi unifilari (a conduttore unico), es. quelli citofonici, al fine di evitare interruzioni sulla linea e falsi contatti;
- non riutilizzare vecchi cavi preesistenti.
LA NON OSSERVANZA DELLE SOPRAELENCATE ISTRUZIONI PUÒ PREGIUDICARE IL BUON FUNZIONAMENTO DELL'APPARECCHIATURA E CREARE PERICOLO PER LE PERSONE, PERTANTO LA "CASA COSTRUTTRICE" DECLINA OGNI RESPONSABILITÀ PER EVENTUALI MAL FUNZIONAMENTI E DANNI DOVUTI ALLA LORO INOSSERVANZA.
1. Quadro di comando per barriera automatica
- Logica con microprocessore
- Stato degli ingressi visualizzato da LEDs
- Circuito di lampeggio incorporato
- Sensore ad encoder per autoapprendimento della corsa
- Radio ricevitore 433,92 MHz integrato a due canali (CH)
- Scheda carica batteria integrata
- Connettore per batteria
- Diagnostica del difetto funzione visualizzato da LED
- Possibilità di funzionamento in basso consumo
- Compatibilità con l'app TAUOPEN e TAUAPP
2. Introduzione
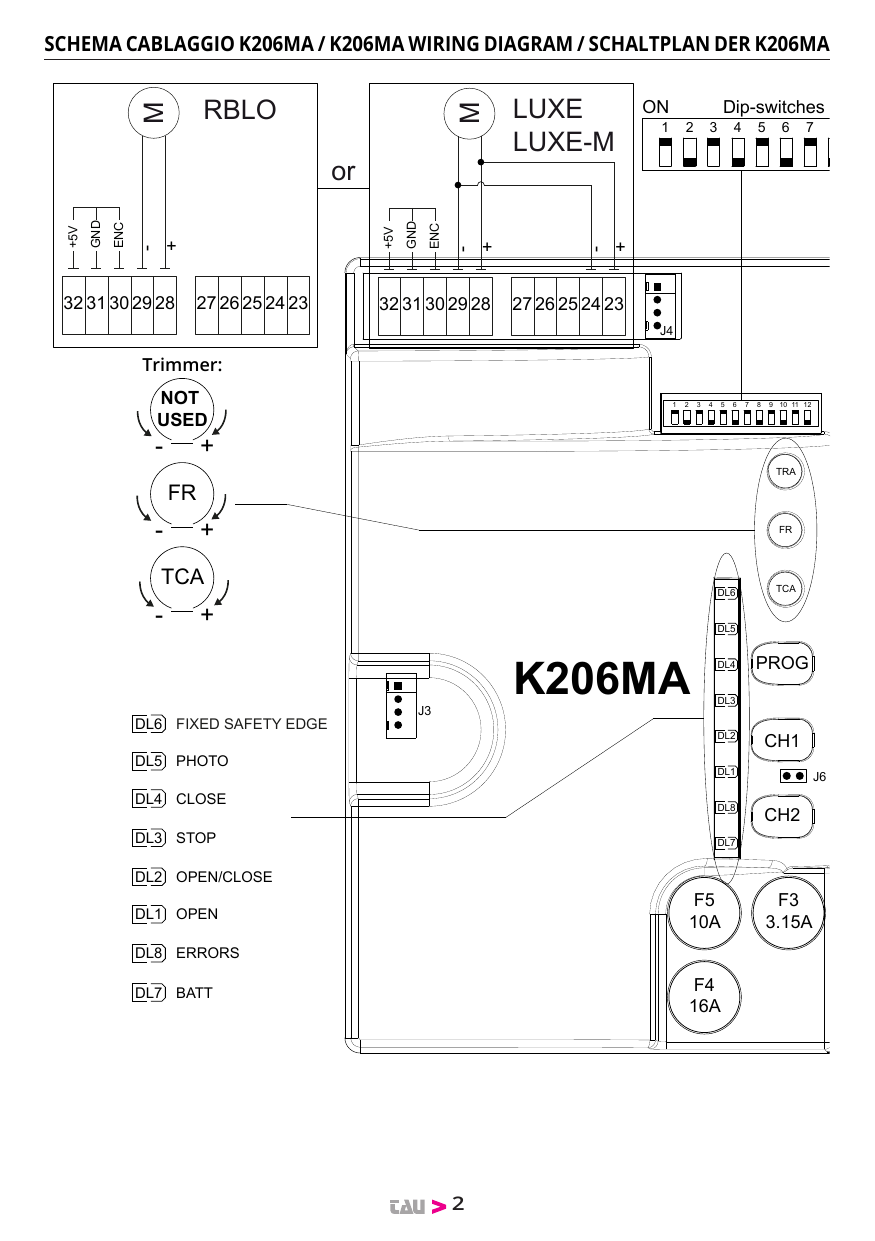
La scheda K206MA può funzionare in due modalità differenti, selezionabili tramite il ponticello J6 (vedi schema cablaggio).
- J6 Ponticellato: modalità standard, ossia la centrale è sempre alimentata;
- J6 Non ponticellato: modalità basso consumo, ossia la centrale si "spegne" al termine di ogni manovra e si accende ad ogni comando (modalità per l'eventuale alimentazione da altre fonti di energia, es. batterie caricate da pannello fotovoltaico).
A collegamento ultimato, in modalità basso consumo, premere brevemente il pulsante PROG:
- I Leds verdi devono essere tutti accesi (corrispondono ciascuno ad un ingresso Normalmente Chiuso). Si spengono solo quando sono interessati i comandi ai quali sono associati. Fa eccezione il led verde DL4, che corrisponde all'ingresso CHIUDE (contatto Normalmente Aperto).
- I Leds rossi (ed il led verde DL4) devono essere tutti spenti (corrispondono ciascuno ad un ingresso Normalmente Aperto) si accendono solo quando sono interessati i comandi ai quali sono associati.
3. Caratteristiche tecniche
| Alimentazione scheda | 13,5V ac - 50 Hz |
| Max assorbimento motore c.c. | 14 Ah - 18V dc |
| Fusibile rapido protezione alimentazione ingresso 13,5V ac (F4 - 5x20) | F 16A |
| Fusibile rapido protezione caricabatteria (F5 - 5x20) | F 10A |
| Fusibile rapido protezione ausiliari 18V dc (F3 - 5x20) | F 3.15A |
| Tensione circuiti alimentazione motore | 18V dc |
| Tensione alimentazione circuiti dispositivi ausiliari | 18V dc |
| Tensioni alimentazioni circuiti logici | 5V dc |
| Temperatura di funzionamento | -20 °C ÷ +55 °C |
4. Collegamenti alla morsettiera
| Morsetti | Funzione | Descrizione |
|---|---|---|
| FS1 - FS2 | ALIMENTAZIONE | ingresso alimentazione scheda 13,5V AC - Alimentato dal trasformatore toroidale e protetto da fusibile sull'alimentazione 230V AC. |
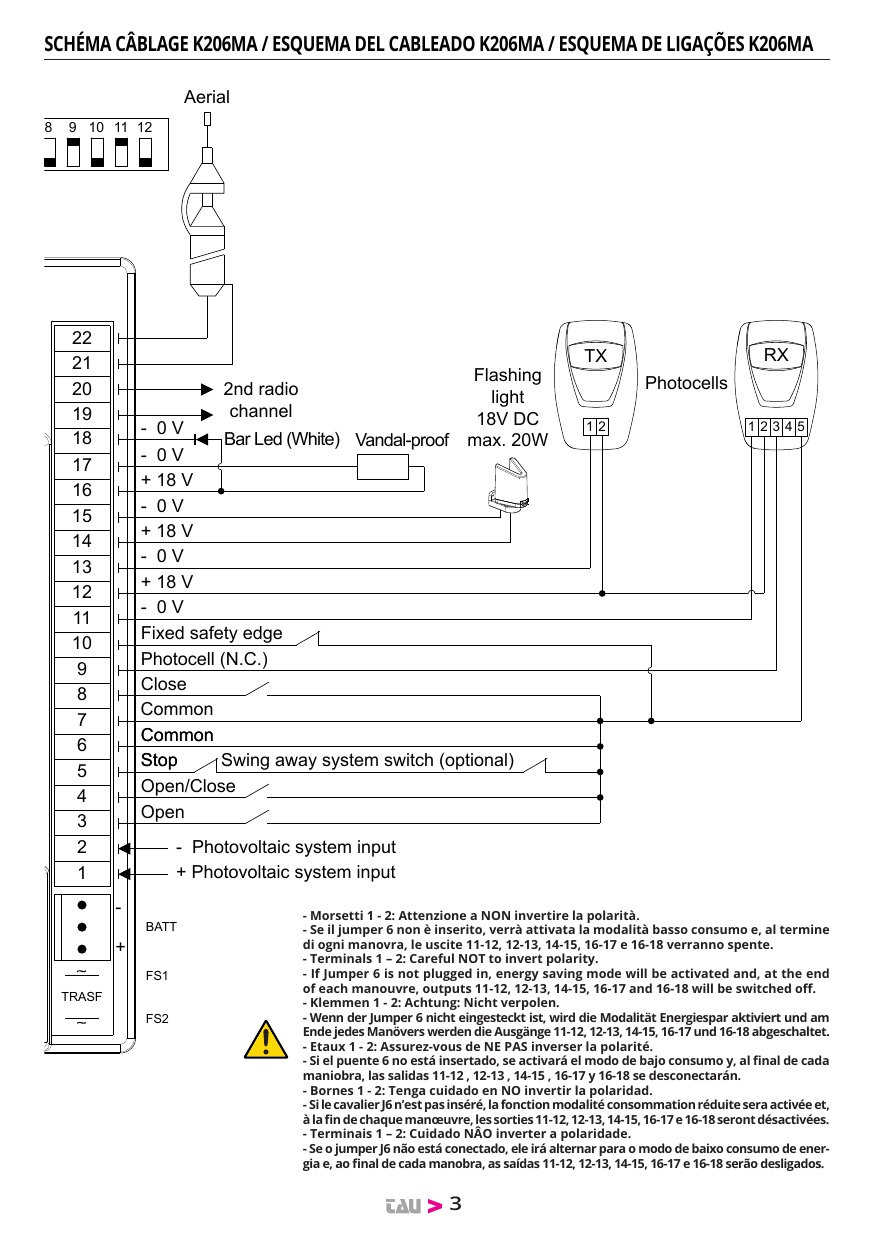
| 1 - 2 | PHOTOVOLTAIC SYSTEM INPUT | ingresso alimentazione esterna (es. sistema fotovoltaico 12V DC). ATTENZIONE: ALIMENTANDO LA CENTRALE DA UNA SORGENTE ESTERNA, TUTTE LE ALTRE USCITE 18V DC ASSUMONO IL VALORE DELLA TENSIONE DI ALIMENTAZIONE DELLA SORGENTE STESSA. |
| 3 - 6 | APRE | ingresso N.A. pulsante APRE - Comanda l'apertura totale della barriera. (3= AP - 6= COM) |
| 4 - 6 | APRE/CHIUDE | ingresso N.A. pulsante APRE/CHIUDE - Comanda l'apertura e la chiusura della barriera ed è regolato nel funzionamento dai dip-switches 2 e 4. (4= A/C - 6= COM) |
| 5 - 6 | STOP | ingresso N.C. pulsante STOP - Arresta la barriera dovunque si trovi, inibendo temporaneamente la chiusura automatica, se programmata. Ponticellare i morsetti se non utilizzati. (5= STOP - 6= COM) |
| 7 - 8 | CHIUDE | ingresso N.A. pulsante CHIUDE - Comanda la chiusura totale della barriera. (7= COM - 8= CH) |
| 7 - 9 | FOTOCELLULE | ingresso N.C. fotocellule - interviene durante la chiusura della barriera. Ponticellare i morsetti se non utilizzati. (7= COM - 9= FOT) Nota: il trasmettittore della fotocellula deve sempre essere alimentato dai morsetti nr 12 e nr 13, in quanto su di esso si effettua la verifica del sistema di sicurezza (Fototest). Senza questo collegamento, la centralina non funziona. Per eliminare la verifica del sistema di sicurezza, o quando non si usano le fotocellule, porre il dip-switch nr 6 in OFF. |
| 7 - 10 | BORDO SENSIBILE | ingresso BORDO SENSIBILE (Bordo sensibile resistivo o costa fissa); Funziona solo durante la fase di chiusura e provoca la totale riapertura dell'asta. Ponticellare i morsetti se non utilizzati. Nel caso in cui ci sia la chiusura automatica attiva: Dopo il primo intervento della costa fissa e la conseguente apertura totale, la sbarra proverà una chiusura automatica. Nel caso in cui venga impegnato di nuovo il contatto C.F l'automazione riaprirà fino al finecorsa di apertura e disabiliterà momentaneamente la chiusura automatica. Essa rientrerà in funzione solo successivamente alla prima manovra dell'automazione, la quale necessita un comando manuale. (7= COMUNE - 10= BORDO SENSIBILE) |
| 11 - 12* ** | AUX | uscita ausiliari 18V DC max. 15 W per fotocellule, ricevitori, etc... (11= NEGATIVO - 12= POSITIVO) |
| 12 - 13* ** | TX FOTOCELLULE | uscita 18V DC fotocellula trasmittente -fototest- max. nr. 1 trasmettitore fotocellule. (12= POSITIVO - 13= NEGATIVO) |
| 14 - 15* ** | LAMPEGGIANTE (LED ARMADIO LUXE) | uscita 18V DC max. 20W alimentazione lampeggiante, lampeggio fornito dalla centrale, veloce in chiusura e lento in apertura. (14= POSITIVO - 15= NEGATIVO) |
| 16 - 17* ** | ELETTROMAGNETE (ANTI-VANDALO) | uscita anti-vandalo 18V DC, max. 3 W; Uscita per elettromagnete da collegare in testa all'asta per la tenuta in chiusura (antivandalismo). A barriera chiusa l'elettromagnete viene costantemente alimentato. Ad ogni comando, prima della apertura della barriera viene disattivato l'elettromagnete. (16= POSITIVO - 17= NEGATIVO) |
| 16 - 18* ** | LED ASTA (BIANCO) | uscita alimentazione led asta; (16= POSITIVO - 18= NEGATIVO) |
| 19 - 20* | 2° CH RADIO | uscita 2° canale radio - per comandare un'altra automazione o accendere luci, etc... (contatto pulito N.A.) Nota: per il collegamento di altri dispositivi al 2° canale radio, quali accensione luci, comando pompe o carichi importanti, utilizzare un relè ausiliario di potenza con portata adeguata ai dispositivi da collegare. ATTENZIONE: l'uscita di default è monostabile attiva 2 sec. Per commutarla in bistabile attiva oppure per modificare il tempo di attivazione è necessario operare tramite programmatore palmare TAUPROG (vedi istruzioni relative). |
| 21 - 22 | ANTENNA | ingresso antenna radioricevente ad innesto solo per ricevitori 433,92 MHz. (21= MASSA - 22= SEGNALE) |
| 23 - 24 - 28 - 29 | MOTORE | uscita alimentazione motore 18V DC max 50 W. (23-28= POSITIVO - 24-29= NEGATIVO) Vedi nota sotto. |
| 25 - 26 - 27 | ENCODER OPZIONALE | alimentazione e ingresso encoder opzionale (25= BIANCO segnale - 26= BLU negativo - 27= MARRONE positivo) Vedi nota sotto. |
| 30 - 31 - 32 | ENCODER PRINCIPALE | alimentazione e ingresso encoder (30= BIANCO segnale - 31= BLU negativo - 32= MARRONE positivo) |
* Le uscite sono configurabili tramite TAUPROG (vedi istruzioni relative). In tabella è riportata la configurazione standard.
** Se il jumper 6 non è inserito, verrà attivata la modalità basso consumo e, al termine di ogni manovra, le uscite 11-12, 12-13, 14-15, 16-17 e 16-18 verranno spente.
I morsetti 23-24 vanno utilizzati in parallelo a 28-29 nel caso di barriere LUXE (rispettare la stessa polarità tra le 2 uscite). I morsetti 25-26-27 sono disponibili nel caso in cui il circuito presente sulla K206MA relativo all'encoder, morsetti 30-31-32, sia guasto.
IMPORTANTE:
- non collegare relè ausiliari o altri dispositivi all'uscita 18V DC, morsetti 11 - 12 della centrale, onde evitare di pregiudicarne il buon funzionamento. Utilizzare in alternativa alimentatori/trasformatori esterni;
- non collegare in prossimità della barriera degli alimentatori switching o apparecchiature similari che potrebbero essere fonte di disturbi.
5. Regolazioni logiche
Effettuare le regolazioni logiche.
NOTA: agendo su qualsiasi regolazione del quadro di comando (trimmer o dip-switches) è necessario effettuare una manovra completa (apertura e chiusura) dell'automazione per rendere attive le nuove impostazioni.
Trimmer
- T.R.A. non utilizzato;
- T.C.A. regolazione Tempo di Chiusura Automatica: da 0,1 a 12 secondi ca. (vedi dip-switch nr. 1);
- FR. regolazione sensibilità rilevamento ostacoli.
NOTA: ruotando il TRIMMER FR. in senso orario si diminuisce la sensibilità del motoriduttore sull'ostacolo e quindi aumenta la forza di spinta; viceversa, ruotandolo in senso antiorario, aumenta la sensibilità del motoriduttore sull'ostacolo e diminuisce la forza di spinta.
Dip switch
| N. | Funzione | Stato | Descrizione |
|---|---|---|---|
| 1 | CHIUSURA AUTOMATICA | On | ad apertura completata, la chiusura dell'asta è automatica trascorso un tempo impostato sul trimmer T.C.A. |
| 1 | Off | la chiusura necessita di un comando manuale. | |
| 2 | 2 / 4 TEMPI | On | ad automazione funzionante, una sequenza di comandi di apertura/chiusura induce l'asta ad una APERTURA-CHIUSURA-APERTURA-CHIUSURA, etc. |
| 2 | Off | nelle stesse condizioni, la stessa sequenza di comandi induce l'asta ad una APERTURA-STOP-CHIUSURA-STOP-APERTURA-STOP, etc. (funzione passo-passo) (vedi anche dip switch 4) | |
| 3 | RICHIUDE DOPO FOTOCELLULA | On | in seguito all'intervento del contatto fotocellula (ingresso 7 - 9), l'automazione si chiude automaticamente dopo 1 secondi. |
| 3 | Off | funzione disinserita. | |
| 4 | NO REVERSE | On | l'automatismo ignora i comandi di chiusura durante l'apertura e il tempo di pausa. |
| 4 | Off | l'automatismo si comporta come stabilito dal dip switch nr. 2. | |
| 5 | PRELAMPEGGIO | On | la funzione prelampeggio è inserita. |
| 5 | Off | la funzione prelampeggio è disinserita. | |
| 6 | FOTOTEST | On | la funzione "verifica delle fotocellule" è inserita. |
| 6 | Off | la funzione "verifica delle fotocellule" è disinserita. Nota: da utilizzare quando non si usano le fotocellule. | |
| 7 | MASTER / SLAVE | On | abilita la modalità MASTER nella configurazione master/slave (vedi istruzioni T-COMM). |
| 7 | Off | abilita la modalità SLAVE nella configurazione master/slave (vedi istruzioni T-COMM), oppure il funzionamento standard (motore singolo). | |
| 8 | LED ASTA | On | con asta aperta i led rimangono tutti SPENTI. |
| 8 | Off | con asta aperta i led si comportano come da impostazione dell'uscita configurabile relativa, morsetti 16-18 (default: LAMPEGGIO). |
Dip 9-10-11: Selezione modello barriera e lunghezza asta
| Dip 9 | Dip 10 | Dip 11 | Modello |
|---|---|---|---|
| Off | Off | Off | RBLO asta ≥ 2 m ≤ 2,5 m |
| On | Off | Off | RBLO asta > 2,5 m ≤ 3,5 m - RBLO-R 24 Vdc |
| Off | On | Off | RBLO asta > 3,5 m ≤ 4 m |
| On | On | Off | LUXE-M asta > 3,5 m ≤ 5 m (asta elittica) / ≤ 6 m (asta tonda) |
| Off | Off | On | LUXE asta ≥ 4 m ≤ 4,5 m (accessori compresi) |
| On | Off | On | LUXE asta > 4,5 m ≤ 5,5 m (accessori compresi) |
| Off | On | On | LUXE asta > 5,5 m ≤ 6,5 m (accessori compresi) |
| On | On | On | LUXE asta > 6,5 m (accessori compresi) |
IMPORTANTE: il modello di asta viene caricato durante il setup SOLO la prima volta che si esegue la procedura (led DL8 lampeggio rosso/verde alternato). Per cambiare modello è necessario effettuare, prima di una nuova procedura di setup, un "RESET DI FABBRICA".
| N. | Funzione | Stato | Descrizione |
|---|---|---|---|
| 12 | BORDO SENSIBILE | On | BORDO SENSIBILE RESISTIVO (morsetto nr 10). |
| 12 | Off | COSTA FISSA (contatto NC - morsetto nr 10). Nota: lasciare in OFF se non utilizzato. |
6. Procedura di memorizzazione
NOTA: Prima di iniziare la procedura di memorizzazione accertarsi che l'asta della barriera sia perfettamente bilanciata e che i finecorsa meccanici dell'asta siano regolati sia in apertura che in chiusura (vedi istruzioni montaggio barriera).
ATTENZIONE: dopo aver alimentato il quadro di comando attendere 2 sec. prima di iniziare a svolgere le manovre di regolazione.
Terminata l'installazione dell'automazione: Verificare la posizione dei dip 9, 10 e 11. Devono essere settati in base al modello di barriera utilizzata ed alla lunghezza dell'asta (vedi tabella dip 9-10-11). È preferibile iniziare la procedura con l'asta abbassata. Premere e tenere premuto il tasto PROG fino a che il led DL8 inizia a lampeggiare (giallo):
- l'automazione comincia ad aprire lentamente alla ricerca del finecorsa in apertura;
Se l'automazione chiude anzichè aprire, fermare la corsa del cancello (tramite fotocellule o premendo il tasto STOP), invertire la polarità del motore, portare il cancello in posizione chiusa (sul fermo meccanico) e riprendere la procedura dall'inizio.
Nota: se l'automazione rimane ferma, controllare i collegamenti degli ingressi. Tutti i led verdi DL6, DL5 e DL3 devono essere accesi fissi.
- raggiunta la battuta in apertura, l'automazione inizia a chiudere alla ricerca della battuta in chiusura (in questa fase la centrale acquisisce tutti i parametri relativi alla corsa);
- l'automazione esegue un'apertura completa per l'ottimizzazione della forza motore in apertura;
- dopo una piccola pausa, l'automazione esegue una chiusura completa per l'ottimizzazione della forza motore in chiusura.
ATTENZIONE:
- La procedura può essere interrotta premendo il tasto STOP.
- Durante le varie fasi dell'operazione, un intervento delle fotocellule interrompe la memorizzazione. Per far ripartire la procedura dall'inizio (con led DL8 giallo lampeggiante), usare il comando AP/CH, il tasto del radiocomando (se programmato), o premere brevemente il tasto PROG.
Si ricorda che la presenza di un ostacolo durante la procedura di memorizzazione è interpretata come finecorsa meccanico (il sistema non interviene attuando movimenti di sicurezza, ma solo fermando i motori). Accertarsi pertanto di non sostare nelle vicinanze dell'asta durante la procedura di memorizzazione.
7. Caratteristiche della K206MA
Apertura e chiusura comandata da orologio
É possibile comandare l'apertura e la chiusura dell'automazione mediante un orologio digitale che in uscita disponga di un contatto pulito N.A. (relè). Sarà sufficiente collegarlo ai morsetti 4 - 6 (pulsante APRE/CHIUDE) e programmarlo in modo che, all'ora di apertura desiderata, il contatto relè dell'orologio si chiuda sino all'ora di chiusura voluta (momento in cui il contatto relè dell'orologio si apre nuovamente, permettendo così la richiusura automatica).
Nota: la richiusura automatica deve essere inserita (Dip-switch nr. 1 in ON).
Scheda carica batteria (integrata)
Se si collega la batteria, in assenza di rete l'automazione risulta comunque funzionante. Nel caso la tensione scenda sotto gli 11,3V DC, l'automazione cessa di funzionare (il quadro di comando rimane alimentato); quando, invece, scende sotto i 10,2V DC, la scheda sgancia completamente la batteria (il quadro di comando non è più alimentato).
Rilevamento ostacoli
La funzione di rilevamento ostacoli (impostabile tramite trimmer FR) intervenendo in fase di apertura dell'automazione provoca una richiusura della stessa di 20 cm ca., mentre in fase di chiusura provoca un'apertura totale.
ATTENZIONE: la logica del quadro di comando può interpretare un attrito meccanico come un eventuale ostacolo.
8. Led di diagnosi
| DL1 - Rosso | led di segnalazione pulsante APRE |
| DL2 - Rosso | led di segnalazione pulsante APRE/CHIUDE |
| DL3 - Verde | led di segnalazione pulsante di STOP |
| DL4 - Verde | led di segnalazione pulsante CHIUDE |
| DL5 - Verde | led di segnalazione FOTOCELLULA |
| DL6 - Verde | led di segnalazione BORDO SENSIBILE |
LED - DL7
Il led DL7, oltre ad indicare la presenza della batteria, segnala eventuali errori con una serie di lampeggi predefiniti di diversi colori:
| Segnalazione | Significato / Azione |
|---|---|
| sempre acceso (verde) | batteria carica, tensione di rete presente |
| sempre acceso (giallo) | batteria in carica |
| 1 lampeggio ogni 4 sec (verde) | batteria carica, tensione di rete assente; Controllare l'alimentazione di rete |
| 1 lampeggio ogni 4 sec (giallo) | alimentazione con pannello fotovoltaico (morsetti 1-2), caricabatteria disattivato |
| 1 lampeggio ogni 2 sec (rosso) | batteria scarica; Caricare la batteria, sostituire la batteria |
| lampeggio veloce (rosso) | batteria guasta; Sostituire la batteria |
LED - DL8
Il led DL8 segnala eventuali avvisi/errori della logica della scheda con una serie di lampeggi predefiniti di diversi colori:
| Segnalazione | Significato / Azione |
|---|---|
| 1 lampeggio ogni 4 sec (verde) | funzionamento regolare |
| lampeggio alternato (rosso/verde) | memorizzazione da eseguire |
| lampeggio veloce (giallo) | memorizzazione in corso |
| 1 lampeggio (rosso) | errore fototest; Disabilitare fototest (dip-switch 6 in OFF), verificare funzionamento fotocellule e loro collegamento |
| 1 lampeggio (giallo) | stato sconosciuto, prossima manovra RIALLINEAMENTO |
| 2 lampeggi (rosso) | presenza ostacolo per il motore; Controllare l'assenza di ostacoli lungo la corsa dell'asta e il bilanciamento della stessa |
| 3 lampeggi (rosso) | assenza segnale encoder motore; Controllare cablaggio, verificare encoder tramite TEST-ENCODER (opzionale) |
| 4 lampeggi (rosso) | assenza segnale motore; Controllare cablaggio, verificare che il motore giri liberamente alimentato direttamente dalla batteria, verificare fusibile F5 |
| 5 lampeggi (rosso) | superamento limite max. di corrente motore; Picco di eccessivo assorbimento del motoriduttore, controllare l'assenza di ostacoli lungo la corsa dell'asta, verificare l'assorbimento di corrente del motore a vuoto e applicato all'asta |
| 6 lampeggi (giallo) | errore comunicazione master/slave; Verificare il cablaggio tra le centrali, verificare l'efficienza della centrale slave (fusibili), verificare l'efficienza delle schede di interfaccia |
| 7 lampeggi (rosso) | Intervento sicurezza bordo sensibile; È necessario un impulso di comando per effettuare la chiusura |
| 8 lampeggi (rosso) | errore memoria Eeprom esterna; Sostituire il modulo di memoria esterna |
| 8 lampeggi (giallo) | errore dati in Eeprom (interna/esterna); Eseguire procedura di RESET MEMORIA RADIO |
Oltre agli avvisi/errori della parte logica, il led DL8 indica anche lo stato della centrale durante la memorizzazione dei radiocomandi:
| sempre acceso (verde) | canale CH1 in attesa di programmazione |
| lampeggio veloce (verde) | memoria canale CH1 piena |
| sempre acceso (giallo) | canale CH2 in attesa di programmazione |
| lampeggio veloce (giallo) | memoria canale CH2 piena |
| lampeggio (verde) | canale CH1 in attesa di cancellazione |
| sempre acceso (verde) | canale CH1 in cancellazione |
| lampeggio (giallo) | canale CH2 in attesa di cancellazione |
| sempre acceso (giallo) | canale CH2 in cancellazione |
I led DL7 e DL8, quando lampeggiano simultaneamente, hanno la funzione di segnalare:
- lampeggio rosso + rosso: procedura reset di fabbrica in attesa di conferma;
- lampeggio giallo + giallo: attesa cancellazione totale dei canali radio;
L'indicazione di più errori viene eseguita con una pausa di 2 sec. tra una segnalazione e l'altra. Nel caso di intervento (durante la manovra di chiusura) da parte dell'encoder (rilevazione ostacolo), la centrale inverte il moto ed entra in fase di corsa rallentata alla ricerca della battuta in apertura, bloccando la chiusura automatica. Al successivo impulso di comando, viene ripristinata la chiusura automatica. Nel caso di 5 interventi consecutivi (durante la stessa manovra di chiusura) da parte dei sistemi di sicurezza, la centrale incrementa progressivamente il tempo della chiusura automatica.
9. Visualizzazione sforzo motore (solo dalla versione 6.00)
Questa funzione permette di visualizzare lo sforzo del motore durante il funzionamento per individuare eventuali situazioni di lavoro gravoso. Per attivare la funzione premere contemporaneamente e mantenere premuti per circa 2 secondi i tre tasti Ch1, Ch2 e PROG, quindi azionare il motore con telecomandi, pulsante prog o selettore ecc..
| Livello | DL7 | DL8 |
|---|---|---|
| Cancello facile da muovere | Spento | Spento |
| Verde | Spento | |
| Verde | Verde | |
| Verde | Giallo | |
| Giallo | Verde | |
| Giallo | Giallo | |
| Giallo | Rosso | |
| Rosso | Giallo | |
| Cancello difficile da muovere | Rosso | Rosso |
Dopo 5 minuti di inattività la scheda ritornerà alla visualizzazione classica (per tornare manualmente alla visualizzazione classica ripremere contemporaneamente i tre tasti).
10. Ripristino funzionamento automatico
Qualora si renda necessario movimentare manualmente la chiusura o l'apertura del cancello, azionare lo sblocco manuale. Per ripristinare il normale funzionamento (in automatico), occorre specificare:
- se il ripristino avviene successivamente ad un black-out (la scheda resta priva di alimentazione per un certo tempo), l'automazione entrerà in fase di corsa rallentata alla ricerca della battuta di apertura (manovra di RIALLINEAMENTO);
- se il ripristino avviene dopo un intervento manuale (senza interruzioni all'alimentazione della scheda), sarà necessaria almeno 1 manovra completa per fare riallineare l'automazione, durante la quale non verranno osservati i normali rallentamenti e le conseguenti battute d'arresto.
11. Radio ricevitore 433,92 MHz integrato
Il radio ricevitore può apprendere fino ad un max di 30 codici rolling code (S-2RP, S-4RP, K-SLIM-RP, T-4RP) da impostare liberamente su due canali. Il primo canale comanda direttamente la scheda di comando per l'apertura dell'automazione; il secondo canale comanda un relè per un contatto pulito N.A. in uscita ai morsetti nr 19 e 20 (max 24V AC, 1 A).
Apprendimento radiocomandi
CH1 = APRE/CHIUDE — CH2 = 2° canale
- premere brevemente il tasto CH1 se si desidera associare un radiocomando alla funzione APRE/CHIUDE;
- il led DL8 (verde) si accende fisso per indicare la modalità di apprendimento dei codici (se non viene immesso nessun codice entro 10 secondi, la scheda esce dalla modalità di programmazione);
- premere il tasto del radiocomando che si desidera utilizzare;
- il led DL8 (verde) si spegne per segnalare l'avvenuta memorizzazione e si riaccende subito in attesa di altri radiocomandi (se ciò non accade, provare a ritrasmettere oppure attendere 10 secondi e riprendere dal punto 1);
- se si desidera memorizzare altri radiocomandi, premere il tasto da memorizzare sugli altri dispositivi entro 2-3 sec. Passato questo lasso di tempo (il led DL8 si spegne) è necessario ripetere la procedura dal punto 1 (fino ad un massimo di 30 trasmettitori);
- se si desidera effettuare la memorizzazione sul 2° canale, ripetere la procedura dal punto 1 utilizzando il tasto CH2 anzichè il tasto CH1 (in questo caso il led DL8 si accende con colore giallo);
- se si desidera uscire dalla modalità di apprendimento senza memorizzare un codice, premere brevemente il tasto CH1 o il tasto CH2.
Nel caso di raggiungimento del nr massimo di radiocomandi (nr 30), il led DL8 lampeggia velocemente per circa 3 secondi senza però eseguire la memorizzazione.
Programmazione remota tramite T-4RP, K-SLIM-RP, S-2RP e S-4RP (V 4.X)
Con la versione di software V 4.X è possibile eseguire l'apprendimento remoto con i radiocomandi T-4RP, K-SLIM-RP, S-2RP E S-4RP (V 4.X), ossia senza agire direttamente sui tasti di programmazione della ricevente. Sarà sufficiente disporre di un radiocomando già programmato nella ricevente per poter aprire la procedura di programmazione remota dei nuovi radiocomandi. Seguire la procedura riportata sulle istruzioni del radiocomando T-4RP, K-SLIM-RP, S-2RP E S-4RP (V 4.X).
Cancellazione radiocomandi
- tenere premuto per 3 secondi ca. il tasto CH1 al fine di cancellare tutti i radiocomandi ad esso associati;
- il led DL8 inizia a lampeggiare lentamente per indicare che la modalità di cancellazione è attivata;
- tenere premuto nuovamente il tasto CH1 per 3 secondi;
- il led DL8 si spegne per 3 secondi ca. per poi riaccendersi fisso ad indicare l'avvenuta cancellazione;
- riprendere la procedura dal punto 1 utilizzando il tasto CH2 per cancellare tutti i radiocomandi ad esso associati;
- se si desidera uscire dalla modalità di cancellazione senza memorizzare un codice, premere brevemente il tasto CH1 o il tasto CH2.
Memoria codici
È possibile espandere la memoria dei codici da 30* a 126, 254 o 1022, utilizzando le schede di memoria come indicato (innestandole nel connettore J3, vedi schema cablaggio):
| 126 codici | Art. 250SM126 |
| 254 codici | Art. 250SM254 |
| 1022 codici | Art. 250SM1022 |
* Le centrali, di serie, hanno una memoria di 30 codici. La scheda per la maggiorazione deve essere ordinata a parte.
ATTENZIONE: nel momento in cui si innesta/toglie una scheda di memoria, la centrale deve essere spenta.
IMPORTANTE: se si utilizza una scheda di memoria, quella interna alla centrale da 30 codici viene disabilitata.
Reset memoria radio
Tenere premuti i tasti CH1 e PROG fino a che i led DL7 e DL8 iniziano a lampeggiare velocemente entrambi in giallo. A questo punto, rilasciare i tasti e premerli nuovamente fino a che i led si spengono, a conferma che l'operazione è terminata (se non vengono premuti e si resta in attesa, la scheda ritorna in funzionamento normale dopo circa 12 secondi).
Reset di fabbrica (impostazioni di fabbrica)
Tenere premuti i tasti CH2 e PROG fino a che i led DL7 e DL8 iniziano a lampeggiare velocemente entrambi in rosso. A questo punto, rilasciare i tasti e premerli nuovamente fino a che i led si spengono (reset in corso), a conferma che l'operazione è terminata. Alla ripartenza, sarà necessario eseguire la procedura di memorizzazione.
Effettuando un reset di fabbrica la memoria radio rimane invariata, pertanto i radiocomandi esistenti rimangono memorizzati.
12. Malfunzionamenti: possibili cause e rimedi
L'automazione non parte
- Verificare con lo strumento (Multimetro) la presenza dell'alimentazione 230 V AC.
- Verificare, in modalità standard, che i contatti N.C. della scheda siano effettivamente normalmente chiusi (3 led verdi accesi).
- Impostare il dip 6 (fototest) su OFF.
- Aumentare il trimmer FR al massimo.
- Controllare con lo strumento (Multimetro) che i fusibili siano integri.
Il radiocomando ha poca portata
- Controllare che il collegamento della massa e del segnale dell'antenna non sia invertito.
- Non eseguire giunzioni per allungare il cavo dell'antenna.
- Non installare l'antenna in posizioni basse o in posizioni nascoste dalla muratura o dal pilastro.
- Controllare lo stato delle pile del radiocomando.
L'automazione si apre al contrario
Invertire tra loro i collegamenti del motore sulla morsettiera, morsetti 28 - 29 e morsetti 23 - 24 (se utilizzati).
13. Garanzia: condizioni generali
La garanzia della TAU ha durata di 24 mesi dalla data di acquisto dei prodotti (fa fede il documento fiscale di vendita, scontrino o fattura). La garanzia comprende la riparazione con sostituzione gratuita (franco sede TAU: spese di imballo e di trasporto sono a carico del cliente) delle parti che presentano difetti di lavorazione o vizi di materiale riconosciuti dalla TAU. In caso di intervento a domicilio, anche nel periodo coperto da garanzia, l'utente è tenuto a corrispondere il "Diritto fisso di chiamata" per spese di trasferimento a domicilio, più manodopera.
La garanzia decade nei seguenti casi:
- Qualora il guasto sia determinato da un impianto non eseguito secondo le istruzioni fornite dall'azienda all'interno di ogni confezione.
- Qualora non siano stati impiegati tutti componenti originali TAU per l'installazione dell'automatismo.
- Qualora i danni siano causati da calamità naturali, manomissioni, sovraccarico di tensione, alimentazione non corretta, riparazioni improprie, errata installazione, o altre cause non imputabili alla TAU.
- Qualora non siano state effettuate le manutenzioni periodiche da parte di un tecnico specializzato secondo le istruzioni fornite dall'azienda all'interno di ogni confezione.
- Usura dei componenti.
La riparazione o la sostituzione dei pezzi durante il periodo di garanzia non comporta un prolungamento del termine di scadenza della garanzia stessa. In caso di utilizzo industriale o professionale oppure in caso di impiego simile, tale garanzia ha validità 12 mesi.
Dichiarazione di incorporazione del costruttore
(ai sensi della Direttiva Europea 2006/42/CE All. II.B)
| Fabbricante | TAU S.r.l. |
| Indirizzo | Via E. Fermi, 43 - 36066 Sandrigo (Vi) - ITALIA |
| Prodotto | Centrale di comando |
| Realizzato per il movimento automatico di | Barriere stradali |
| Uso in ambiente | Generico |
| Completo di | Radioricevente e scheda carica batteria |
| Modello / Tipo | K206MA / K206MA |
| Denominazione commerciale | Quadro di comando per barriere automatiche |
È realizzato per essere incorporato su una chiusura (barriera automatica) o per essere assemblato con altri dispositivi al fine di movimentare una tale chiusura per costituire una macchina ai sensi della Direttiva Macchine 2006/42/CE. Dichiara inoltre che questo prodotto è conforme ai requisiti essenziali di sicurezza delle seguenti ulteriori direttive CEE: 2014/35/EU Direttiva Bassa Tensione; 2014/30/EU Direttiva Compatibilità Elettromagnetica; ed ove richiesto 2014/53/EU Apparecchiature Radio. Sono applicate le seguenti norme: EN 61000-6-2; EN 61000-6-3; EN 60335-1; ETSI EN 301 489-1 V1.9.2; ETSI EN 301 489-3 V1.6.1; EN 300 220-2 V2.4.1; EN 12453:2000; EN 12445:2000; EN 60335-2-103.
Sandrigo, 24/01/2018 — Il Rappresentante Legale, Loris Virgilio Danieli.
ENGLISH
Warnings
This manual is designed to assist qualified installation personnel only. It contains no information that may be of interest to final users. This manual is attached to the K206MA control unit mounted on the LUXE or RBLO(X) automatic bar, therefore it may not be used for different products!
Important warnings:
Disconnect the mains power supply to the board before accessing it.
The K206MA control unit is suitable for the control of a direct-current electromechanical gearmotor for the automation of sliding gates. Any other use is considered improper and is consequently forbidden by current laws.
Please note that the automation system you are going to install is classified as "machine construction" and therefore is included in the application of European directive 2006/42/EC (Machinery Directive). This directive includes the following prescriptions:
- Only trained and qualified personnel should install the equipment;
- the installer must first make a "risk analysis" of the machine;
- the equipment must be installed in a correct and workmanlike manner in compliance with all the standards concerned;
- after installation, the machine owner must be given the "declaration of conformity".
Whoever ignores such standards shall be held responsible for any damage caused by the system! Do not install the unit before you have read all the instructions.
Installation
Before proceeding, make sure that the mechanical part is working perfectly and that the boom has been properly balanced.
Note: it is compulsory to earth the system and to observe the safety regulations that are in force in each country.
CAUTION:
- do not use single-wire cables (single conductor), eg. intercom ones, in order to avoid interruptions on the line and false contacts;
- do not reuse old pre-existing cables.
IF THESE ABOVE INSTRUCTIONS ARE NOT FOLLOWED IT COULD PREJUDICE THE PROPER WORKING ORDER OF THE EQUIPMENT AND CREATE HAZARDOUS SITUATIONS FOR PEOPLE. FOR THIS REASON THE "MANUFACTURER" DECLINES ALL RESPONSIBILITY FOR ANY MALFUNCTIONING AND DAMAGES THUS RESULTING.
1. Control panel for automatic bars
- Logics with microprocessor
- Status of inputs signalled by LEDs
- Incorporated flashing circuit
- Encoder sensor for self-learning of travel
- 433.92 MHz 2 channel built-in radio receiver (CH)
- Battery charger board (integrated)
- Battery connector
- Diagnostics of malfunctions signalled by LED
- Possibility of energy saving operation
- Compatibility with our apps: TAUOPEN and TAUAPP
2. Introduction
The K206MA board has two working modes, selectable through the J6 jumper (see wiring diagram).
- J6 Jumped: standard mode, i.e. the control unit is powered all the time;
- J6 Not jumped: low-energy mode, i.e. the control unit is switched off after each operation and on after each command (mode where power is supplied by other energy sources, ex. batteries charged by a photovoltaic panel).
Once the connection is achieved, in low-energy mode, press the PROG button briefly:
- All the green LEDs must be on (each of them corresponds to a Normally Closed input). They go off only when the controls to which they are associated are operated. Except for the green led DL4, which corresponds to CLOSE input (a Normally Open contact).
- All the red LEDs (and the green led DL4) must be off (each of them corresponds to a Normally Open input). They light up only when the controls to which they are associated are operated.
3. Technical characteristics
| Board power supply | 13,5V AC - 50 Hz |
| Max. absorption DC motor | 14 Ah - 18V DC |
| Fast acting fuse for protection of input power supply 13,5V AC (F4 - 5x20) | F 16A |
| Fast acting fuse for battery charger protection (F5 - 5x20) | F 10A |
| Fast acting fuse for protection of auxiliary circuits 18V DC (F3 - 5x20) | F 3.15A |
| Motor power supply circuits voltage | 18V DC |
| Auxiliary device circuits supply voltage | 18V DC |
| Logic circuits supply voltages | 5V DC |
| Operating temperature | -20 °C ÷ +55 °C |
4. Connections to terminal board
| Terminals | Function | Description |
|---|---|---|
| FS1 - FS2 | POWER SUPPLY | 13,5V AC control unit power supply input – Fed by the toroidal transformer and protected by the fuses on the 230V AC power supply. |
| 1 - 2 | AUX INPUT | external power input (ex. Photovoltaic system 12V DC). NB: In the latest versions of the control boards, the voltage change through jumper J7 is no longer necessary. ATTENTION: POWERING THE CONTROL UNIT WITH AN EXTERNAL SOURCE, ALL THE OTHER 18V DC OUTPUTS BECOME THE SAME AS THE OUTSIDE VOLTAGE. |
| 3 - 6 | OPEN | OPEN button N.O. input – Controls the total opening of the barrier. (3= OPEN - 6= COM) |
| 4 - 6 | OPEN/CLOSE | OPEN/CLOSE button N.O. input – Controls the opening and closing of the barrier and is regulated based on the function of dip-switches 2 and 4. (4= O/C - 6= COM) |
| 5 - 6 | STOP | STOP button N.C. input – Stops the bar in any position, temporarily preventing the automatic closure, if programmed. Bridge the connectors if not used. (5= STOP - 6= COM) |
| 7 - 8 | CLOSE | CLOSE button N.O. input – Controls the total closure of the barrier. (7= COM - 8= CLOSE) |
| 7 - 9 | PHOTOCELLS | N.C. photocell input - it cuts in during the closing. Bridge the connectors if not used. (7= COM - 9= FOT) Note: the photocell transmitter must always be supplied by terminals no. 12 and no. 13, since the safety system test (phototest) is carried out on it. Without this connection, the control unit does not work. To override the testing of the safety system, or when the photocells are not used, set dip-switch no. 6 to OFF. |
| 7 - 10 | SENSITIVE EDGE | SENSITIVE EDGE input (resistive sensitive edge or fixed edge); It works only during the closing phase and causes the total reopening of the boom. Bridge the terminals if not used. In case of an active automatic closing: After the first intervention of the fixed edge and the consequent total opening, the boom will try an automatic closing. If the CF contact is engaged again, the automation will reopen up to the opening limit switch and temporarily disable the automatic closing. It will return to normal operation only after the first maneuver of the automation, which requires a manual command. (7 = COMMON - 10 = SENSITIVE EDGE) |
| 11 - 12 ** | AUX | auxiliary circuits output 18 V DC max. 15 W for photocells, receivers, etc... (11= NEGATIVE - 12= POSITIVE) |
| 12 - 13 ** | TX PHOTOCELLS | 18V DC output for transmitter photocell – phototest - max. no. 1 photocell transmitters. (12 = POSITIVE - 13 = NEGATIVE) |
| 14 - 15 ** | FLASHING LIGHT (LED CABINET LUXE) | 18V DC max. 20W output for flashing light supply, flashing signal supplied by the control unit, rapid for closing, slow for opening. (14 = POSITIVE - 15 = NEGATIVE) |
| 16 - 17* ** | ELECTROMAGNET (VANDAL-PROOF) | Output for vandal-proof 18V DC, 3 W max; Output for electromagnet to be connected to the end of the rod to hold the barrier closed. With the barrier closed, the electromagnet is constantly powered. Every time a command is given, the electromagnet is turned off before the motor starts running. (16= POSITIVE - 17= NEGATIVE) |
| 16 - 18* ** | BAR LED (WHITE) | bar LED power output. (16=POSITIVE - 18= NEGATIVE) |
| 19 - 20* | 2nd CH RADIO | 2nd radio channel output - for control of an additional automation or for switching on lights, etc... (N.O. clean contact). WARNING: the default outlet is active monostable 2 sec. To switch it to active bistable or to modify the activation time it is necessary to use the TAUPROG hand-held programmer. |
| 21 - 22 | AERIAL | plug-in radio-receiver aerial input, for 433.92 MHz receivers only. (21 = GROUND - 22 = SIGNAL) |
| 23 - 24 - 28 - 29 | MOTOR | motor supply output 18V DC max. 50 W. (23-28 = POSITIVE - 24-29 = NEGATIVE). See note below. |
| 25 - 26 - 27 | OPTIONAL ENCODER | encoder supply and input (25 = WHITE signal - 26 = BLUE negative - 27 = BROWN positive). See note below. |
| 30 - 31 - 32 | MAIN ENCODER | encoder supply and input (30 = WHITE signal - 31 = BLUE negative - 32 = BROWN positive). |
* The outlets can be configured using the TAUPROG. The standard configuration is shown in the table.
** If Jumper 6 is not plugged in, energy saving mode will be activated and, at the end of each manouvre, outputs 11-12, 12-13, 14-15, 16-17 and 16-18 will be switched off.
Terminals 23-24 must be used in parallel to 28-29 in the case of LUXE automatic barriers (you have to observe the same polarity between the 2 outputs). Terminals 25-26-27 are available if the circuit present on the K206MA relative to the encoder, terminals 30-31-32, is faulty.
IMPORTANT:
- Do not connect auxiliary relays or other devices to the 18 V DC output (terminals 11 – 12) to avoid malfunctions of the control unit. Use separated power supply / transformers instead;
- do not connect switching feeders or similar apparatus close to the barrier that may be a source of disturbance.
5. Logic adjustments
Make the logic adjustments. Note: when any adjusting devices (trimmers or dip-switches) on the control panel are operated, a complete manoeuvre must be carried out in order for the new settings to take effect.
Trimmer
- T.R.A. not used;
- T.C.A. Automatic Closing time adjustment: from about 0,1 to 12 seconds (see dip-switch no. 1);
- FR. obstacle detection sensitivity adjustment.
Note: by rotating the TRIMMER FR. clockwise the sensitivity of the gearmotor to obstacles diminishes and therefore the thrust force increases; vice-versa, by rotating it counter-clockwise, the sensitivity of the gearmotor to obstacles increases and therefore the thrust force diminishes.
Dip switch
| N. | Function | Status | Description |
|---|---|---|---|
| 1 | AUTOMATIC CLOSING | On | when completely open, closure is automatic after the set time on the T.C.A. trimmer has past. |
| 1 | Off | the closing manoeuvre requires a manual command. | |
| 2 | 2 / 4 STROKE | On | when the automation is operating, a sequence of opening/closing commands causes the bar to OPEN-CLOSE-OPEN-CLOSE, etc. |
| 2 | Off | in the same conditions, the same sequence of commands causes the bar to OPEN-STOP-CLOSE-STOP-OPEN-STOP, etc. (step-by step function) (see also dip switch 4). | |
| 3 | CLOSES AGAIN AFTER THE PHOTOCELL | On | after the photocell is activated (input 7 - 9), the automation closes automatically after 1 seconds. |
| 3 | Off | function off. | |
| 4 | NO REVERSE | On | the automation ignores the closure command during opening and autoclose time. |
| 4 | Off | the automation responds as established by dip switch No. 2. | |
| 5 | PREFLASHING | On | the pre-flashing function is enabled. |
| 5 | Off | the pre-flashing function is disabled. | |
| 6 | FOTOTEST | On | the "photocell test" function is enabled. |
| 6 | Off | the "photocell test" function is disabled. Note: to be used when the photocells are not used. | |
| 7 | MASTER/SLAVE | On | enables the MASTER mode in the master/slave configuration (see T-COMM instructions). |
| 7 | Off | enables the SLAVE mode in the master/slave configuration (see T-COMM instructions), or standard operation (single motor). | |
| 8 | BAR LED | On | when the boom is lifted all LEDs remain OFF. |
| 8 | Off | when the boom is lifted all LEDs behave as per setting of wire terminals 16-18 (default: FLASHING). |
Dip 9-10-11: Selection of barrier model and bar length
| Dip 9 | Dip 10 | Dip 11 | Model |
|---|---|---|---|
| Off | Off | Off | RBLO bar ≥ 2 m ≤ 2,5 m |
| On | Off | Off | RBLO bar > 2,5 m ≤ 3,5 m - RBLO-R 24 Vdc |
| Off | On | Off | RBLO bar > 3,5 m ≤ 4 m |
| On | On | Off | LUXE-M bar > 3,5 m ≤ 5 m (elliptical boom) / ≤ 6 m (round boom) |
| Off | Off | On | LUXE bar ≥ 4 m ≤ 4,5 m (including accessories) |
| On | Off | On | LUXE bar > 4,5 m ≤ 5,5 m (including accessories) |
| Off | On | On | LUXE bar > 5,5 m ≤ 6,5 m (including accessories) |
| On | On | On | LUXE bar > 6,5 m (including accessories) |
IMPORTANT: In case the boom length change, a new setting of the dips # 9, 10 and 11 will be required. Before the new setup, however, it is necessary to proceed to a HARD RESET of the controller.
| N. | Function | Status | Description |
|---|---|---|---|
| 12 | SENSITIVE EDGE | On | RESISTIVE SENSITIVE EDGE (terminal No. 10). |
| 12 | Off | FIXED EDGE (NC contact – terminal No. 10). Note: if not used, keep the DIP in the OFF position. |
6. Memorization procedure
NOTE: Before starting the memorization procedure, make sure that the barrier boom is perfectly balanced and that the mechanical limit switches of the boom are adjusted both in opening and closing (see barrier assembly instructions).
WARNING: After powering the control panel, wait 2 seconds before you start performing the adjustment operations.
When you have completed the installation procedures: Check the position of dip-switches 9, 10 and 11. Dip-switches must be set according to the barrier model and the bar length. It is recommended to start the learning process with the bar down. Press without releasing the PROG button till the DL8 LED starts flashing (yellow):
- the automation starts to open slowly looking for the opening limit stop;
If the automation closes instead of opening, stop the run of the gate (by cutting the photocells or closing the STOP contact), invert the polarity of the motor, take the gate in the closed position (on the mechanical stop) and restart the procedure from the beginning. Note: if the automation does not work, check the input connections. The DL6, DL5 and DL3 green LEDS must be on.
- once the limit stop is reached, the automation starts closing looking for the closing limit stop (in this phase the control unit gathers all the parameters regarding the run);
- the automation carries out one complete opening to optimize the opening power;
- after a short pause, the automation carries out one complete closure to optimize the closing power.
WARNING:
- The procedure can be stopped by pressing the STOP button.
- During the various stages of the operation, if the sensor is activated saving is stopped. To restart the procedure from the beginning (with the DL8 yellow LED flashing), use the AP/CH control, the remote control (if programmed) or press the PROG button briefly.
Please remember that an obstacle during saving is interpreted as a mechanical limit stop (the system does not start any safety operation, it just stops the motors). Make sure you don't stand near the bar during saving.
7. K206MA characteristics
Timer-operated opening and closing cycles
The opening/closing of the automation can be controlled by means of a timer that has a free N.O. output contact (relay). The timer must be connected to terminals 4 - 6 (OPEN/CLOSE button) and can be programmed so that, at the desired opening time, the relay contact closes until the desired closing time. Note: the automatic closing function must be enabled by setting Dip-switch no. 1 to ON.
Battery charger board (integrated)
If the battery is connected the automation will operate in any case if there is no mains power supply. If the voltage drops below 11.3 Vdc, the automation ceases to operate (the control unit remains fed); whereas, when the voltage drops below 10.2 Vdc, the card completely disconnects the battery.
Obstacle detection
If the obstacle detection function (which can be set through trimmer FR) is activated during an opening manoeuvre, the gate closes approx. 20 cm., if it is activated during a closing manoeuvre, the gate opens all the way.
WARNING: the control panel logics may interpret mechanical friction as an obstacle.
8. Diagnostics LED
| DL1 - Red | OPEN button LED signal |
| DL2 - Red | OPEN/CLOSE button LED signal |
| DL3 - Green | STOP button LED signal |
| DL4 - Green | CLOSE button LED signal |
| DL5 - Green | PHOTOCELL LED signal |
| DL6 - Green | SENSITIVE EDGE LED signal |
LED - DL7
| Signal | Meaning / Action |
|---|---|
| always on (green) | fully-charged battery, main voltage present |
| always on (yellow) | battery charging |
| 1 flash every 4 seconds (green) | fully-charged battery, no main voltage; Check the main voltage |
| 1 flash every 4 seconds (yellow) | power supply through photovoltaic panel (terminals 1-2), battery charger disabled |
| 1 flash every 2 seconds (red) | low battery; Charge the battery, replace the battery |
| fast flashing (red) | faulty battery; Replace the battery |
LED - DL8
| Signal | Meaning / Action |
|---|---|
| 1 flash every 4 seconds (green) | normal operation |
| alternate flashing (red/green) | saving to be performed |
| fast flashing (yellow) | learning process |
| 1 flash (red) | phototest error; Disable phototest (dip-switch 6 OFF), check the operation of the photocells and their connection |
| 1 flash (yellow) | unknown status, next operation REALIGNMENT |
| 2 flashes (red) | obstacle for motor; Check there are no obstacles on the path of the bar and its balancing |
| 3 flashes (red) | no motor encoder signal; Check wiring, check encoder by TEST-ENCODER (optional) |
| 4 flashes (red) | no motor signal; Check wiring, check the motor rotates freely and is powered directly by the battery, check fuse F5 |
| 5 flashes (red) | max current limit for motor exceeded; Excessive absorption peaks of the gearmotor, check there are no obstacles on the bar path, check the current absorption of the motor when in a no-load condition and when applied to the bar |
| 6 flashes (yellow) | master/slave communication error; Check wiring between the controllers, efficiency of slave controller (fuses), efficiency of interface boards |
| 7 flashes (red) | Sensitive edge safety intervention; A command pulse is required to carry out the closure |
| 8 flashes (red) | Eeprom external memory fault; Replace the external memory module |
| 8 flashes (yellow) | Eeprom data error (internal/external); Perform procedure RADIO MEMORY RESET |
Apart from the logic mistakes, the DL8 LED indicates also the status of the control unit during the saving of the radio controls:
| always on (green) | channel CH1 waiting to be saved |
| fast flashing (green) | CH1 channel memory full |
| always on (yellow) | channel CH2 waiting to be saved |
| fast flashing (yellow) | CH2 channel memory full |
| flashing (green) | CH1 channel waiting to be cancelled |
| always on (green) | cancelling of channel CH1 in progress |
| flashing (yellow) | CH2 channel waiting to be cancelled |
| always on (yellow) | cancelling of channel CH2 in progress |
When LEDs DL7 and DL8 flash at the same time they indicate: flashing red + red = factory reset procedure waiting for confirmation; flashing yellow + yellow = waiting for total cancellation of the radio channels. Multiple errors are signalled by a 2-second pause between signals. Should the encoder (obstacle detection) activate while closing, the controller will reverse the direction and slowly open until the boom reaches its fully opened position. Auto Close function will be deactivated until a further command pulse is given. In case of 5 consecutive safety interventions the controller will progressively increase the Auto Close delay.
9. Absorption check function (from 5.17 release onwards)
This function allows to monitor the absorption during a complete cycle in order to value the motor stress. To activate this function press and hold for 2 seconds simultaneously CH1, PROG, CH2 and then start the motor (OP/CL contact, remote, PROG button).
| Level | DL7 | DL8 |
|---|---|---|
| Easy to move gate | Off | Off |
| Green | Off | |
| Green | Green | |
| Green | Yellow | |
| Yellow | Green | |
| Yellow | Yellow | |
| Yellow | Red | |
| Red | Yellow | |
| Hard to move gate | Red | Red |
After 5 minutes from the function activation, the board automatically resumes to the standard LED visualization (to resume manually press simultaneously CH1, PROG and CH2).
10. Restoring automatic operation
Should the Bar need to be operated manually, use the release system. After the manual operation:
- after a Mains Power Failure, such as a black-out (controller remains disconnected for a certain time), the automation will be moving slowly to allow the Controller to establish its Limits (REALIGNMENT);
- after a Manual Operation without Mains Power Failure (controller remains connected) it will take 1 complete cycle to complete the realignment procedure. During this cycle, Limits and Soft-Stops will not be working.
11. 433.92 MHz built-in radio receiver
The radio receiver can learn up to a maximum of 30 rolling codes (S-2RP, S-4RP, K-SLIM-RP, T-4RP) which can be set on the two channels as required. The first channel directly commands the control board for opening the automatic device; the second channel commands a relay for a N.O. no-voltage output contact (terminals 19 - 20, max. 24V AC, 1 A).
Learning system for radio control devices
CH1 = OPEN/CLOSE — CH2 = 2nd channel
- press button CH1 briefly to associate a radio control device with the OPEN/CLOSE function;
- the (green) DL8 LED is ON to indicate the code learning mode has been activated (if no code is entered within 10 seconds the board exits the programming function);
- press the button of the relative radio control device;
- the (green) DL8 LED turns off to indicate saving is complete and then on again immediately waiting for other radio control devices (if this is not the case, try to re-transmit or wait 10 seconds and restart from point 1);
- to memorise codes to other radio control devices, press the key to be stored on other devices within 2-3 sec. After this time (DL8 LED turns off) must repeat the procedure from point 1 (up to a maximum of 30 transmitters);
- if you wish to save on the 2nd channel, repeat the procedure from point 1 using the CH2 key instead of CH1 (in this case the DL8 LED is yellow);
- to exit the learning mode without memorising a code, press button CH1 or CH2 briefly.
If the maximum number of radio controls is reached (30), the LED DL8 will begin to flash rapidly for about 3 seconds but without performing memorisation.
Remote programming by means of T-4RP, K-SLIM-RP, S-2RP and S-4RP (V 4.X)
With the new version of software V 4.X it is possible to carry out the remote self-learning of the new version of transmitters T-4RP, K-SLIM-RP, S-2RP and S-4RP (V 4.X), that is without pressing the receiver's programming buttons. It will be sufficient to have an already programmed transmitter in the receiver in order to start the procedure of remote programming of the new transmitters.
Cancelling codes from radio control devices
- keep button CH1 pressed for 3 seconds in order to cancel all the associated radio control devices;
- LED DL8 flashes slowly to indicate that the cancellation mode has been activated;
- press button CH1 again for 3 seconds;
- LED DL8 turns off for approx. 3 seconds and then remains steady to indicate that the code has been cancelled;
- repeat the procedure from point 1 using button CH2 to cancel all the associated radio control devices;
- to exit the learning mode without memorising a code, press button CH1 or CH2 briefly.
Memory capacity
The code memory capacity* can be expanded from 30 to 126, 254 or 1022 codes (transmitters) by replacing the memory cards as follows (plug them onto J3 connector):
| 126 codes | Art. 250SM126 |
| 254 codes | Art. 250SM254 |
| 1022 codes | Art. 250SM1022 |
* Control units are supplied with a standard built-in 30-code memory. The memory card for enhancing the code memory capacity must be ordered separately.
WARNING: Control unit must be turned OFF to insert / remove a memory card. IMPORTANT: when a memory card is used, the control unit's built-in 30 codes memory is disabled.
Radio memory reset
Press without releasing keys CH1 and PROG till LEDs DL7 and DL8 start flashing quickly with a yellow light. At this point release the keys and press them again till the LEDs go off confirming the operation is complete (if they are not pressed the board reverts to normal operation after about 12 seconds).
Hard reset (factory setting)
Press without releasing keys CH2 and PROG till LEDs DL7 and DL8 start flashing quickly with a red light. At this point release the keys and press them again till the LEDs go off (reset in progress). When the unit starts again saving will be required.
In case of Hard Reset the memory of the radio receiver will not be erased: all existing transmitters remain programmed.
12. Malfunctions: possible causes and solution
The automation does not start
- Check there is 230V AC power supply with the multimeter.
- Check, in the standard mode, that the NC contacts on the board are really normally closed (3 green LEDs on).
- Set dip-switch 6 (phototest) OFF.
- Increase the FR trimmer to the limit.
- Check that the fuses are intact with the multimeter.
The radio control has very little range
- Check that the ground and the aerial signal connections have not been inverted.
- Do not make joints to increase the length of the aerial wire.
- Do not install the aerial in a low position or behind walls or pillars.
- Check the state of the radio control batteries.
The gate opens the wrong way
Invert the motor connections on the terminal block, terminals 28 - 29 and terminals 23 - 24 (if used).
13. Guarantee: general conditions
TAU guarantees this product for a period of 24 months from the date of purchase (as proved by the sales document, receipt or invoice). This guarantee covers the repair or replacement at TAU's expense (ex-works TAU: packing and transport at the customer's expense) of parts that TAU recognises as being faulty as regards workmanship or materials. For visits to the customer's facilities, also during the guarantee period, a "Call-out fee" will be charged for travelling expenses and labour costs.
The guarantee does not cover the following cases:
- If the fault was caused by an installation that was not performed according to the instructions provided by the company inside the product pack.
- If original TAU spare parts were not used to install the product.
- If the damage was caused by an Act of God, tampering, overvoltage, incorrect power supply, improper repairs, incorrect installation, or other reasons that do not depend on TAU.
- If a specialised maintenance man does not carry out routine maintenance operations according to the instructions provided by the company inside the product pack.
- Wear of components.
The repair or replacement of pieces under guarantee does not extend the guarantee period. In case of industrial, professional or similar use, this warranty is valid for 12 months.
Manufacturer's Declaration of Incorporation (in accordance with European Directive 2006/42/EC App. II.B): Manufacturer TAU S.r.l., Via E. Fermi, 43 - 36066 Sandrigo (Vi) - ITALY. Product: Electronic control unit, designed for automatic movement of road barriers, complete with radioreceiver and battery charger board. Model/Type: K206MA. Applied standards: EN 61000-6-2; EN 61000-6-3; EN 60335-1; ETSI EN 301 489-1 V1.9.2; ETSI EN 301 489-3 V1.6.1; EN 300 220-2 V2.4.1; EN 12453:2000; EN 12445:2000; EN 60335-2-103. Sandrigo, 24/01/2018 — Legal Representative, Loris Virgilio Danieli.
DEUTSCH
Hinweise
Das vorliegende Handbuch ist nur für technisches, zur Installation qualifiziertes Personal bestimmt. Diese Anleitung liegt der Steuerung K206MA bei, die an den automatische schranken LUXE oder RBLO(X) montiert ist, und darf daher nicht für andere Produkte verwendet werden!
Wichtige Hinweise:
Vor Eingriffen an der Steuerkarte die Netzstromversorgung abtrennen.
Die Steuerung K206MA dient zum Steuern eines elektromechanischen Gleichstromgetriebemotors für die Automatisierung von Schiebetoren. Jeder andere Einsatz ist unsachgemäß und daher laut gültiger Vorschriften verboten.
Die Automatisierung ist als „Maschinenkonstruktion" klassiert und gehört zum Anwendungsbereich der Europäischen Richtlinie 2006/42/CE (Maschinenrichtlinie):
- darf die Installation ausschließlich von erfahrenem Fachpersonal ausgeführt werden;
- muss jener, der die Installation ausführt, vorher eine „Risikoanalyse" der Maschine machen;
- muss die Installation "fachgerecht" bzw. unter Anwendung der Vorschriften ausgeführt sein;
- muss dem Besitzer der Maschine die „Konformitätserklärung" ausgehändigt werden.
Wer sich nicht an die Vorschriften hält, haftet für die Schäden, die von der Anlage verursacht werden können.
Installation
Bevor Sie fortfahren, stellen Sie sicher, dass das mechanische Teil ordnungsgemäß funktioniert und der Baum richtig ausbalanciert wurde.
Anmerkung: Bitte beachten Sie, dass die Erdung der Anlage und die Einhaltung der in jedem Land gültigen Sicherheitsvorschriften Pflicht ist.
VORSICHT:
- Verwenden Sie keine eindrahtigen Kabel (einadrig), z.B wie der der Gegensprechanlage, um Unterbrechungen in der Leitung und falsche Kontakte zu vermeiden;
- Alte vorhandene Kabel nicht wiederverwenden.
DAS NICHTEINHALTEN DER OBEN ANGEFÜHRTEN ANLEITUNGEN KANN DEN EINWANDFREIEN BETRIEB DES GERÄTS BEEINTRÄCHTIGEN UND GEFAHREN FÜR PERSONEN HERVORRUFEN.
1. Schalt- und Steuertafel für den automatischen Schranken
- Mikroprozessorlogik
- Statusanzeige der Eingänge durch LEDs
- Eingebauter Blinkkreislauf
- Encodersensor zur Selbsterlernung des Laufs
- 433,92 MHz Funkempfänger, eingebaut, 2 Kanäle (CH)
- Batterieladekarte (eingebaut)
- Verbinder für Batterie
- Störungsdiagnose mit LED-Anzeige
- Möglichkeit des Betriebs mit niedrigem Verbrauch
- Kompatibilität mit TAUOPEN und TAUAPP
2. Einführung
Die Karte K206MA kann mit zwei verschiedenen Betriebsweisen arbeiten, wählbar mit dem Jumper J6 (siehe Verkabelungsplan).
- J6 Gebrückt: Modalität Standard, das heißt, das Steuergerät ist immer gespeist;
- J6 Nicht gebrückt: Modalität mit geringem Verbrauch, das heißt das Steuergerät schaltet sich am Ende jedes Manövers ab und bei jedem Befehl ein (Modalität für die eventuelle Speisung mit anderen Energiequellen, zum Beispiel Batterie geladen über Fotovoltaikpaneel).
Drücken Sie nach dem Anschließen in der Modalität mit geringem Verbrauch kurz die Taste PROG:
- müssen alle grünen LEDs leuchten (jede LED entspricht einem gewöhnlich geschlossenen Eingang). Außer dem grünen Led DL4, das entspricht dem TOR ZU-Eingang (ein Schliesser-Kontakt).
- müssen alle roten LEDs (und dem grünen LED DL4) abgeschaltet sein (jede LED entspricht einem gewöhnlich geöffneten Eingang).
3. Technische Merkmale
| Versorgung der Steuerkarte | 13,5V AC - 50 Hz |
| Max. Absorption des Gleichstrommotors | 14 Ah - 18V DC |
| Schnellsicherung zum Schutz der Eingangsversorgung 13,5 V AC (F4 - 5x20) | F 16A |
| Flinke Sicherung zum Schutz der Ladegerät (F5 - 5x20) | F 10A |
| Schnellsicherung zum Schutz der Hilfskreise 18 V DC (F3 - 5x20) | F 3.15A |
| Spannung der Versorgungskreise des Motors | 18V DC |
| Spannung der Versorgungskreise der Hilfsvorrichtungen | 18V DC |
| Versorgungsspannungen der logischen Kreisläufe | 5V DC |
| Betriebstemperatur | -20 °C ÷ +55 °C |
4. Anschlüsse am Klemmenbrett
| Klemmen | Funktion | Beschreibung |
|---|---|---|
| FS1 - FS2 | VERSORGUNG | Eingang der 13,5V AC Versorgung der Steuerkarte – versorgt vom Ringtransformator und geschützt durch Sicherung in der 230V AC Versorgung. |
| 1 - 2 | PHOTOVOLTAIC SYSTEM INPUT | Eingang externe Stromversorgung (z. B. Fotovoltaiksystem 12V DC). Hinweis: Ab den neuen Versionen ist eine Spannungsänderung mit dem Jumper J7 nicht mehr erforderlich. ACHTUNG: BEI SPEISUNG DES STEUERGERÄTES ÜBER EINE EXTERNE QUELLE NEHMEN ALLE ANDEREN AUSGÄNGE 18V DC DEN WERT DER SPANNUNG DER EXTERNEN QUELLE AN. |
| 3 - 6 | ÖFFNET | NO-Eingang, Taste ÖFFNET – verursacht die vollständige Öffnung des Schrankenbaums. (3= ÖFFNET - 6= GEM.) |
| 4 - 6 | ÖFFNET/SCHLIEßT | NO-Eingang Taste ÖFFNET/SCHLIEßT – verursacht die Öffnung und Schließung des Schrankenbaums und wird über die Dip-Switches 2 und 4 geregelt. (4= ÖFFNET/SCHLIEßT - 6= GEM.) |
| 5 - 6 | STOP | NC-Eingang, Taste STOPP – hält den Schrankenbaum unabhängig von seiner Position an; stellt die automatische Schließung vorübergehend ab, falls programmiert. Falls nicht benutzt, die Klemmen überbrücken. (5= STOP - 6= GEM.) |
| 7 - 8 | SCHLIEßT | NO-Eingang, Taste SCHLIEßT – verursacht die vollständige Schließung des Schrankenbaums. (7= GEM. - 8=SCHLIEßT) |
| 7 - 9 | FOTOZELLEN | NC-Eingang Fotozellen – spricht während der Schließung. Falls nicht benutzt, die Klemmen überbrücken. (7= GEMEIN - 9= FOT) Anmerkung: der Fotozellensender muss immer von den Klemmen Nr. 12 und Nr. 13 gespeist sein, da die Überprüfung des Sicherheitssystems (Fotozellentest) an ihm erfolgt. Um das Sicherheitssystem nicht zu überprüfen bzw. wenn keine Fotozellen benutzt sind, muss der Dip-Switch Nr. 6 auf OFF gestellt werden. |
| 7 - 10 | TASTLEISTE | Eingang KONTAKTLEISTE (ohmsche empfindliche Leiste oder feste Leiste); Sie funktioniert nur während der Schliessungsphase und bewirkt die vollständige Wiedereröffnung des Baums. (7 = GEMEINSAM - 10 = KONTAKTLEISTE) |
| 11 - 12 ** | AUX | 18V DC Ausgang für Hilfskreise max. 15 W für Fotozellen, Empfänger, usw. (11 = MINUS - 12 = PLUS) |
| 12 - 13 ** | SENDER FOTOZELLEN | 18V DC Ausgang für Senderfotozelle – Fotozellentest max. Nr. 1 Fotozellensender. (12= PLUS - 13= MINUS) |
| 14 - 15 ** | BLINKLEUCHTE (LED-SCHRANK LUXE) | 18V DC Ausgang für die Versorgung der Blinkleuchte max. 20W. Langsamblinken in Öffnung und Schnellblinken in Schließung. (14= PLUS - 15= MINUS) |
| 16 - 17* ** | ELEKTROMAGNET (VANDALISMUSSCHUTZ) | Ausgang Vandalismusschutz 18V DC, max. 3 W; Bei geschlossener Stange wird der Elektromagnet ständig gespeist. (16= PLUS - 17= MINUS) |
| 16 - 18* ** | LED STANGE (WEISS) | Ausgang Stromversorgung LED Stange; (16= PLUS - 18= MINUS) |
| 19 - 20* | 2. FUNKKANAL | Ausgang 2. Funkkanal (potentialfreier NO-Kontakt). ACHTUNG: Der Default-Ausgang ist monostabil an für 2 Sek. Zur Umschaltung muss die Programmierung mit dem Handprogrammiergerät TAUPROG vorgenommen werden. |
| 21 - 22 | ANTENNE | Eingang für steckbare Funkempfängerantenne, nur für 433,92 MHz Empfänger. (21= MASSE - 22= SIGNAL) |
| 23 - 24 - 28 - 29 | MOTOR | Ausgang Motorversorgung 18V DC max. 50 W. (23-28= PLUS - 24-29= MINUS) Siehe Hinweis unten. |
| 25 - 26 - 27 | ENCODER ALS OPTION | Versorgung und Encoder als Option Eingang (25= WEIß Signal - 26= BLAU minus - 27= BRAUN plus) Siehe Hinweis unten. |
| 30 - 31 - 32 | HAUPT-ENCODER | Versorgung und Haupt-Encoder Eingang (30= WEIß Signal - 31= BLAU minus - 32= BRAUN plus) |
* Die Ausgänge können mit TAUPROG konfiguriert werden.
** Wenn der Jumper 6 nicht eingesteckt ist, wird die Modalität Energiespar aktiviert und am Ende jedes Manövers werden die Ausgänge 11-12, 12-13, 14-15, 16-17 und 16-18 abgeschaltet.
Bei LUXE-Automatische Schranken müssen die Klemmen 23-24 parallel zu 28-29 verwendet werden (gleiche Polarität zwischen den beiden Ausgängen beachten). Die Klemmen 25-26-27 stehen zur Verfügung, wenn der Stromkreis des K206MA relativ zum Encoder (Klemmen 30-31-32) fehlerhaft ist.
WICHTIG:
- keine Hilfsrelais (oder andere Belastungen) an den 18V DC Ausgang (Klemme Nr. 11 – 12) anschließen. Dafür lieber einen separaten Trafo verwenden;
- in der Nähe der Schranke keine Switching-Speisegeräte oder ähnliche Apparaturen anschließen, die Störungen verursachen könnten.
5. Einstellung der Logik
Die Logik einstellen. Anmerkung: wenn eine Einstellung der Steuertafel verändert wird (Trimmer oder Dip-Switches) muss die Automatisierung eine vollständige Bewegung (Öffnung und Schließung) durchführen.
Trimmer
- T.R.A. nicht verwendet;
- T.C.A. Einstellung der Automatischen Schließzeit: von 0,1 bis ca. 12 Sekunden (siehe Dip-Switch Nr. 1);
- FR. Einstellung des Ansprechvermögens bei der Wahrnehmung von Hindernissen.
Anmerkung: durch Drehung des TRIMMERS FR. im Uhrzeigersinn verringert sich das Ansprechvermögen des Getriebemotors gegenüber einem Hindernis und daher erhöht sich die Schubkraft; umgekehrt, durch Drehung gegen den Uhrzeigersinn erhöht sich das Ansprechvermögen und die Schubkraft verringert sich.
Dip-Switch
| Nr. | Funktion | Stand | Beschreibung |
|---|---|---|---|
| 1 | AUTOMATISCHE SCHLIEßUNG | On | nach beendeter Öffnung ist die Schließung des Schrankenbaums nach Ablauf einer an Trimmer T.C.A. eingestellten Zeit automatisch. |
| 1 | Off | für das Schließen ist ein manueller Steuerbefehl erforderlich. | |
| 2 | 2 / 4 TAKT | On | eine Auf/Zu Befehlesequenz verursacht eine ÖFFNUNG-SCHLIEßUNG-ÖFFNUNG-SCHLIEßUNG usw. |
| 2 | Off | die gleiche Befehlesequenz verursacht ÖFFNUNG-STOPP-SCHLIEßUNG-STOPP usw. (Funktion Schrittbetrieb) (siehe auch Dip-Switch 4) | |
| 3 | ERNEUT SCHLIESSEN NACH FOTOZELLE | On | Nach dem Einsetzen des Fotozellenkontaktes (Eingang 7-9) schließt sich die Automatisierung automatisch nach 1 Sekunden. |
| 3 | Off | Funktion deaktiviert. | |
| 4 | KEIN REVERSE | On | die Automatisierung ignoriert die Schließbefehle während des Öffnens und der Pausenzeit. |
| 4 | Off | der Automatisierung verhält sich wie durch Dip-Switch Nr. 2 festgelegt. | |
| 5 | VORWARNFUNKTION | On | die Vorwarnfunktion ist eingeschaltet. |
| 5 | Off | die Vorwarnfunktion ist abgeschaltet. | |
| 6 | FOTOTEST | On | die Funktion „Fotozellentest" ist eingeschaltet. |
| 6 | Off | die Funktion „Fotozellentest" ist abgeschaltet. Anmerkung: nur verwenden, wenn die Fotozellen benutzt sind. | |
| 7 | MASTER / SLAVE | On | aktiviert die Modalität MASTER der Konfigurierung Master/Slave (siehe Anweisungen T-COMM). |
| 7 | Off | aktiviert die Modalität SLAVE oder die Standardfunktionsweise (einzelner Motor). | |
| 8 | LED STANGE | On | bei geöffneter Schranke sind die LEDs ausgeschaltet. |
| 8 | Off | bei geöffneter Schranke arbeiten die LEDs wie durch Klemmen 16-18 festgelegt (Default: BLINKEND). |
Dip 9-10-11: Schrankentyp und Baumlänge
| Dip 9 | Dip 10 | Dip 11 | Modell |
|---|---|---|---|
| Off | Off | Off | RBLO stange ≥ 2 m ≤ 2,5 m |
| On | Off | Off | RBLO stange > 2,5 m ≤ 3,5 m - RBLO-R 24 Vdc |
| Off | On | Off | RBLO stange > 3,5 m ≤ 4 m |
| On | On | Off | LUXE-M stange > 3,5 m ≤ 5 m (elliptische Bäume) / ≤ 6 m (runde Bäume) |
| Off | Off | On | LUXE stange ≥ 4 m ≤ 4,5 m (inklusive Zubehör) |
| On | Off | On | LUXE stange > 4,5 m ≤ 5,5 m (inklusive Zubehör) |
| Off | On | On | LUXE stange > 5,5 m ≤ 6,5 m (inklusive Zubehör) |
| On | On | On | LUXE stange > 6,5 m (inklusive Zubehör) |
WICHTIG: Falls die Schankenbaumlänge sich ändern sollte, dann muß die Einstellung der DIP-Switches # 9, 10 und 11 entsprechend korrigiert werden. Vor der Einstellung ist ein HARD-RESET erforderlich.
| Nr. | Funktion | Stand | Beschreibung |
|---|---|---|---|
| 12 | SCHALTLEISTE | On | FESTE LEISTE MIT WIDERSTAND (Klemme Nr. 10). |
| 12 | Off | FESTE LEISTE (Ausschaltglied – Klemme Nr. 10). Hinweis: wenn nicht verwendet, DIP schalter bleibt auf OFF. |
6. Speicherverfahren
HINWEIS: Bevor Sie mit der Speicherung beginnen, stellen Sie sicher, dass der Schrankenbaum perfekt ausbalanciert ist und dass die mechanischen Endschalter des Baums sowohl beim Öffnen als auch beim Schließen eingestellt sind.
ACHTUNG: Nach der Versorgung der Schalt- und Steuertafel, vor Beginn der Einstellverfahren ca. 2 Sekunden warten.
Nach der Installation der Automatisierung: Überprüfen Sie die Position der DIP-Switches 9, 10 und 11. Das Verfahren sollte vorzugsweise mit dem Schankenbaum nach unten begonnen werden. Drücken Sie die Taste PROG und halten Sie sie gedrückt, bis die LED DL8 (gelb) zu blinken beginnt:
- Die Automatisierung beginnt, sich langsam auf der Suche des Endschalter Öffnung zu öffnen;
Halten Sie die Bewegung des Tors an (mit den Fotozellen oder durch Schließung des Kontakts STOP), vertauschen Sie die Polarität der Motor, das Tor in geschlossene Position bringen und das Verfahren vom Beginn wiederholen, wenn sich das Tor schließt, statt sich zu öffnen. Alle grünen LEDs DL6, DL5 und DL3 müssen ununterbrochen an sein.
- Nach Erreichen des Anschlags Öffnung, beginnt die Automatisierung mit Schließung auf der Suche nach dem Anschlag Schließung;
- Die Automatisierung führt eine vollständige Öffnung durch, um die Kraft des Motor bei der Öffnung zu optimieren;
- nach einer kleinen Pause führt die Automatisierung eine vollständige Schließung aus.
Das Vorhandensein eines Hindernisses während des Abspeicherungsverfahrens wird als Anschlag interpretiert (das System greift aus Sicherheitsgründen nicht ein, aber die Motoren bleiben stehen). Halten Sie sich daher während des Abspeicherungsverfahrens nicht in der Nähe der Stange auf.
7. Merkmale der Schalt- und Steuertafel K206MA
Öffnung und Schließung mit Zeituhr
Die Öffnung und Schließung der Automatisierung kann über eine digitale Uhr gesteuert werden (potentialfreier NO-Kontakt/Relais), angeschlossen an den Klemmen 4 - 6 (Taste ÖFFNET/SCHLIEßT). Anmerkung: das erneute automatische Schließen muss eingestellt werden (Dip-Switch Nr. 1 auf ON).
Batterieladekarte (eingebaut)
Wenn man die Batterie anschließt, funktioniert die Automatisierung auch bei Netzstromausfall. Wenn die Spannung unter 11,3 Vdc sinkt, wird die Automatisierung nicht mehr funktionieren (die Steuertafel bleibt jedoch gespeist); wenn die Spannung unter 10,2 Vdc sinkt, schaltet die Karte die Batterie ganz ab.
Wahrnehmung von Hindernissen
Wenn die Funktion (einstellbar über Trimmer FR) in der Öffnungsphase eingreift, verursacht sie das erneute Schließen des Tors um ca. 20 cm; in der Schließphase eine vollständige Öffnung.
ACHTUNG: die Logik der Steuertafel kann eine mechanische Reibung als eventuelles Hindernis ausdeuten.
8. Diagnose-LEDs
| DL1 - Rote | LED für Taste ÖFFNET |
| DL2 - Rote | LED für Taste ÖFFNET/SCHLIEßT |
| DL3 - Grüne | LED für Taste STOPP |
| DL4 - Grüne | LED für Taste SCHLIEßT |
| DL5 - Grüne | LED für FOTOZELLE |
| DL6 - Grüne | LED für SICHERHEITSLEISTE |
LED - DL7
| Anzeige | Bedeutung / Maßnahme |
|---|---|
| Immer an (grün) | Batterie geladen, Netzspannung vorhanden |
| Immer an (gelb) | Batterie wird geladen |
| Aufblinken alle 4 Sekunden (grün) | Batterie geladen, keine Netzspannung vorhanden; Kontrollieren Sie die Netzstromversorgung |
| Aufblinken alle 4 Sekunden (gelb) | Stromversorgung mit Photovoltaik-Modul (Klemmen 1-2), Ladegerät deaktiviert |
| Aufblinken alle 2 Sekunden (rot) | Batterie leer; Batterie laden, Batterie ersetzen |
| Schnelles Aufblinken (rot) | Batterie defekt; Batterie ersetzen |
LED - DL8
| Anzeige | Bedeutung / Maßnahme |
|---|---|
| Aufblinken alle 4 Sekunden (grün) | Ordnungsgemäßer Betrieb |
| Aufblinken abwechselnd (rot/grün) | Abspeicherung muss vorgenommen werden |
| Schnelles Aufblinken (gelb) | Abspeicherung läuft |
| 1 Aufblinken (rot) | Fehler Fototest; Fototest deaktivieren (DIP-Switch 6 OFF), Betrieb der Fotozelle und ihren Anschluss überprüfen |
| 1 Aufblinken (gelb) | Status unbekannt, nächstes Manöver VERLANGSAMUNG |
| 2 Aufblinken (rot) | Vorhandensein Hindernis für den Motor |
| 3 Aufblinken (rot) | Kein Signal Encoder Motor; Encoder mit TEST-ENCODER überprüfen |
| 4 Aufblinken (rot) | Kein Signal Motor; Verkabelung kontrollieren, Sicherung F5 überprüfen |
| 5 Aufblinken (rot) | Überschreitung der max. Stromaufnahme von Motor |
| 6 Aufblinken (gelb) | Kommunikationsfehler Master/Slave |
| 7 Aufblinken (rot) | Sicherheitsmaßnahme bei sicherheits Kontaktleisten; Ein Befehlsimpuls ist erforderlich |
| 8 Aufblinken (rot) | Fehler externe Eeprom-Speicher; externes Speichermodul ersetzen |
| 8 Aufblinken (gelb) | Datenfehler in Eeprom (intern/extern); RESET SPEICHER FUNK durchführen |
Anzeige während der Abspeicherung der Fernsteuerungen: Immer an grün = Kanal CH1 wartet auf Programmierung; Schnelles Aufblinken grün = Speicher Kanal CH1 voll; Immer an gelb = Kanal CH2 wartet auf Programmierung; Schnelles Aufblinken gelb = Speicher Kanal CH2 voll; Aufblinken grün = Kanal CH1 wartet auf Löschung; Immer an grün = Kanal CH1 wird gelöscht; Aufblinken gelb = Kanal CH2 wartet auf Löschung; Immer an gelb = Kanal CH2 wird gelöscht. Gleichzeitiges Aufblinken: rot + rot = Verfahren Reset Werkseinstellungen wartet auf Bestätigung; gelb + gelb = Warten vollständiges Löschen der Funkkanäle.
9. Funktion Anzeige der Motorbeanspruchung (ver. 6.00)
Diese Funktion erlaubt die Motorbeanspruchung während des Betriebs zu veranschaulichen. Um die Funktion zu betätigen, die drei Tasten Ch1, Ch2 und PROG gleichzeitig drücken und für etwa 2 Sekunden gedrückt halten, dann den Motor mittels Handsender betätigen.
| Niveau | DL7 | DL8 |
|---|---|---|
| Tor leicht zu bewegen | aus | aus |
| Grün | aus | |
| Grün | Grün | |
| Grün | Gelb | |
| Gelb | Grün | |
| Gelb | Gelb | |
| Gelb | rot | |
| rot | Gelb | |
| Tor schwer zu bewegen | rot | rot |
Nach 5 Minuten Untätigkeit wird die Steuerung zur klassischen Veranschaulichung zurückkehren.
10. Rückstellung automatischer Betrieb
Betätigen Sie die manuelle Entsperrung, wenn es erforderlich ist:
- Bei der Wiederherstellung nach einem Stromausfall wechselt das Automatisierung bei der Suche des Anschlags Schließung zur verlangsamten Phase (Manöver VERLANGSAMUNG);
- Bei der Wiederherstellung nach einem manuellen Eingriff sind 1 vollständige Manöver zur Neuausrichtung erforderlich.
11. Eingebauter 433,92 MHz Funkempfänger
Der Funkempfänger kann bis zu max. 30 Rolling Codes (S-2RP, S-4RP, K-SLIM-RP, T-4RP) erlernen. Der erste Kanal steuert die Steuerkarte zur Öffnung; der zweite Kanal steuert ein Relais für einen potentialfreien NO-Kontakt (Klemmen Nr. 19 - 20, max 24V AC, 1 A).
Erlernung der Funksteuerungen
CH1 = ÖFFNET/SCHLIEßT — CH2 = 2. Kanal
- kurz auf Taste CH1 drücken, wenn man einer Funksteuerung die Funktion ÖFFNET/SCHLIEßT zuordnen will;
- Die LED DL8 (grün) leuchtet ununterbrochen auf (falls innerhalb von 10 Sekunden kein Code eingegeben wird, wechselt die Karte zur Modalität Programmierung);
- auf die Taste der Funksteuerung drücken, die man benutzen will;
- Die LED DL8 (grün) geht aus, um die Abspeicherung anzuzeigen, dann leuchtet wieder;
- wenn man andere Handsender speichern will, innerhalb von 2-3 Sekunden auf die Tasten drücken (bis zu max. 30 Sendern);
- für die Abspeicherung auf dem zweiten Kanal Taste CH2 anstelle CH1 verwenden (LED DL8 leuchtet gelb auf);
- zum Verlassen kurz auf Taste CH1 oder CH2 drücken.
Beim Erreichen der max. Anzahl der Fernsteuerungen (30) blinkt die LED DL8 für ca. drei Sekunden schnell, ohne die Abspeicherung vorzunehmen.
Code-Speicher
Auf der Steuerplatine kann der Speicher von 30 bis zu 126, 254 oder 1022 Codes erweitert werden (Speicherkarte in Slot J3 einstecken):
| 126 Codes | Art. 250SM126 |
| 254 Codes | Art. 250SM254 |
| 1022 Codes | Art. 250SM1022 |
ACHTUNG: Vor dem Einstecken/Ausstecken des Moduls die Stromversorgung zur Steuerplatine unterbrechen. WICHTIG: wenn man ein Speichermodul verwendet, wird der Innenspeicher des 30-Codes-Steuerplatine abgeschaltet. Beim Hard Reset ist die Funkempfänger-Speicher nicht betroffen: die eingelernten Handsender bleiben erhalten.
RESET SPEICHER FUNK: Halten Sie die Tasten CH1 und PROG gedrückt, bis die LEDs DL7 und DL8 beiden schnell gelb zu blinken beginnen, dann loslassen und erneut drücken bis sie ausgehen.
HARD-RESET (Werkseinstellungen): Tasten CH2 und PROG gedrückt halten, bis DL7 und DL8 schnell rot blinken. Beim Neustart muss das Abspeicherungsverfahren durchgeführt werden.
12. Betriebsstörungen: mögliche Ursachen und Abhilfen
Kein Start der Automatisierung
- Mit einem Multimeter prüfen, ob die 230 V AC Versorgung vorhanden ist.
- Sicherstellen, dass die Ausschaltglieder der Karte wirklich normalerweise geschlossen sind (3 Grüne LEDs an).
- DIP 6 (Fototest) auf OFF stellen.
- Trimmer FR auf das Maximum stellen.
- Die Sicherungen mit dem Multimeter kontrollieren.
Funksteuerung mit wenig Reichweite
- Prüfen, dass der Anschluss der Masse und des Antennesignals nicht umgekehrt ist.
- Zur Verlängerung des Antennekabels keine Verbindungen ausführen.
- Die Antenne nicht zu niedrig oder durch Mauern oder Pfeiler versteckt installieren.
- Den Zustand der Batterien in der Funksteuerung überprüfen.
Das Tor öffnet sich umgekehrt
Die Anschlüsse des Motors am Klemmenbrett untereinander umkehren, Klemmen 28 - 29 und Klemmen 23 - 24 (falls verwendet).
13. Garantie: allgemeine Bedingungen
Die Garantie der Firma TAU hat 24 Monate Gültigkeit ab Kaufdatum. Die Garantie schließt die Reparatur mit kostenlosem Ersatz jener Teile ein, die von TAU anerkannte Fabrikations- oder Materialfehler aufweisen. Die Garantie wird ungültig bei: nicht vorschriftsgemäßer Installation, Verwendung von Nicht-Original-TAU-Komponenten, Schäden durch Naturkatastrophen/Handhabungen/Spannungsüberlasten/falsche Installation, fehlender regelmäßiger Wartung, Verschleiß der Komponenten. Bei industrieller, beruflicher oder ähnlicher Nutzung 12 Monate Gültigkeit. Hersteller: TAU S.r.l., Via E. Fermi, 43 - 36066 Sandrigo (Vi) - ITALY. Sandrigo, 24/01/2018 — Der gesetzliche Vertreter, Loris Virgilio Danieli.
FRANÇAIS
Recommandations générales
Le présent manuel est destiné exclusivement au personnel technique qualifié pour l'installation. Aucune information contenue dans ce fascicule ne peut être considérée comme intéressante pour l'utilisateur final. Ce manuel est joint à la logique de commande K206MA montée sur la barrière automatique LUXE ou RBLO(X), il ne doit donc pas être utilisé pour des produits différents !
Recommandations importantes :
Couper l'alimentation électrique de la carte avant d'y accéder.
La logique de commande K206MA est destinée à la commande d'un motoréducteur électromécanique pour l'automatisation de portails coulissants. Toute autre utilisation est impropre et donc interdite par les normes en vigueur.
L'automatisation est classée comme "construction d'une machine" et rentre dans le domaine d'application de la Directive Européenne 2006/42/CE (Directive Machines). Cette directive prévoit que :
- l'installation doit être exécutée exclusivement par du personnel qualifié et expert ;
- qui effectue l'installation devra procéder au préalable à "l'analyse des risques" de la machine;
- l'installation devra être faite dans les "règles de l'art", c'est-à-dire en appliquant les normes;
- l'installateur devra remettre au propriétaire de la machine la "déclaration de conformité".
Qui ne respecte pas les normes est responsable des dommages que l'installation pourra causer !
Installation
Avant de procéder assurez-vous du bon fonctionnement de la partie mécanique ainsi que la lisse soit bien équilibrée.
Note: nous rappelons l'obligation de mettre l'installation à la terre et de respecter les normes de sécurité en vigueur dans le pays d'installation.
ATTENTION : ne pas utilisez le câblage existant.
LA NON OBSERVATION DES INSTRUCTIONS POURRAIT COMPROMETTRE LE BON FONCTIONNEMENT DE L'APPAREILLAGE ET CREER UN DANGER POUR LES PERSONNES.
1. Logique de commande pour barrières automatiques
- Logique avec microprocesseur
- État des entrées visualisé par LEDs
- Circuit de clignotement incorporé
- Capteur à encodeur pour auto-apprentissage de la course
- Récepteur radio 433,92 MHz intégré à 2 canaux (CH)
- Carte chargeur de batterie (intégrée)
- Connecteur pour batterie
- Diagnostic du défaut fonction visualisé par LED
- Possibilité de fonctionnement à basse consommation
- Compatibilité avec l'app TAUOPEN et TAUAPP
2. Introduction
La fiche K206MA peut fonctionner en deux modalités différents, sélectionnables par pontet J6 (voir schéma de câblage).
- J6 pontés : modalité standard, c'est à dire l'unité de commande est alimentée en tout temps;
- J6 non pontés : modalité basse consommation d'énergie, c'est à dire que l'unité de commande « s'éteint » à la fin de chaque manœuvre et s'allume à chaque commande (modalité pour l'éventuelle alimentation par autres fonts d'énergie par exemple batteries chargées par un panneau photovoltaïque).
Lorsque la connexion est établie, en modalité basse consommation, appuyez brièvement sur la touche PROG :
- Les Leds vertes doivent toutes être allumées (elles correspondent chacune à une entrée Normalement Fermée). Excepté le led vert DL4, qui correspond à l'entrée FERME (contact Normalement Ouvert).
- Les Leds rouges (et le led vert DL4) doivent être toutes éteintes (elles correspondent chacune à une entrée Normalement Ouverte).
3. Caractéristiques techniques
| Alimentation carte | 13,5V AC - 50 Hz |
| Puissance maximale moteur cc | 14 Ah - 18V DC |
| Fusible rapide protection alimentation entrée 13,5V AC (F4 – 5x20) | F 16A |
| Fusible rapide protection chargeur de batterie (F5 – 5x20) | F 10A |
| Fusible rapide protection auxiliaires 18V DC (F3 – 5x20) | F 3.15A |
| Tension circuits d'alimentation moteur | 18V DC |
| Tension d'alimentation circuits dispositifs auxiliaires | 18V DC |
| Tension d'alimentation circuits logiques | 5V DC |
| Température de fonctionnement | -20 °C ÷ +55 °C |
4. Connexions au bornier
| Bornes | Fonction | Description |
|---|---|---|
| FS1 - FS2 | ALIMENTATION | entrée alimentation carte 13,5V AC - Alimentée par le transformateur toroïdal et protégée par fusible sur l'alimentation 230V AC. |
| 1 - 2 | PHOTOVOLTAIC SYSTEM INPUT | Entrée d'alimentation externe (ex. Système photovoltaïque 12V DC). NB: Dans les nouvelles versions des centrales, le changement de tension par le jumper J7 n'est plus nécessaire. ATTENTION : EN ALIMENTANT LA CENTRALE AVEC UNE SOURCE EXTERIEURE, TOUTES LES AUTRES SORTIES 18V DC PRENNENT LA VALEUR DE LA TENSION D'ALIMENTATION DE LA SOURCE MEME. |
| 3 - 6 | OUVRE | entrée N.O. touche OUVRE - Commande l'ouverture totale de la barrière. (3= OUV. - 6= COM) |
| 4 - 6 | OUVRE/FERME | entrée N.O. touche OUVRE/FERME – Commande l'ouverture et la fermeture de la barrière et est réglée dans le fonctionnement par les dip-switchs 2 et 4. (4= O/F - 6= COM) |
| 5 - 6 | STOP | entrée N.F. touche STOP – Arrête la barrière quelle que soit sa position, en inhibant momentanément la fermeture automatique, si elle est programmée. Mettre en pont les bornes si non utilisées. (5 = STOP - 6 = COM) |
| 7 - 8 | FERME | entrée N.O. touche FERME – Commande la fermeture totale de la barrière. (7= COM - 8= FERM.) |
| 7 - 9 | PHOTOCELLULES | entrée N.F. photocellules - intervient durant la fermeture. Mettre en pont les bornes si non utilisées. (7= COM - 9= PHOT) Note : l'émetteur de la photocellule doit toujours être alimenté par les bornes n° 12 et n° 13, dans la mesure où c'est sur lui que s'effectue le contrôle du système de sécurité (phototest). Pour éliminer le contrôle du système de sécurité ou quand on n'utilise pas les photocellules, mettre le dip-switch n° 6 sur OFF. |
| 7 - 10 | BORD SENSIBLE | entrée BARRE PALPEUSE (barre palpeuse résistive ou mécanique contact NF); Son fonctionnement est actif que dans la manœuvre de fermeture et son intervention implique une ouverture totale de la lisse. (7=COMMUN - 10=BARRE PALPEUSE) |
| 11 - 12 ** | AUX | sortie auxiliaires 18 V DC max. 15 W pour photocellules, récepteurs, etc. (11= NÉGATIF - 12= POSITIF) |
| 12 - 13 ** | ÉMETTEUR PHOTOCELLULES | sortie 18V DC émetteur photocellule -phototest- max. 1 émetteurs photocellules. (12= POSITIF - 13= NÉGATIF) |
| 14 - 15 ** | CLIGNOTANT (LED ARMOIRE LUXE) | sortie 18V DC max. 20 W alimentation clignotant, rapide en fermeture et lent en ouverture. (14= POSITIF - 15= NÉGATIF) |
| 16 - 17* ** | SIGNALISATION TIGE OUVERTE | sortie anti-vandalisme 18V DC, max. 3 W ; Sortie pour électroaimant à brancher à l'extrémité de la tige pour la tenue en mode fermé (anti-vandalisme). (16= POSITIF - 17= NEGATIF) |
| 16 - 18* ** | LED TIGE (BLANC) | sortie alimentation LED TIGE (16= POSITIF - 18= NEGATIVE) |
| 19 - 20* | 2e CANAL RADIO | sortie 2e canal radio (contact à vide N.O.). ATTENTION : la sortie par défaut est monostable active 2 sec. Pour la commuter en bistable active il est nécessaire d'actionner avec le programmateur de poche TAUPROG. |
| 21 - 22 | ANTENNE | entrée antenne radioréceptrice embrochable seulement pour récepteurs 433,92 MHz. (21= MASSE - 22= SIGNAL) |
| 23 - 24 - 28 - 29 | MOTEUR | sortie alimentation moteur 18V DC max. 300 VA ; (23-28= POSITIF - 24-29= NEGATIVE). Voir la note ci-dessous. |
| 25 - 26 - 27 | ENCODER EN OPTION | alimentation et entrée encodeur en option (25= BLANC signal - 26= BLEU négatif - 27= MARRON positif). Voir note ci-dessous. |
| 30 - 31 - 32 | ENCODER PRINCIPAL | alimentation et entrée encodeur principal (30= BLANC signal - 31= BLEU négatif - 32= MARRON positif). |
* Les sorties sont configurables avec TAUPROG.
** Si le cavalier J6 n'est pas inséré, la fonction modalité consommation réduite sera activée et, à la fin de chaque manœuvre, les sorties 11-12, 12-13, 14-15, 16-17 et 16-18 seront désactivées.
Les bornes 23-24 doivent être utilisés en parallèle aux 28-29 dans le cas de barrières LUXE (respecter la même polarité entre les deux sorties). Les bornes 25-26-27 sont disponibles dans le cas où le système encoder de la carte électronique K206MA (bornes 30-31-32) soit en panne.
IMPORTANT :
- nous recommandons de ne pas raccorder les relais auxiliaires ou d'autres dispositifs à la sortie 18V DC (bornes 11 – 12) de la centrale de commande. Comme alternative, il faut utiliser les alimentateurs/transformateurs extérieurs ;
- ne pas connecter à proximité de la barrière des systèmes d'alimentation à découpage ou appareils similaires qui pourraient être une source de parasites.
5. Réglages logiques
Effectuer les réglages logiques. Note : quand on agit sur un dispositif de réglage quelconque (trimmer ou dip-switchs) il faut effectuer une manœuvre complète (ouverture et fermeture) de l'automatisme.
Trimmers
- T.R.A. il n'est pas utilisé;
- T.C.A. réglage Temps de Fermeture Automatique : de 0,1 à 12 secondes env. (voir dip-switch n. 1) ;
- FR. réglage sensibilité détection obstacles.
Note : en tournant le TRIMMER FR. dans le sens des aiguilles d'une montre, on diminue la sensibilité du motoréducteur sur l'obstacle et donc la force de poussée augmente ; vice versa, en le tournant dans le sens contraire, on augmente la sensibilité du motoréducteur sur l'obstacle et la force de poussée diminue.
Dip-switchs
| N. | Fonction | État | Description |
|---|---|---|---|
| 1 | FERMETURE AUTOMATIQUE | On | quand l'ouverture a été complétée, la fermeture de la barrière est automatique après l'écoulement du temps réglé sur le trimmer T.C.A. |
| 1 | Off | la fermeture nécessite une commande manuelle. | |
| 2 | 2 / 4 TEMPS | On | une séquence de commandes d'ouverture/fermeture induit la barrière à une OUVERTURE-FERMETURE-OUVERTURE-FERMETURE, etc. |
| 2 | Off | la même séquence de commandes amène la barrière à une OUVERTURE-STOP-FERMETURE-STOP-OUVERTURE-STOP, etc. (fonction pas à pas) (voir aussi dip switch 4) | |
| 3 | FERME APRÈS PHOTOCELLULE | On | suite à l'intervention du contact de la photocellule (entrée 7-9), l'automation se ferme automatiquement après 1 secondes. |
| 3 | Off | Hors fonction. | |
| 4 | NO REVERSE | On | l'automatisme ne reconnaît pas les commandes de fermeture pendant l'ouverture et le temps de pause. |
| 4 | Off | l'automatisme se comporte conformément au réglage établi par le dip switch n. 2. | |
| 5 | PRECLIGNOT. | On | la fonction préclignotement est activée. |
| 5 | Off | la fonction préclignotement est désactivée. | |
| 6 | FOTOTEST | On | la fonction «contrôle des photocellules» est activée. |
| 6 | Off | la fonction «contrôle des photocellules» est désactivée. Note : à employer quand on n'utilise pas les photocellules. | |
| 7 | MASTER / SLAVE | On | active la modalité MASTER dans la configuration maitre/esclave (voir instructions T-COMM) |
| 7 | Off | active la modalité SLAVE ou bien le fonctionnement standard (un moteur) | |
| 8 | LED TIGE | On | avec la barrière ouverte tous les led restent ETEINTS. |
| 8 | Off | avec la barrière ouverte les led sont conformes au réglage de la sortie configurée concernée, bornes 16-18 (default: CLIGNOTEMENT). |
Dip 9-10-11 : Sélection du modèle barrière et longueur de la tige
| Dip 9 | Dip 10 | Dip 11 | Modèle |
|---|---|---|---|
| Off | Off | Off | RBLO tige ≥ 2 m ≤ 2,5 m |
| On | Off | Off | RBLO tige > 2,5 m ≤ 3,5 m - RBLO-R 24 Vdc |
| Off | On | Off | RBLO tige > 3,5 m ≤ 4 m |
| On | On | Off | LUXE-M tige > 3,5 m ≤ 5 m (lisse elliptique) / ≤ 6 m (lisse ronde) |
| Off | Off | On | LUXE tige ≥ 4 m ≤ 4,5 m (accessoires compris) |
| On | Off | On | LUXE tige > 4,5 m ≤ 5,5 m (accessoires compris) |
| Off | On | On | LUXE tige > 5,5 m ≤ 6,5 m (accessoires compris) |
| On | On | On | LUXE tige > 6,5 m (accessoires compris) |
IMPORTANT: Le modèle de lisse est chargé pendant la mise en marche SEULEMENT la première fois qu'on fait la procédure (led DL8 qui clignote rouge/vert en alternance). Pour modifier le modèle, il faut effectuer, avant une nouvelle procédure, une "RÉGLAGES DE FABRIQUE".
| N. | Fonction | État | Description |
|---|---|---|---|
| 12 | BORD SENSIBLE | On | BORD SENSIBLE RESISTIF (étau n° 10). |
| 12 | Off | CÔTE FIXE (contact NC - étau n° 10). Remarque: s'il n'est pas utilisé, maintenir le dip sur OFF. |
6. Procédure de mémorisation
NOTE: avant de commencer la procédure de mémorisation, il faudra équilibrer la lisse et vérifier que les fin de course mécaniques en ouverture et fermeture soient correctement en place.
ATTENTION : Après avoir alimenté la logique de commande, attendre 2 secondes avant de commencer les manœuvres de réglage.
Après avoir terminé l'installation de l'automatisme : Vérifier la position des dip 9, 10 et 11. Il est préférable de commencer la procédure avec la lisse vers le bas. Appuyez et maintenez enfoncé le bouton PROG jusqu'à ce que le LED DL8 clignote (jaune):
- L'automation commence lentement la recherche de la fin course en ouverture;
Si l'automatisme ferme au lieu de ouvrir, il est nécessaire d'arrêter la course du portail (au moyen des photocellules ou au moyen du contact STOP), inverser la polarité du moteur, déplacer le portail en position fermée (de butée mécanique) et répétez la procédure. Toutes les LED vertes DL6, DL3 et DL5 doit être allumé en permanence.
- Obtenu le temps d'ouverture, l'automation commence la recherche du temps de fermeture;
- L'automation effectue une ouverture complète pour l'optimisation de la force motrice en ouverture;
- Après une courte pause, l'automation peut effectuer un arrêt complet pour l'optimisation de la force motrice en fermeture.
ATTENTION:
- La procédure peut être interrompue en appuyant sur le bouton STOP.
- Pendant les différentes phases de l'opération, les cellules photoélectriques arrêtent l'enregistrement. Pour faire partir la procédure du début (avec LED DL8 jaune clignotant), utilisez la commande AP/CH, le bouton du radiocommande (si programmée), ou appuyez brièvement sur le bouton PROG.
La présence d'un obstacle pendant la procédure d'enregistrement est interprété comme une fin de course mécanique (le système n'intervient pas avec des mouvements de sécurité, mais seulement avec l'arrêt du moteur). Assurez-vous de ne pas rester au prés de la tige pendant la procédure de stockage.
7. Caractéristiques de la K206MA
Ouverture et fermeture commandée par une horloge
Il est possible de commander l'ouverture et la fermeture de l'automatisme avec une horloge numérique disposant en sortie d'un contact N.O. sans potentiel (relais). Il suffira de la connecter aux bornes 4 - 6 (touche OUVRE/FERME). Note : la refermeture automatique doit être activée (dip-switch n. 1 sur ON).
Carte chargeur de batterie (intégrée)
Si la batterie est connectée, en cas de coupure de courant l'automatisme fonctionne quand même. Si la tension descend en dessous de 11,3 Vcc, l'automatisme cesse de fonctionner ; quand elle descend en dessous de 10,2 Vcc, la carte déconnecte complètement la batterie.
Détection des obstacles
La fonction de détection des obstacles (réglable au moyen du trimmer FR) intervenant en phase d'ouverture provoque une manœuvre de fermeture d'environ 20 cm tandis qu'en phase de fermeture elle provoque une ouverture totale.
ATTENTION : la logique de commande peut interpréter un frottement mécanique comme un éventuel obstacle.
8. Leds de diagnostics
| DL1 - Rouge | led de signalisation touche OUVRE |
| DL2 - Rouge | led de signalisation touche OUVRE/FERME |
| DL3 - Verte | led de signalisation touche STOP |
| DL4 - Verte | led de signalisation touche FERME |
| DL5 - Verte | led de signalisation PHOTOCELLULE |
| DL6 - Verte | led de signalisation BARRE PALPEUSE |
LED - DL7
| Signalisation | Signification / Action |
|---|---|
| toujours allumé (vert) | batterie chargé, présence de tension d'alimentation du réseau |
| toujours allumé (jaune) | batterie en charge |
| 1 clignotement toutes les 4 sec (vert) | batterie chargé, de tension d'alimentation réseau absente; Vérifiez l'alimentation du réseau |
| 1 clignotement toutes les 4 sec (jaune) | alimentation par panneau photovoltaïque (bornes 1-2), chargeur de batterie désactivé |
| 1 clignotement toutes les 2 sec (rouge) | batterie déchargé; Charger la batterie, remplacez la batterie |
| clignotement rapide (rouge) | batterie défectueuse; Remplacez la batterie |
LED - DL8
| Signalisation | Signification / Action |
|---|---|
| 1 clignotement toutes les 4 sec (vert) | fonctionnement normal |
| clignotant alternativement (rouge/vert) | mémorisation doit être exécuté |
| clignotant rapide (jaune) | Mémorisation en course |
| 1 clignotement (rouge) | erreur phototest; Désactiver phototest (dip-switch 6 sur OFF), vérifier le fonctionnement photocellules et leurs linkage |
| 1 clignotement (jaune) | état inconnu, prochaine manœuvre REALIGNEMENT |
| 2 clignotement (rouge) | présence obstacle pour le moteur; Vérifier l'absence des obstacles tout le long de la tige et le balancement de celle-ci |
| 3 clignotement (rouge) | absence signale encoder moteur; Vérifier le câblage, vérifiez Encoder avec TEST-ENCODER (facultatif) |
| 4 clignotement (rouge) | absence signale moteur; Vérifier le câblage, vérifiez le fusible F5 |
| 5 clignotement (rouge) | dépassée limite max. de courant moteur; Absorption excessive du motoréducteur |
| 6 clignotement (jaune) | erreur de transmission master/slave; Vérifier le câblage entre les centrales |
| 7 clignotement (rouge) | intervention de sécurité de la barre palpeuse; Une impulsion de commande est nécessaire pour la fermeture |
| 8 clignotement (rouge) | erreur de mémoire EEPROM externe; Substituer le module de mémoire externe |
| 8 clignotement (jaune) | erreur de données dans l'EEPROM (interne / externe); Effectuez une RÉINITIALISATION DE LA MÉMOIRE DE LA RADIO |
État de la centrale pendant la mémorisation des radiocommandes : toujours allumé vert = chaine CH1 en attente de programmation; clignotement rapide vert = mémoire chaine CH1 plaine; toujours allumé jaune = chaine CH2 en attente de programmation; clignotement rapide jaune = mémoire chaine CH2 plaine; clignotement vert = chaine CH1 en attente d'effacement; toujours allumé vert = chaine CH1 en effacement; clignotement jaune = chaine CH2 en attente d'effacement; toujours allumé jaune = chaine CH2 en effacement. Clignotement simultané : rouge + rouge = procédure de réinitialisation de fabrique à confirmer; jaune + jaune = en attente effacement total des chaînes de radio.
9. Visualisation effort moteur (seulement à partir de la version 6.00)
Cette fonction permet de visualiser l'effort du moteur pendant le fonctionnement. Pour activer la fonction appuyer en même temps et maintenir pressé pour environ 2 secondes les trois touches Ch1, Ch2 et PROG, puis actionner le moteur.
| Niveau | DL7 | DL8 |
|---|---|---|
| Portail facil à remuer | de (éteint) | de (éteint) |
| vert | de (éteint) | |
| vert | vert | |
| vert | jaune | |
| jaune | vert | |
| jaune | jaune | |
| jaune | rouge | |
| rouge | jaune | |
| Portail difficile à remuer | rouge | rouge |
Après 5 minutes d'inactivité la platine reviendra à la visualisation classique.
10. Remise fonctionnement automatique
Lors qu'il devient nécessaire de gérer manuellement la fermeture ou l'ouverture, il faut actionner le déblocage manuel :
- si la remise a lieu suite à une panne de courant, le portail entre dans une phase de course lente à la recherche de la butée de fermeture (manoeuvre de REALIGNEMENT);
- si la remise a lieu après une intervention manuelle (centrale toujours alimentée), il faudra 1 cycle complet pour réaligner l'automatisation. Pendant ce cycle le ralentissement normal ainsi que les butées ne seront pas observés.
11. Récepteur radio 433,92 MHz intégré
Le récepteur radio peut apprendre jusqu'à un max. de 30 codes rolling code (S-2RP, S-4RP, K-SLIM-RP, T-4RP) à paramétrer librement sur deux canaux. Le premier canal commande directement la carte de commande pour l'ouverture ; le deuxième canal commande un relais pour un contact à vide N.O. en sortie (bornes 19 - 20, max. 24V AC, 1 A).
Apprentissage émetteur
CH1 = OUVRE/FERME — CH2 = 2e canal
- presser rapidement la touche CH1 si l'on souhaite associer un émetteur à la fonction OUVRE/FERME ;
- le led DL8 (vert) s'allume en continu pour indiquer la modalité apprentissage des codes (si aucun code n'est introduit dans 10 secondes, la fiche quitte la modalité de programmation) ;
- presser la touche de l'émetteur que l'on souhaite utiliser ;
- DL8 LED (vert) s'éteint pour indiquer que la mémorisation est complète puis rallume immédiatement ;
- pour mémoriser d'autres émetteurs, presser la touche dans 2-3 sec (jusqu'à un maximum de 30 émetteurs) ;
- pour la mémorisation sur la 2ème chaîne, utiliser le bouton CH2 au lieu de CH1 (le LED DL8 s'allume jaune) ;
- pour sortir sans mémoriser, presser brièvement la touche CH1 ou CH2.
Dans le cas de obtention du numéro maximal de radiocommandes (n° 30), le led DL8 clignote rapidement pendant environ 3 secondes mais sans effectuer la mémorisation.
Effacement émetteurs
- maintenir enfoncée pendant environ 3 secondes la touche CH1 pour effacer tous les émetteurs associés ;
- la led DL8 commence à clignoter lentement pour indiquer que le mode d'effacement est activé ;
- maintenir de nouveau la touche CH1 enfoncée pendant 3 secondes ;
- la led DL8 s'éteint pendant environ 3 secondes puis se rallume pour indiquer que l'effacement a été fait ;
- reprendre la procédure à partir du point 1 en utilisant la touche CH2 ;
- pour sortir sans mémoriser, presser brièvement CH1 ou CH2.
Mémoire des codes
Il est possible d'augmenter la mémoire des codes (émetteurs) de 30 à 126, 254 ou 1022 en remplaçant les cartes de mémoire (les brancher dans le connecteur J3) :
| 126 codes | Art. 250SM126 |
| 254 codes | Art. 250SM254 |
| 1022 codes | Art. 250SM1022 |
ATTENTION: lors qu'on fait le branchement/débranchement d'une carte de mémoire, la centrale doit être désactivée. IMPORTANT: En cas d'utilisation d'une carte de mémoire, la mémoire de 30 codes de la logique de commande est désactivée. Si on fait un RÉGLAGES DE FABRIQUE, la mémoire du récepteur radio reste inchangée.
RÉINITIALISATION DE LA MÉMOIRE DE LA RADIO : Maintenez enfoncés les boutons CH1 et PROG jusqu'à ce que les led DL7 et DL8 clignotent rapidement en jaune, puis relâchez et pressez à nouveau jusqu'à ce que les led s'éteignent.
RÉGLAGES DE FABRIQUE : Maintenez enfoncés les boutons CH2 et PROG jusqu'à ce que les led DL7 et DL8 clignotent rapidement en rouge. À la relance, vous devez effectuer la procédure de mémorisation.
12. Problèmes de fonctionnement : causes possibles et remèdes
L'automatisme ne démarre pas
- Vérifier avec l'instrument (Multimètre) la présence de l'alimentation 230 V AC.
- Vérifier, en modalité standard, que les contacts N.C. de la fiche sont effectivement normalement fermés (3 LED verts).
- Positionner le dip-6 (phototest) sur OFF.
- Tourner le trimmer FR sur le maximum.
- Contrôler avec l'instrument (Multimètre) que les fusibles sont intacts.
La portée de la radiocommande est faible
- Contrôler que la connexion de la masse et du signal de l'antenne n'est pas inversée.
- Ne pas effectuer d'épissures pour prolonger le câble de l'antenne.
- Ne pas installer l'antenne dans des positions basses ou cachées par la maçonnerie ou par le pilier.
- Contrôler l'état des piles de la radiocommande.
Le portail s'ouvre dans le sens contraire
Intervertir les connexions du moteur sur le bornier, bornes 28 - 29 et bornes 23 - 24 (en cas d'usage).
13. Garantie : conditions générales
La garantie TAU a une durée de 24 mois à compter de la date d'achat des produits. La garantie comprend la réparation avec remplacement gratuit (départ usine TAU) des parties qui présentent des défauts de fabrication ou des vices de matériau reconnus par TAU. En cas d'intervention à domicile, l'utilisateur est tenu de verser le "Forfait d'intervention".
La garantie n'est plus applicable dans les cas suivants : installation non effectuée suivant les instructions ; pièces non originales TAU ; dommages par calamités naturelles, actes de malveillance, surcharge de tension, alimentation incorrecte, réparations impropres, installation erronée ; absence de maintenances périodiques ; usure des composants. Dans le cas d'un usage industriel ou professionnel, la garantie est valable 12 mois. Fabricant : TAU S.r.l., Via E. Fermi, 43 - 36066 Sandrigo (Vi) - ITALY. Sandrigo, 24/01/2018 — Le Représentant légal, Loris Virgilio Danieli.
ESPAÑOL
Advertencias
El presente manual está destinado sólo al personal técnico cualificado para la instalación. Este manual se adjunta a la centralina K206MA montada en la barrera automática LUXE o RBLO(X), por lo tanto, no debe utilizarse para productos diversos.
Advertencias importantes:
Antes de acceder a la tarjeta es necesario desconectarla de la alimentación de red.
La centralina K206MA está destinada al control de un motorreductor electromecánico de corriente continua para la automatización de puertas correderas. Cualquier otro uso es considerado inadecuado y prohibido por las normativas vigentes.
La automatización está clasificada como «construcción de una máquina» y entra dentro del campo de aplicación de la directiva europea 2006/42/CE (Directiva de máquinas):
- la instalación debe ser efectuada sólo por personal cualificado y experto;
- la persona que efectúe la instalación deberá analizar preventivamente los riesgos de la máquina;
- la instalación deberá ser hecha según las reglas del arte, es decir aplicando las normas;
- habrá que expedir al dueño de la máquina la «declaración de conformidad».
¡Quien no respeta las normativas es responsable de los daños que la instalación podría provocar!
Instalación
Antes de continuar, asegúrese de que la parte mecánica esté funcionando correctamente y que el asta esté correctamente equilibrada.
Nota: se recuerda que es obligatorio conectar a tierra el equipo y respetar las normas de seguridad vigentes en cada país.
PRECAUCIÓN:
- no utilice cables de un solo hilo (un solo conductor), por ejemplo los de los intercomunicadores;
- no reutilice cables viejos preexistentes.
LA INOBSERVANCIA DE LAS INSTRUCCIONES ANTEDICHAS PUEDE PERJUDICAR EL FUNCIONAMIENTO CORRECTO DEL EQUIPO Y CONSTITUIR UN PELIGRO PARA LAS PERSONAS.
1. Panel de mandos para barreras automáticas
- Lógica con microprocesador
- Estado de las entradas visualizado por LEDs
- Circuito de destello incorporado
- Sensor con codificador para el autoaprendizaje del recorrido
- Radiorreceptor de 433,92 MHz integrado de 2 canales (CH)
- Tarjeta carga batería (integrada)
- Conector para batería
- Diagnóstico del defecto de la función visualizado por el LED
- Posibilidad de funcionamiento en bajo consumo
- Compatibilidad con la aplicación TAUOPEN y TAUAPP
2. Introducción
La tarjeta K206MA puede funcionar en dos modos diferentes que se seleccionan con el puente J6 (véase el diagrama de cableado).
- J6 Puenteado: modalidad estándar, es decir la central siempre está alimentada;
- J6 No puenteado: modalidad bajo consumo, es decir la central se "apaga" al final de cada maniobra y se enciende con cada mando (modalidad para la alimentación con otras fuentes de energía, por ej. baterías cargadas mediante panel fotovoltaico).
Al concluir la conexión, en modalidad bajo consumo, pulse brevemente el pulsador PROG:
- Los Leds verdes tienen que estar todos encendidos (cada uno corresponde a una entrada Normalmente Cerrada). Hace excepción el led verde DL4, que corresponde a la entrada CIERRA (contacto Normalmente Abierto).
- Los Leds rojos (y el led verde DL4) tienen que estar todos apagados (cada uno corresponde a una entrada Normalmente Abierta).
3. Características técnicas
| Alimentación tarjeta | 13,5V AC - 50 Hz |
| Máxima absorción del motor DC | 14 Ah - 18V DC |
| Fusible rápido protección alimentación entrada 13,5 Vac (F4 - 5x20) | F 16A |
| Fusible rápido protección carga batería (F5 - 5x20) | F 10A |
| Fusible rápido protección auxiliares 18 V dc (F3 - 5x20) |