Notice Somfy Outdoor Camera
Produit concerné
Box Content
FR Contenu de la boîte / ES Contenido de la caja / IT Contenuto della confezione / DE Inhalt / NL De inhoud van de verpakking
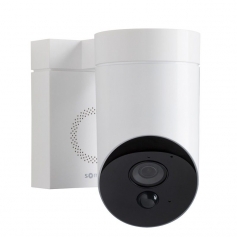
- EN Outdoor Camera and wall plate — FR Outdoor Camera et platine de fixation — ES Outdoor Camera y placa de fijación — IT Outdoor Camera e piastra di fissaggio — DE Outdoor Camera und Platte zur Wandbefestigung — NL Outdoor camera en bevestigingsplaat (85 mm × 119 mm)
- EN Allen Key — FR Clé Allen — ES Llave Allen — IT Chiave Allen — DE Inbusschraube — NL Inbussleutel
- EN Wall screws and screwholders (x2) — FR Vis et chevilles (x2) — ES Tornillos y tacos (x2) — IT Viti e tasselli (x2) — DE Schrauben und Muttern (x2) — NL Schroeven en pluggen (x2) (25 mm / Ø 3 mm)
- EN Tool for reset — FR Picot reset — ES Herramienta de Reset — IT Oggetto sottile — DE Werkzeuge für Reset — NL Gereedschap voor Reset
What You'll Need
FR Ce dont vous avez besoin / ES Lo que necesitarás / IT Quello che ti serve / DE Was Sie brauchen / NL Wat u nodig heeft
- EN Wi-Fi connection (500 kbps upload speed recommended) — FR Connexion Wi-Fi (débit montant recommandé 500 Kbps) — ES Conexión Wi-Fi (velocidad de subida recomendada 500 Kbps) — IT Connessione Wi-Fi (upload consigliato 500 Kbps) — DE WLAN-Verbindung (empfohlene Bandbreite 500 Kbps) — NL Wifiverbinding (500 Kbps upload aanbevolen). La 3G/4G n'est pas suffisante.
- EN Drill (Ø 5 mm) — FR Perceuse — ES Taladro — IT Trapano — DE Bohrer — NL Boormachine
- EN Step ladder — FR Escabeau — ES Escalerilla — IT Scaletta — DE Trittleiter — NL Trapladder
- EN Hammer and Phillips screwdriver — FR Marteau et tournevis cruciforme — ES Martillo y destornillador cruciforme — IT Martello o cacciavite a croce — DE Hammer und Kreuzschlitzschraubenzieher — NL Hamer en kruiskopschroevendraaier
EN If you want to connect the camera to an existing light or socket, you will need additional power cables. FR Si vous souhaitez raccorder la caméra à un éclairage existant ou à une prise électrique, vous aurez besoin de câbles électriques supplémentaires. ES Si desea conectar la cámara a una iluminación o una toma ya existente, necesitará cables eléctricos adicionales. IT Se vuoi collegare la telecamera a un'illuminazione esistente o a una presa, serviranno dei cavi elettrici in più. DE Wenn Sie die Kamera an eine vorhandene Beleuchtung oder Steckdose anschließen möchten, benötigen Sie zusätzliche Kabel. NL Wilt u de camera op een bestaand lichtpunt of stopcontact aansluiten, dan heeft u extra elektrische kabels nodig.
Somfy Outdoor Camera
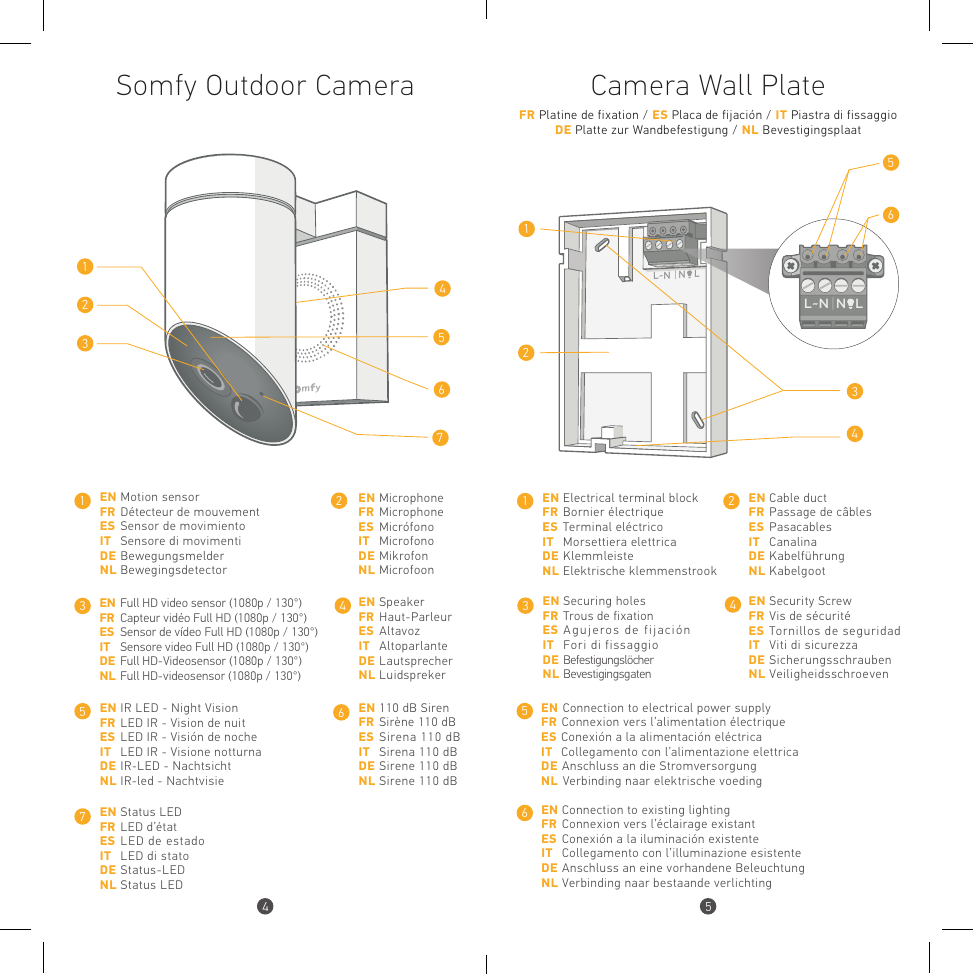
- EN Motion sensor — FR Détecteur de mouvement — ES Sensor de movimiento — IT Sensore di movimenti — DE Bewegungsmelder — NL Bewegingsdetector
- EN Microphone — FR Microphone — ES Micrófono — IT Microfono — DE Mikrofon — NL Microfoon
- EN Full HD video sensor (1080p / 130°) — FR Capteur vidéo Full HD (1080p / 130°) — ES Sensor de vídeo Full HD — IT Sensore video Full HD — DE Full HD-Videosensor — NL Full HD-videosensor
- EN Speaker — FR Haut-Parleur — ES Altavoz — IT Altoparlante — DE Lautsprecher — NL Luidspreker
- EN IR LED - Night Vision — FR LED IR - Vision de nuit — ES LED IR - Visión de noche — IT LED IR - Visione notturna — DE IR-LED - Nachtsicht — NL IR-led - Nachtvisie
- EN 110 dB Siren — FR Sirène 110 dB — ES Sirena 110 dB — IT Sirena 110 dB — DE Sirene 110 dB — NL Sirene 110 dB
- EN Status LED — FR LED d'état — ES LED de estado — IT LED di stato — DE Status-LED — NL Status LED
Camera Wall Plate
FR Platine de fixation / ES Placa de fijación / IT Piastra di fissaggio / DE Platte zur Wandbefestigung / NL Bevestigingsplaat
- EN Electrical terminal block — FR Bornier électrique — ES Terminal eléctrico — IT Morsettiera elettrica — DE Klemmleiste — NL Elektrische klemmenstrook
- EN Cable duct — FR Passage de câbles — ES Pasacables — IT Canalina — DE Kabelführung — NL Kabelgoot
- EN Securing holes — FR Trous de fixation — ES Agujeros de fijación — IT Fori di fissaggio — DE Befestigungslöcher — NL Bevestigingsgaten
- EN Security Screw — FR Vis de sécurité — ES Tornillos de seguridad — IT Viti di sicurezza — DE Sicherungsschrauben — NL Veiligheidsschroeven
- EN Connection to electrical power supply — FR Connexion vers l'alimentation électrique — ES Conexión a la alimentación eléctrica — IT Collegamento con l'alimentazione elettrica — DE Anschluss an die Stromversorgung — NL Verbinding naar elektrische voeding
- EN Connection to existing lighting — FR Connexion vers l'éclairage existant — ES Conexión a la iluminación existente — IT Collegamento con l'illuminazione esistente — DE Anschluss an eine vorhandene Beleuchtung — NL Verbinding naar bestaande verlichting
Where to Install it?
FR Où installer votre caméra ? / ES ¿Dónde desea instalar su cámara? / IT Dove si può installare la telecamera? / DE Wo sollten Sie Ihre Kamera installieren? / NL Waar kunt u het beste de camera installeren?

EN Wi-Fi: Use your smartphone to check that Wi-Fi is available at the selected location. Location: For best operation, avoid direct exposure to the sun or rain. Ensure that the field of view of the camera is unobstructed. Height: Position the camera at least 2.5 m (8 ft) above ground level.
FR Wi-Fi : Utilisez votre smartphone pour vous assurer de la disponibilité du Wi-Fi à l'emplacement choisi. Emplacement : Pour un fonctionnement optimal du produit, évitez l'exposition directe au soleil et à la pluie. Veillez à ce que le champ de vision de la caméra soit dégagé. Hauteur : Placez la caméra à une hauteur minimale de 2,5 m.
ES Wi-Fi: Utilice su smartphone para verificar el alcance de la Wi-Fi en el lugar elegido. Ubicación: Para garantizar el funcionamiento óptimo del producto, evite la exposición directa al sol y a la lluvia. Asegúrese de que la cámara disponga de un campo de visión despejado. Altura: Instale la cámara a una altura mínima de 2,5 m.
IT Wi-Fi: Utilizza il tuo smartphone per assicurarti che sia disponibile il Wi-Fi nella posizione scelta. Posizionamento: Per un funzionamento ottimale del prodotto, evita l'esposizione diretta al sole e alla pioggia. Accertati che il campo visivo della telecamera sia libero. Altezza: La telecamera va collocata a un'altezza minima di 2,5 m.
DE WLAN: Stellen Sie mithilfe Ihres Smartphones fest, ob an dem gewählten Platz WLAN-Empfang besteht. Platzierung: Damit das Gerät optimal funktioniert, platzieren Sie es an einem Ort, an dem es weder direkter Sonneneinstrahlung noch Regen ausgesetzt ist. Achten Sie darauf, dass die Kamera ein freies «Blickfeld» hat. Höhe: Bringen Sie die Kamera in mindestens 2,5 m Höhe an.
NL Wi-Fi: Gebruik uw smartphone om de Wifibeschikbaarheid op de gekozen plaats te controleren. Locatie: Voor een optimale werking van het product dient u rechtstreekse blootstelling aan de zon en regen te vermijden. Controleer of het gezichtsveld van de camera vrij is. Hoogte: Plaats de camera op een hoogte van minstens 2,5 m.
3 Ways of Installing it
FR 3 façons d'installer votre caméra / ES 3 maneras de instalar su cámara / IT 3 modi di installare la telecamera / DE 3 Möglichkeiten, Ihre Kamera zu installieren / NL 3 manieren om uw camera te installeren
- A — Connecting to an electrical power cable / FR Branchement sur une arrivée électrique / ES Conexión a una entrada eléctrica / IT Collegamento a un ingresso elettrico / DE Anschluss an eine Verteilerdose / NL Aansluiting op een elektrische toevoer
- B — Connecting to an existing light fixture / FR Raccordement à un éclairage existant / ES Conexión a un punto de luz existente / IT Collegamento a un'illuminazione esistente / DE Anschluss an eine vorhandene Beleuchtung / NL Aansluiting op een bestaand lichtpunt
- C — Connecting to an electrical power socket / FR Branchement sur une prise électrique / ES Conexión a una toma eléctrica / IT Collegamento a una presa elettrica / DE Anschluss an eine Steckdose / NL Aansluiting op een elektrisch stopcontact
WARNING Switch off the electrical power supply before starting. There are risks involved in working with electricity. If you are not qualified, call a professional.
ATTENTION Coupez l'électricité avant de commencer. Intervenir sur une installation électrique présente des risques. Si vous n'êtes pas une personne qualifiée, faites appel à un professionnel.
ATENCIÓN Interrumpa la electricidad antes de comenzar. Intervenir en una instalación eléctrica presenta riesgos. Si usted no es una persona cualificada, solicite la asistencia de un profesional.
ATTENZIONE Spegnere l'elettricità prima di iniziare. Intervenire su un impianto elettrico presenta rischi. Se non sei una persona qualificata, ricorri a un professionista.
ACHTUNG Stellen Sie zuvor den Strom ab. Das Arbeiten an elektrischen Anlagen ist mit Gefahren verbunden. Wenn Sie nicht dafür qualifiziert sind, lassen Sie das einen Fachmann machen.
LET OP Sluit de elektriciteit af voor u begint. Aan een elektrische installatie werken brengt risico's met zich mee. Bent u niet bevoegd, doe dan een beroep op een vakman.
A — Connecting to an electrical power cable
FR Branchement sur une arrivée électrique / ES Conexión a una entrada eléctrica / IT Collegamento a un ingresso elettrico / DE Anschluss an eine Verteilerdose / NL Aansluiting op een elektrische toevoer
Étape 1
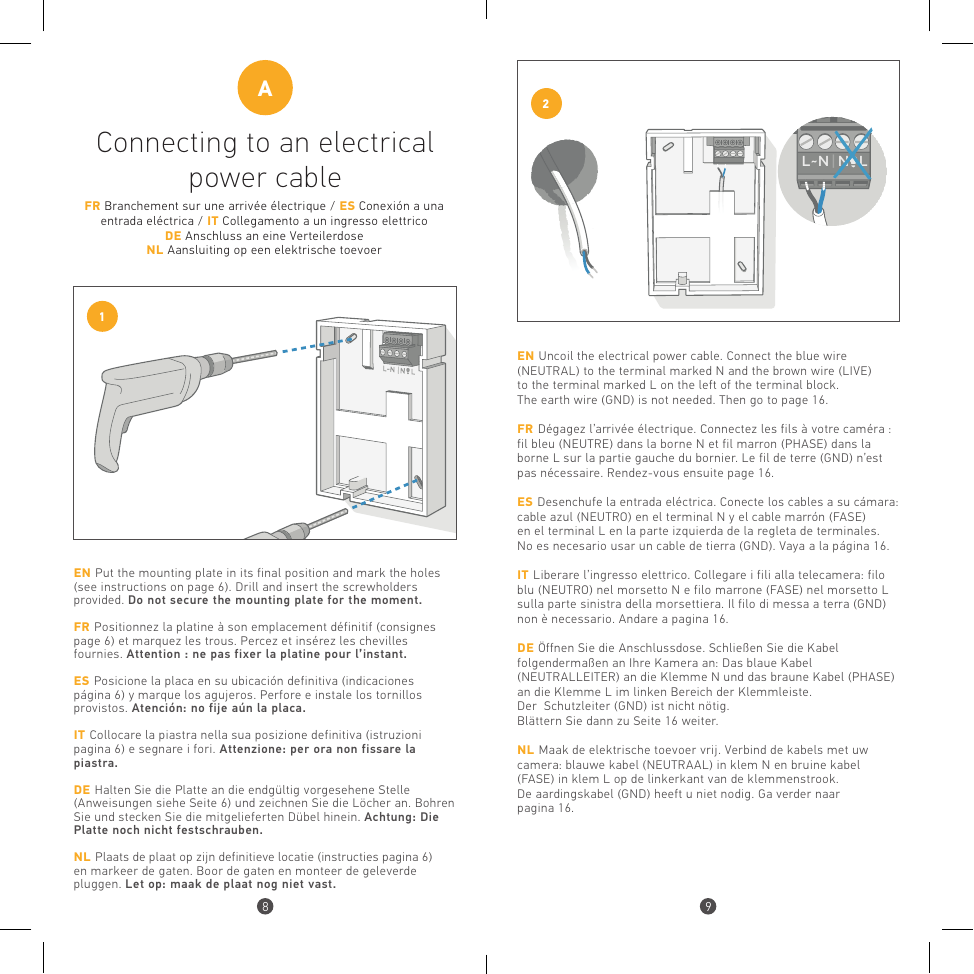
EN Put the mounting plate in its final position and mark the holes (see instructions on page 6). Drill and insert the screwholders provided. Do not secure the mounting plate for the moment.
FR Positionnez la platine à son emplacement définitif et marquez les trous. Percez et insérez les chevilles fournies. Attention : ne pas fixer la platine pour l'instant.
ES Posicione la placa en su ubicación definitiva y marque los agujeros. Perfore e instale los tornillos provistos. Atención: no fije aún la placa.
IT Collocare la piastra nella sua posizione definitiva e segnare i fori. Attenzione: per ora non fissare la piastra.
DE Halten Sie die Platte an die endgültig vorgesehene Stelle und zeichnen Sie die Löcher an. Bohren Sie und stecken Sie die mitgelieferten Dübel hinein. Achtung: Die Platte noch nicht festschrauben.
NL Plaats de plaat op zijn definitieve locatie en markeer de gaten. Boor de gaten en monteer de geleverde pluggen. Let op: maak de plaat nog niet vast.
Étape 2
EN Uncoil the electrical power cable. Connect the blue wire (NEUTRAL) to the terminal marked N and the brown wire (LIVE) to the terminal marked L on the left of the terminal block. The earth wire (GND) is not needed. Then go to page 16.
FR Dégagez l'arrivée électrique. Connectez les fils à votre caméra : fil bleu (NEUTRE) dans la borne N et fil marron (PHASE) dans la borne L sur la partie gauche du bornier. Le fil de terre (GND) n'est pas nécessaire.
ES Desenchufe la entrada eléctrica. Conecte los cables: cable azul (NEUTRO) en el terminal N y cable marrón (FASE) en el terminal L en la parte izquierda de la regleta. No es necesario usar un cable de tierra (GND).
IT Liberare l'ingresso elettrico. Collegare i fili: filo blu (NEUTRO) nel morsetto N e filo marrone (FASE) nel morsetto L sulla parte sinistra della morsettiera. Il filo di messa a terra (GND) non è necessario.
DE Öffnen Sie die Anschlussdose. Schließen Sie das blaue Kabel (NEUTRALLEITER) an die Klemme N und das braune Kabel (PHASE) an die Klemme L im linken Bereich der Klemmleiste. Der Schutzleiter (GND) ist nicht nötig.
NL Maak de elektrische toevoer vrij. Verbind de blauwe kabel (NEUTRAAL) in klem N en de bruine kabel (FASE) in klem L op de linkerkant van de klemmenstrook. De aardingskabel (GND) heeft u niet nodig.
B — Connecting to an existing light fixture
FR Raccordement à un éclairage existant / ES Conexión a un punto de luz existente / IT Collegamento a un'illuminazione esistente / DE Anschluss an eine vorhandene Beleuchtung / NL Aansluiting op een bestaand lichtpunt

Étape 1
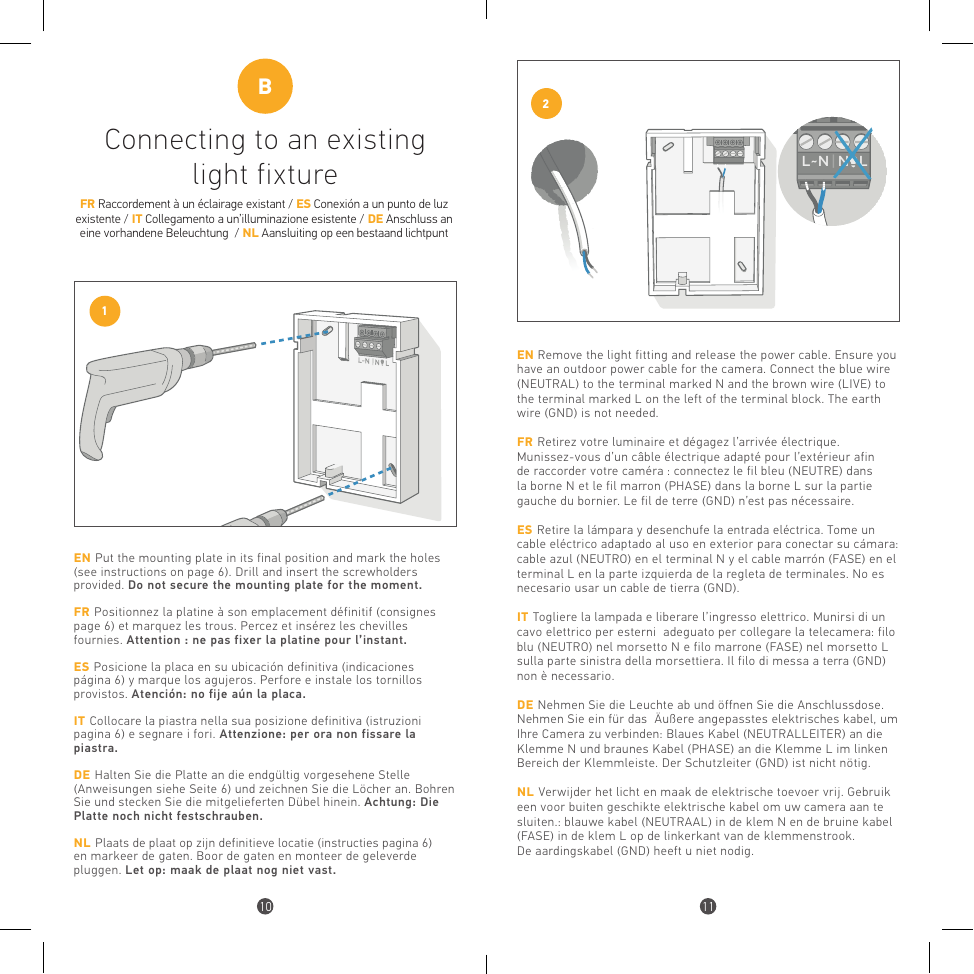
EN Put the mounting plate in its final position and mark the holes. Drill and insert the screwholders provided. Do not secure the mounting plate for the moment.
FR Positionnez la platine à son emplacement définitif et marquez les trous. Percez et insérez les chevilles fournies. Attention : ne pas fixer la platine pour l'instant.
ES Posicione la placa en su ubicación definitiva y marque los agujeros. Perfore e instale los tornillos provistos. Atención: no fije aún la placa.
IT Collocare la piastra nella sua posizione definitiva e segnare i fori. Attenzione: per ora non fissare la piastra.
DE Halten Sie die Platte an die endgültig vorgesehene Stelle und zeichnen Sie die Löcher an. Bohren Sie und stecken Sie die mitgelieferten Dübel hinein. Achtung: Die Platte noch nicht festschrauben.
NL Plaats de plaat op zijn definitieve locatie en markeer de gaten. Boor de gaten en monteer de geleverde pluggen. Let op: maak de plaat nog niet vast.
Étape 2
EN Remove the light fitting and release the power cable. Ensure you have an outdoor power cable for the camera. Connect the blue wire (NEUTRAL) to the terminal marked N and the brown wire (LIVE) to the terminal marked L on the left of the terminal block. The earth wire (GND) is not needed.
FR Retirez votre luminaire et dégagez l'arrivée électrique. Munissez-vous d'un câble électrique adapté pour l'extérieur afin de raccorder votre caméra : fil bleu (NEUTRE) dans la borne N et fil marron (PHASE) dans la borne L sur la partie gauche du bornier. Le fil de terre (GND) n'est pas nécessaire.
ES Retire la lámpara y desenchufe la entrada eléctrica. Tome un cable eléctrico adaptado al uso en exterior: cable azul (NEUTRO) en el terminal N y cable marrón (FASE) en el terminal L en la parte izquierda de la regleta. No es necesario usar un cable de tierra (GND).
IT Togliere la lampada e liberare l'ingresso elettrico. Munirsi di un cavo elettrico per esterni: filo blu (NEUTRO) nel morsetto N e filo marrone (FASE) nel morsetto L sulla parte sinistra della morsettiera. Il filo di messa a terra (GND) non è necessario.
DE Nehmen Sie die Leuchte ab und öffnen Sie die Anschlussdose. Nehmen Sie ein für den Außenbereich geeignetes Kabel: blaues Kabel (NEUTRALLEITER) an die Klemme N und braunes Kabel (PHASE) an die Klemme L im linken Bereich der Klemmleiste. Der Schutzleiter (GND) ist nicht nötig.
NL Verwijder het licht en maak de elektrische toevoer vrij. Gebruik een voor buiten geschikte elektrische kabel: blauwe kabel (NEUTRAAL) in klem N en bruine kabel (FASE) in klem L op de linkerkant van de klemmenstrook. De aardingskabel (GND) heeft u niet nodig.
Étape 3
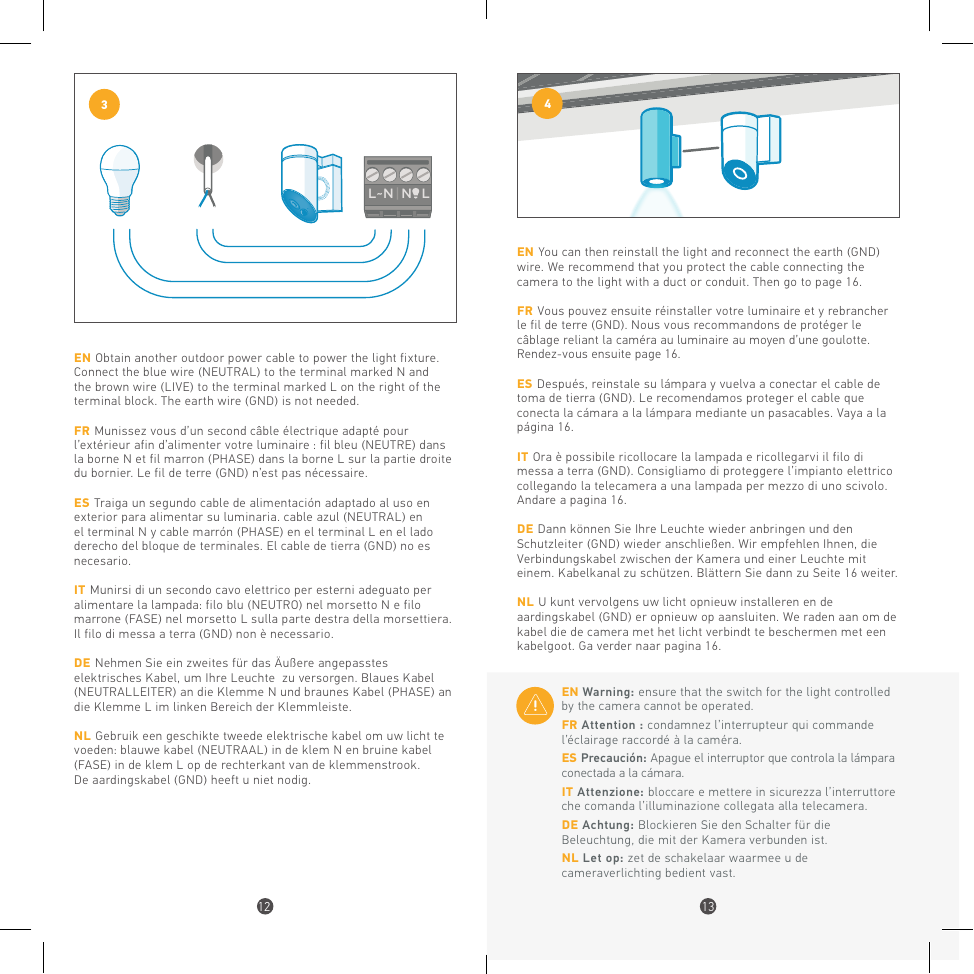
EN Obtain another outdoor power cable to power the light fixture. Connect the blue wire (NEUTRAL) to the terminal marked N and the brown wire (LIVE) to the terminal marked L on the right of the terminal block. The earth wire (GND) is not needed.
FR Munissez-vous d'un second câble électrique adapté pour l'extérieur afin d'alimenter votre luminaire : fil bleu (NEUTRE) dans la borne N et fil marron (PHASE) dans la borne L sur la partie droite du bornier. Le fil de terre (GND) n'est pas nécessaire.
ES Traiga un segundo cable de alimentación adaptado al exterior para alimentar su luminaria: cable azul (NEUTRO) en el terminal N y cable marrón (FASE) en el terminal L en el lado derecho del bloque de terminales. El cable de tierra (GND) no es necesario.
IT Munirsi di un secondo cavo elettrico per esterni per alimentare la lampada: filo blu (NEUTRO) nel morsetto N e filo marrone (FASE) nel morsetto L sulla parte destra della morsettiera. Il filo di messa a terra (GND) non è necessario.
DE Nehmen Sie ein zweites für den Außenbereich geeignetes Kabel, um Ihre Leuchte zu versorgen: blaues Kabel (NEUTRALLEITER) an die Klemme N und braunes Kabel (PHASE) an die Klemme L im rechten Bereich der Klemmleiste.
NL Gebruik een geschikte tweede elektrische kabel om uw licht te voeden: blauwe kabel (NEUTRAAL) in klem N en bruine kabel (FASE) in klem L op de rechterkant van de klemmenstrook. De aardingskabel (GND) heeft u niet nodig.
Étape 4
EN You can then reinstall the light and reconnect the earth (GND) wire. We recommend that you protect the cable connecting the camera to the light with a duct or conduit. Then go to page 16.
FR Vous pouvez ensuite réinstaller votre luminaire et y rebrancher le fil de terre (GND). Nous vous recommandons de protéger le câblage reliant la caméra au luminaire au moyen d'une goulotte.
ES Después, reinstale su lámpara y vuelva a conectar el cable de toma de tierra (GND). Le recomendamos proteger el cable que conecta la cámara a la lámpara mediante un pasacables.
IT Ora è possibile ricollocare la lampada e ricollegarvi il filo di messa a terra (GND). Consigliamo di proteggere l'impianto elettrico per mezzo di una canalina.
DE Dann können Sie Ihre Leuchte wieder anbringen und den Schutzleiter (GND) wieder anschließen. Wir empfehlen, das Verbindungskabel zwischen Kamera und Leuchte mit einem Kabelkanal zu schützen.
NL U kunt vervolgens uw licht opnieuw installeren en de aardingskabel (GND) er opnieuw op aansluiten. We raden aan om de kabel met een kabelgoot te beschermen.
EN Warning: ensure that the switch for the light controlled by the camera cannot be operated.
FR Attention : condamnez l'interrupteur qui commande l'éclairage raccordé à la caméra.
ES Precaución: Apague el interruptor que controla la lámpara conectada a la cámara.
IT Attenzione: bloccare e mettere in sicurezza l'interruttore che comanda l'illuminazione collegata alla telecamera.
DE Achtung: Blockieren Sie den Schalter für die Beleuchtung, die mit der Kamera verbunden ist.
NL Let op: zet de schakelaar waarmee u de cameraverlichting bedient vast.
C — Connecting to an electrical power socket
FR Branchement sur une prise électrique / ES Conexión a una toma eléctrica / IT Collegamento a una presa elettrica / DE Anschluss an eine Steckdose / NL Aansluiting op een elektrisch stopcontact
Étape 1
EN Choose a close and accessible power socket. Put the mounting plate in its final position and mark the holes. Drill and insert the screwholders provided. Do not secure the mounting plate for the moment.
FR Choisissez une prise électrique proche et accessible. Positionnez la platine à son emplacement définitif et marquez les trous. Percez et insérez les chevilles fournies. Attention : ne pas fixer la platine pour l'instant.
ES Escoja una toma eléctrica cercana y accesible. Posicione la placa en su ubicación definitiva y marque los agujeros. Perfore e instale los tornillos provistos. Atención: no fije aún la placa.
IT Scegliere una presa elettrica vicina ed accessibile. Collocare la piastra nella sua posizione definitiva e segnare i fori. Attenzione: per ora non fissare la piastra.
DE Wählen Sie eine nahe und zugängliche Steckdose. Halten Sie die Platte an die endgültig vorgesehene Stelle und zeichnen Sie die Löcher an. Bohren Sie und stecken Sie die mitgelieferten Dübel hinein. Achtung: Die Platte noch nicht festschrauben.
NL Kies een nabij en toegankelijk stopcontact. Plaats de plaat op zijn definitieve locatie en markeer de gaten. Boor de gaten en monteer de geleverde pluggen. Let op: maak de plaat nog niet vast.
Étape 2
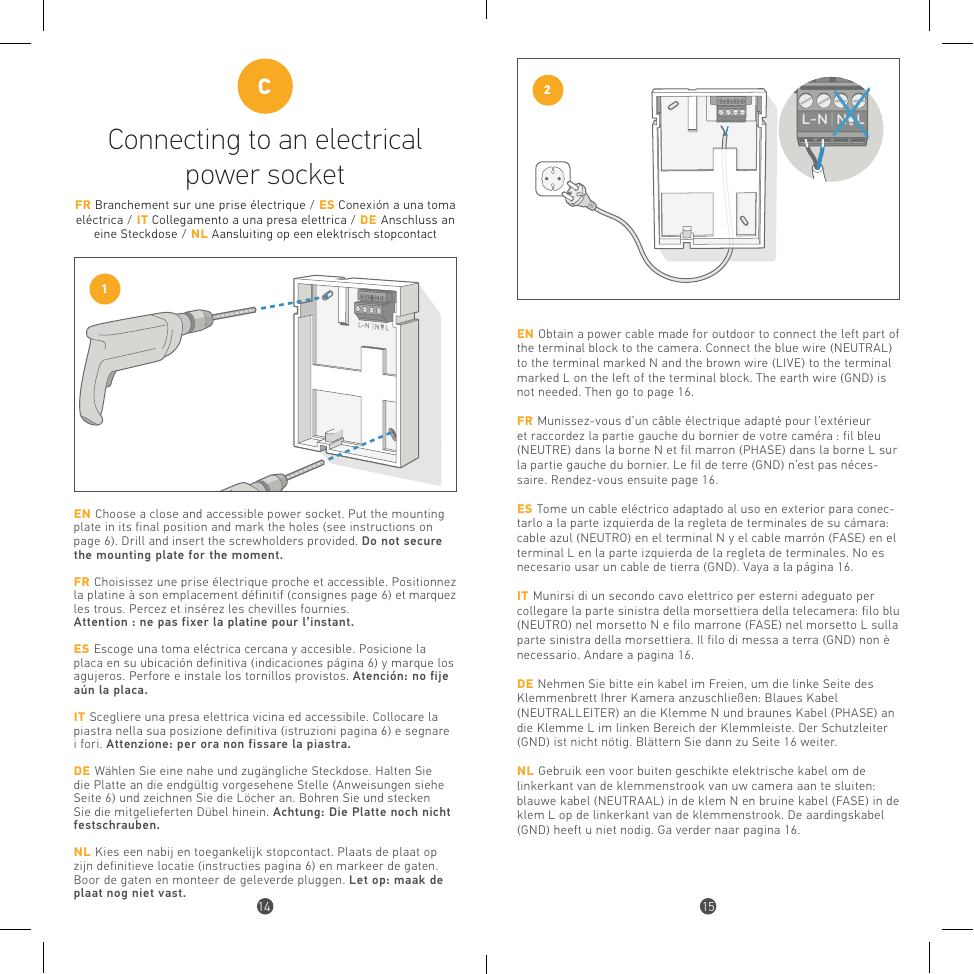
EN Obtain a power cable made for outdoor to connect the left part of the terminal block to the camera. Connect the blue wire (NEUTRAL) to the terminal marked N and the brown wire (LIVE) to the terminal marked L on the left of the terminal block. The earth wire (GND) is not needed. Then go to page 16.
FR Munissez-vous d'un câble électrique adapté pour l'extérieur et raccordez la partie gauche du bornier de votre caméra : fil bleu (NEUTRE) dans la borne N et fil marron (PHASE) dans la borne L sur la partie gauche du bornier. Le fil de terre (GND) n'est pas nécessaire.
ES Tome un cable eléctrico adaptado al exterior para conectarlo a la parte izquierda de la regleta: cable azul (NEUTRO) en el terminal N y cable marrón (FASE) en el terminal L. No es necesario usar un cable de tierra (GND).
IT Munirsi di un cavo elettrico per esterni per collegare la parte sinistra della morsettiera: filo blu (NEUTRO) nel morsetto N e filo marrone (FASE) nel morsetto L. Il filo di messa a terra (GND) non è necessario.
DE Nehmen Sie ein für den Außenbereich geeignetes Kabel, um die linke Seite der Klemmleiste anzuschließen: blaues Kabel (NEUTRALLEITER) an die Klemme N und braunes Kabel (PHASE) an die Klemme L. Der Schutzleiter (GND) ist nicht nötig.
NL Gebruik een voor buiten geschikte elektrische kabel om de linkerkant van de klemmenstrook aan te sluiten: blauwe kabel (NEUTRAAL) in klem N en bruine kabel (FASE) in klem L. De aardingskabel (GND) heeft u niet nodig.
Securing the Camera
FR Fixer la caméra / ES Fije la cámara / IT Fissare la telecamera / DE Befestigen der Kamera / NL De camera bevestigen
EN 1. Secure the wall plate to the wall with the screws provided. 2. Clip the camera to the wall plate. Secure it with the security screw. 3. When using a power cable, do not rest any object on its surface, and lay it away from areas where people pass through.
FR 1. Fixez la platine au mur en utilisant les vis fournies. 2. Clipsez la caméra sur la platine. Sécurisez-la avec la vis de sécurité. 3. Dans le cadre d'un branchement avec câble, veillez à ne rien poser dessus et à le positionner en dehors de tout passage.
ES 1. Fije la placa a la pared con los tornillos provistos. 2. Fije la cámara a la placa. Sujétela con el tornillo de seguridad. 3. Tratándose de una conexión eléctrica, no coloque ningún objeto encima del cable y no lo instale en zonas de paso.
IT 1. Fissare la piastra al muro utilizzando le viti fornite. 2. Agganciare la telecamera sulla piastra. Proteggerla con la vite di sicurezza. 3. Nel caso di un collegamento con cavo, non mettere niente sopra e posizionarlo lontano da ogni passaggio.
DE 1. Schrauben Sie die Platte mithilfe der mitgelieferten Schrauben an die Wand. 2. Befestigen Sie die Kamera mit der Clip-Halterung an der Platte und sichern Sie sie mit der Sicherungsschraube. 3. Bei einem Kabelanschluss achten Sie darauf, nichts darauf zu stellen und es außerhalb jeden Durchgangs zu positionieren.
NL 1. Maak de bevestigingsplaat vast aan de muur met de geleverde schroeven. 2. Klik de camera vast op de plaat. Maak ze vast met de veiligheidsschroeven. 3. Zorg bij het installeren met een kabel ervoor dat deze uit de buurt ligt van doorgangen en er niets op wordt geplaatst.
Finalising the Installation
FR Finalisation de l'installation / ES Conclusión de la instalación / IT Finalizzazione dell'installazione / DE Abschluss der Installation / NL De installatie voltooien
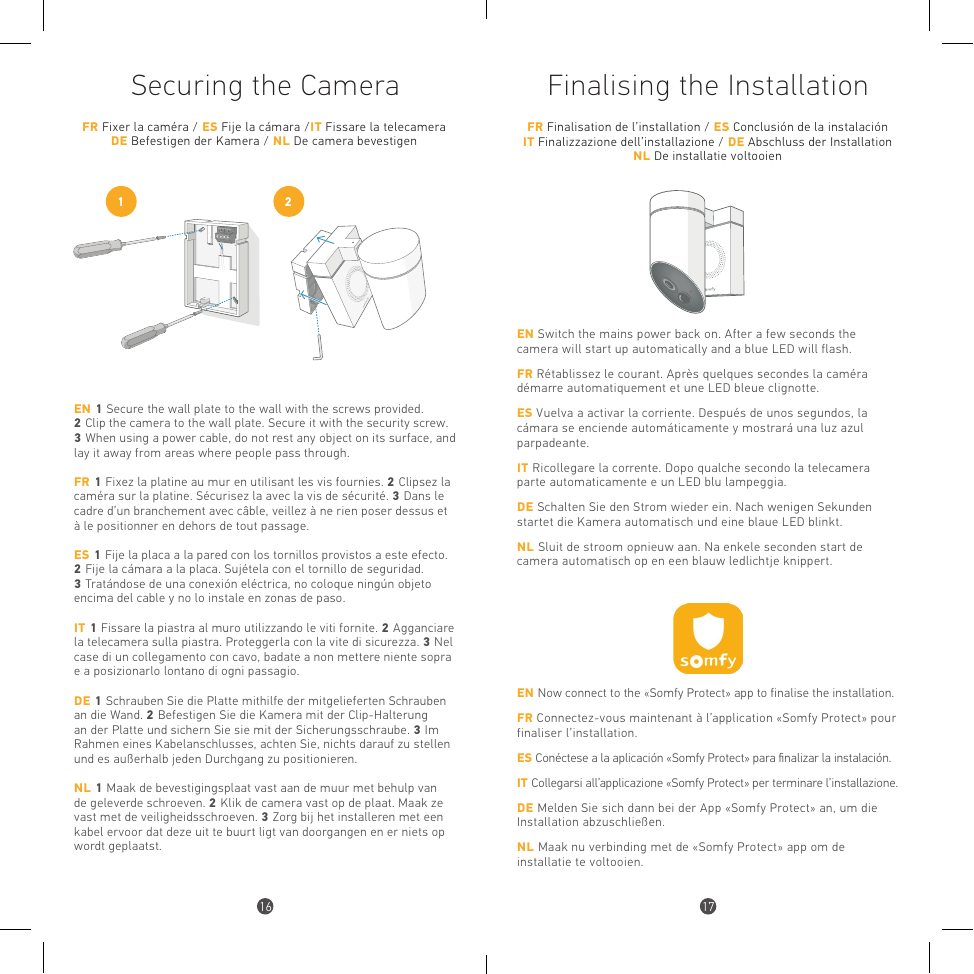
EN Switch the mains power back on. After a few seconds the camera will start up automatically and a blue LED will flash.
FR Rétablissez le courant. Après quelques secondes la caméra démarre automatiquement et une LED bleue clignote.
ES Vuelva a activar la corriente. Después de unos segundos, la cámara se enciende automáticamente y mostrará una luz azul parpadeante.
IT Ricollegare la corrente. Dopo qualche secondo la telecamera parte automaticamente e un LED blu lampeggia.
DE Schalten Sie den Strom wieder ein. Nach wenigen Sekunden startet die Kamera automatisch und eine blaue LED blinkt.
NL Sluit de stroom opnieuw aan. Na enkele seconden start de camera automatisch op en een blauw ledlichtje knippert.
EN Now connect to the «Somfy Protect» app to finalise the installation. FR Connectez-vous maintenant à l'application «Somfy Protect» pour finaliser l'installation. ES Conéctese a la aplicación «Somfy Protect» para finalizar la instalación. IT Collegarsi all'applicazione «Somfy Protect» per terminare l'installazione. DE Melden Sie sich dann bei der App «Somfy Protect» an, um die Installation abzuschließen. NL Maak nu verbinding met de «Somfy Protect» app om de installatie te voltooien.
Technical Information
FR Informations techniques / ES Informaciones técnicas / IT Specifiche tecniche / DE Technische Informationen / NL Technische informatie
| Video / Vidéo | Full HD video sensor 1080p / 30 fps | Wide angle 130° (diagonal) | Night vision (8 m) with mechanical infrared filter | Digital zoom x8 | Somfy-Vision™ motion detection (up to 8 m) |
|---|---|
| Connectivity / Connectivité | Wi-Fi 802.11 b/g/n (2.4 GHz) (e.r.p < 100 mW) | Open / WPA2-Personal / WPA-WPA2 mixed mode | 500 Kbps (HD) or 1200 Kbps (Full HD) upload recommended | Bluetooth 4.0 (e.r.p < 2.5 mW) |
| Audio | Built-in speaker and microphone | Siren 110 dB |
| Power Supply / Alimentation | 110-230 V AC, 50-60 Hz, 4.8 A Max | Protected by a 10 A or 16 A circuit breaker | Powered by electric cables of at least 1.5 mm2 | Max power supported lighting: 500 W (Halogen) or 100 W (LED) |
| Size / Weight | 150 × 150 × 85 mm / 512 g |
| Operating temperature | from -20 °C to 50 °C | IP54 weather resistant |
| Secure connection | Video feed secured with SSL/TLS 2048-bit encryption and cloud storage with AES-256 encryption |
To go further
EN Go further with Somfy Protect Home Security Solutions — FR Allez plus loin avec les solutions de sécurité Somfy Protect — ES Ir más lejos con las soluciones de seguridad Somfy Protect — IT Vai oltre con le soluzioni di sicurezza Somfy Protect — DE Mit den Sicherheitslösungen von Somfy Protect weiter gehen — NL Verder met de beveiligingsoplossingen van Somfy Protect
Need help?
FR Besoin d'aide ? / ES ¿Necesita ayuda? / IT Serve aiuto? / DE Benötigen Sie Hilfe? / NL Hulp nodig?
Support & FAQs : www.somfyprotect.com/support