Notice Micro-module SOMFY On/Off IZYMO io-homecontrol
Produit concerné

IZYMO ON-OFF RECEIVER io — F/CE/NE/SE
Réf. : 1822649A
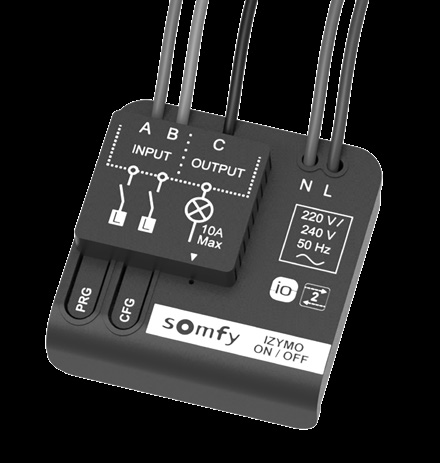
Français — Récepteur ON-OFF IZYMO io
Introduction
Le micromodule IZYMO ON-OFF RECEIVER io est un récepteur radio qui permet de piloter tout type de lumières ou de charges en on/off. Il se pilote à partir d’émetteurs radio io-homecontrol et/ou d’interrupteur(s) à bascule ou de bouton(s) poussoir.
Généralités
Lire attentivement cette notice d’installation et les consignes de sécurité avant de commencer l’installation de ce produit Somfy. Suivre précisément chacune des instructions données et conserver cette notice aussi longtemps que le produit. Avant toute installation, vérifier la compatibilité de ce produit Somfy avec les équipements et accessoires associés.
Cette notice décrit l’installation et l’utilisation de ce produit. Toute installation ou utilisation hors du domaine d’application défini par Somfy est non conforme. Elle entraînerait, comme tout irrespect des instructions figurant dans cette notice, l’exclusion de la responsabilité et de la garantie Somfy.
Somfy ne peut être tenu responsable des changements de normes et standards intervenus après la publication de cette notice.
Consignes générales de sécurité
Ce produit n’est pas prévu pour être utilisé par des personnes (y compris les enfants) dont les capacités physiques, sensorielles ou mentales sont réduites, ou des personnes dénuées d’expérience ou de connaissance, sauf si elles ont pu bénéficier, par l’intermédiaire d’une personne responsable de leur sécurité, d’une surveillance ou d’instructions préalables concernant l’utilisation de ce produit.
Ne pas exposer le produit à des chocs ou des chutes, à des matières inflammables ou à une source de chaleur, à l’humidité, à des projections de liquide, ne pas l’immerger. Ne pas tenter de le réparer.
Conditions d’utilisation
Ne pas utiliser ce produit à l’extérieur. La portée radio est limitée par les normes de régulation des appareils radio. La portée du IZYMO ON-OFF RECEIVER io dépend fortement de l’environnement d’usage : perturbations possibles par gros appareillage électrique à proximité de l’installation, type de matériau utilisé dans les murs et cloisons du site (surfaces métalliques, etc.). L’utilisation d’appareils radio (par exemple un casque radio hifi) utilisant la même fréquence radio peut réduire les performances du produit.
Conformité
Par la présente Somfy déclare que l’équipement radio couvert par ces instructions est conforme aux exigences de la Directive Radio 2014/53/UE et aux autres exigences essentielles des Directives Européennes applicables. Le texte complet de la déclaration UE de conformité est disponible sur www.somfy.com/ce.
Nous nous soucions de notre environnement. Ne jetez pas l’appareil avec les ordures ménagères. Donnez-le à un point de collecte approuvé pour le recyclage.
Garantie
Ce produit est garanti 5 ans à compter de sa date d’achat.
Compatibilité
Charges
| Type | Puissance |
|---|---|
| LED 220-240V AC | Max. 150W |
| Fluocompacte | Max. 150W |
| Halogène ou Résistive* | Max. 2000W |
| Transformateur électronique ou ferromagnétique | Max. 500W |
* exemples de charges : chauffe-eau, radiateur électrique…
Appareillages (types d’interrupteur)
- Tout bouton poussoir (un ou plusieurs en parallèle sur l’entrée INPUT A)
- Tout interrupteur à bascule (un ou deux sur chacune des entrées INPUT A et B)
- Sans appareillage. Le pilotage s’effectue alors uniquement par un ou plusieurs émetteurs io.
Émetteurs io-homecontrol
- IZYMO TRANSMITTER io
- Smoove Lighting io
- TaHoma
- Connexoon io
- Box Energeasyconnect (Rexel)
- Télécommandes io-homecontrol
Description
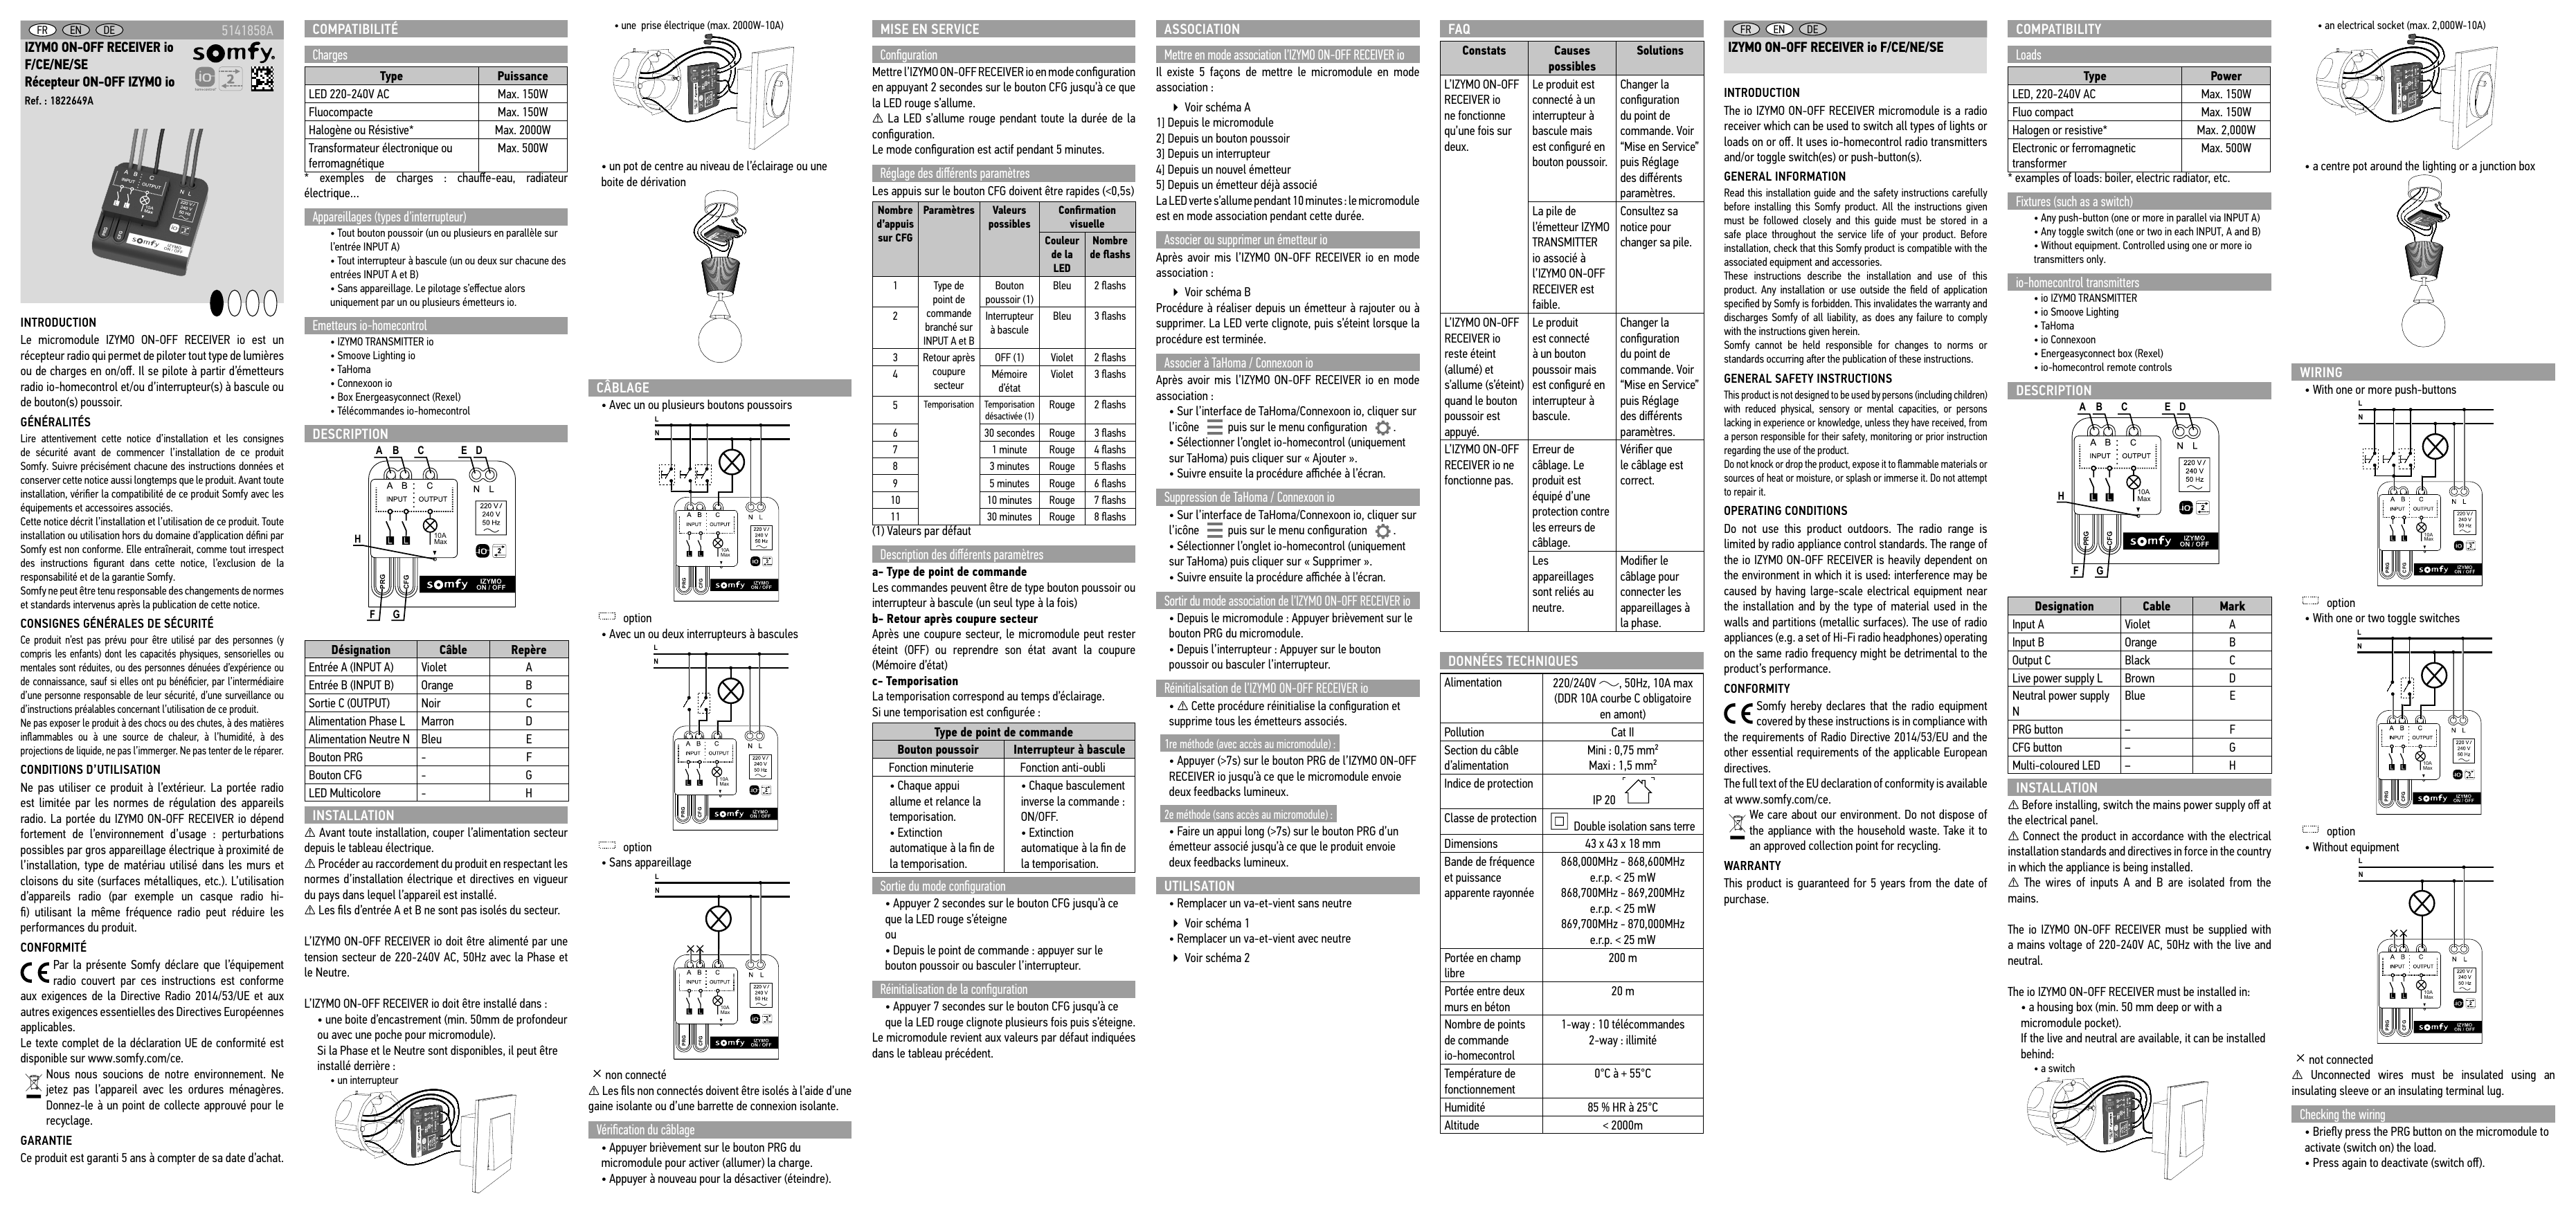
| Désignation | Câble | Repère |
|---|---|---|
| Entrée A (INPUT A) | Violet | A |
| Entrée B (INPUT B) | Orange | B |
| Sortie C (OUTPUT) | Noir | C |
| Alimentation Phase L | Marron | D |
| Alimentation Neutre N | Bleu | E |
| Bouton PRG | – | F |
| Bouton CFG | – | G |
| LED Multicolore | – | H |
Installation
Avant toute installation, couper l’alimentation secteur depuis le tableau électrique.
Procéder au raccordement du produit en respectant les normes d’installation électrique et directives en vigueur du pays dans lequel l’appareil est installé.
Les fils d’entrée A et B ne sont pas isolés du secteur.
L’IZYMO ON-OFF RECEIVER io doit être alimenté par une tension secteur de 220-240V AC, 50Hz avec la Phase et le Neutre.
L’IZYMO ON-OFF RECEIVER io doit être installé dans :
- une boite d’encastrement (min. 50mm de profondeur ou avec une poche pour micromodule).
Si la Phase et le Neutre sont disponibles, il peut être installé derrière :
- un interrupteur
- une prise électrique (max. 2000W-10A)
- un pot de centre au niveau de l’éclairage ou une boite de dérivation
Câblage
- Avec un ou plusieurs boutons poussoirs
- Avec un ou deux interrupteurs à bascules
- Sans appareillage
Les fils non connectés doivent être isolés à l’aide d’une gaine isolante ou d’une barrette de connexion isolante.
Vérification du câblage
- Appuyer brièvement sur le bouton PRG du micromodule pour activer (allumer) la charge.
- Appuyer à nouveau pour la désactiver (éteindre).
Mise en service
Configuration
Mettre l’IZYMO ON-OFF RECEIVER io en mode configuration en appuyant 2 secondes sur le bouton CFG jusqu’à ce que la LED rouge s’allume.
La LED s’allume rouge pendant toute la durée de la configuration.
Le mode configuration est actif pendant 5 minutes.
Réglage des différents paramètres
Les appuis sur le bouton CFG doivent être rapides (<0,5s).
| Nombre d’appuis sur CFG | Paramètres | Valeurs possibles | Couleur de la LED | Nombre de flashs |
|---|---|---|---|---|
| 1 | Type de point de commande branché sur INPUT A et B | Bouton poussoir (1) | Bleu | 2 flashs |
| 2 | Interrupteur à bascule | Bleu | 3 flashs | |
| 3 | Retour après coupure secteur | OFF (1) | Violet | 2 flashs |
| 4 | Mémoire d’état | Violet | 3 flashs | |
| 5 | Temporisation | Temporisation désactivée (1) | Rouge | 2 flashs |
| 6 | 30 secondes | Rouge | 3 flashs | |
| 7 | 1 minute | Rouge | 4 flashs | |
| 8 | 3 minutes | Rouge | 5 flashs | |
| 9 | 5 minutes | Rouge | 6 flashs | |
| 10 | 10 minutes | Rouge | 7 flashs | |
| 11 | 30 minutes | Rouge | 8 flashs |
(1) Valeurs par défaut
Description des différents paramètres
a- Type de point de commande
Les commandes peuvent être de type bouton poussoir ou interrupteur à bascule (un seul type à la fois).
b- Retour après coupure secteur
Après une coupure secteur, le micromodule peut rester éteint (OFF) ou reprendre son état avant la coupure (Mémoire d’état).
c- Temporisation
La temporisation correspond au temps d’éclairage. Si une temporisation est configurée :
| Bouton poussoir — Fonction minuterie | Interrupteur à bascule — Fonction anti-oubli |
|---|---|
| Chaque appui allume et relance la temporisation. Extinction automatique à la fin de la temporisation. | Chaque basculement inverse la commande : ON/OFF. Extinction automatique à la fin de la temporisation. |
Sortie du mode configuration
- Appuyer 2 secondes sur le bouton CFG jusqu’à ce que la LED rouge s’éteigne, ou
- Depuis le point de commande : appuyer sur le bouton poussoir ou basculer l’interrupteur.
Réinitialisation de la configuration
Appuyer 7 secondes sur le bouton CFG jusqu’à ce que la LED rouge clignote plusieurs fois puis s’éteigne. Le micromodule revient aux valeurs par défaut indiquées dans le tableau précédent.
Association
Mettre en mode association l’IZYMO ON-OFF RECEIVER io
Il existe 5 façons de mettre le micromodule en mode association (voir schéma A) :
- Depuis le micromodule
- Depuis un bouton poussoir
- Depuis un interrupteur
- Depuis un nouvel émetteur
- Depuis un émetteur déjà associé
La LED verte s’allume pendant 10 minutes : le micromodule est en mode association pendant cette durée.
Associer ou supprimer un émetteur io
Après avoir mis l’IZYMO ON-OFF RECEIVER io en mode association (voir schéma B) : procédure à réaliser depuis un émetteur à rajouter ou à supprimer. La LED verte clignote, puis s’éteint lorsque la procédure est terminée.
Associer à TaHoma / Connexoon io
Après avoir mis l’IZYMO ON-OFF RECEIVER io en mode association :
- Sur l’interface de TaHoma/Connexoon io, cliquer sur l’icône puis sur le menu configuration.
- Sélectionner l’onglet io-homecontrol (uniquement sur TaHoma) puis cliquer sur « Ajouter ».
- Suivre ensuite la procédure affichée à l’écran.
Suppression de TaHoma / Connexoon io
- Sur l’interface de TaHoma/Connexoon io, cliquer sur l’icône puis sur le menu configuration.
- Sélectionner l’onglet io-homecontrol (uniquement sur TaHoma) puis cliquer sur « Supprimer ».
- Suivre ensuite la procédure affichée à l’écran.
Sortir du mode association de l’IZYMO ON-OFF RECEIVER io
- Depuis le micromodule : Appuyer brièvement sur le bouton PRG du micromodule.
- Depuis l’interrupteur : Appuyer sur le bouton poussoir ou basculer l’interrupteur.
Réinitialisation de l’IZYMO ON-OFF RECEIVER io
Cette procédure réinitialise la configuration et supprime tous les émetteurs associés.
1re méthode (avec accès au micromodule) : Appuyer (>7s) sur le bouton PRG de l’IZYMO ON-OFF RECEIVER io jusqu’à ce que le micromodule envoie deux feedbacks lumineux.
2e méthode (sans accès au micromodule) : Faire un appui long (>7s) sur le bouton PRG d’un émetteur associé jusqu’à ce que le produit envoie deux feedbacks lumineux.
Utilisation
- Remplacer un va-et-vient sans neutre (voir schéma 1)
- Remplacer un va-et-vient avec neutre (voir schéma 2)
FAQ
| Constats | Causes possibles | Solutions |
|---|---|---|
| L’IZYMO ON-OFF RECEIVER io ne fonctionne qu’une fois sur deux. | Le produit est connecté à un interrupteur à bascule mais est configuré en bouton poussoir. | Changer la configuration du point de commande. Voir « Mise en Service » puis Réglage des différents paramètres. |
| La pile de l’émetteur IZYMO TRANSMITTER io associé à l’IZYMO ON-OFF RECEIVER est faible. | Consultez sa notice pour changer sa pile. | |
| L’IZYMO ON-OFF RECEIVER io reste éteint (allumé) et s’allume (s’éteint) quand le bouton poussoir est appuyé. | Le produit est connecté à un bouton poussoir mais est configuré en interrupteur à bascule. | Changer la configuration du point de commande. Voir « Mise en Service » puis Réglage des différents paramètres. |
| L’IZYMO ON-OFF RECEIVER io ne fonctionne pas. | Erreur de câblage. Le produit est équipé d’une protection contre les erreurs de câblage. | Vérifier que le câblage est correct. |
| Les appareillages sont reliés au neutre. | Modifier le câblage pour connecter les appareillages à la phase. |
Données techniques
| Alimentation | 220/240V, 50Hz, 10A max (DDR 10A courbe C obligatoire en amont) |
|---|---|
| Pollution | Cat II |
| Section du câble d’alimentation | Mini : 0,75 mm² — Maxi : 1,5 mm² |
| Indice de protection | IP 20 |
| Classe de protection | Double isolation sans terre |
| Dimensions | 43 x 43 x 18 mm |
| Bande de fréquence et puissance apparente rayonnée | 868,000MHz - 868,600MHz e.r.p. < 25 mW ; 868,700MHz - 869,200MHz e.r.p. < 25 mW ; 869,700MHz - 870,000MHz e.r.p. < 25 mW |
| Portée en champ libre | 200 m |
| Portée entre deux murs en béton | 20 m |
| Nombre de points de commande io-homecontrol | 1-way : 10 télécommandes ; 2-way : illimité |
| Température de fonctionnement | 0°C à + 55°C |
| Humidité | 85 % HR à 25°C |
| Altitude | < 2000m |
English — IZYMO ON-OFF RECEIVER io F/CE/NE/SE
Introduction
The io IZYMO ON-OFF RECEIVER micromodule is a radio receiver which can be used to switch all types of lights or loads on or off. It uses io-homecontrol radio transmitters and/or toggle switch(es) or push-button(s).
General information
Read this installation guide and the safety instructions carefully before installing this Somfy product. All the instructions given must be followed closely and this guide must be stored in a safe place throughout the service life of your product. Before installation, check that this Somfy product is compatible with the associated equipment and accessories.
These instructions describe the installation and use of this product. Any installation or use outside the field of application specified by Somfy is forbidden. This invalidates the warranty and discharges Somfy of all liability, as does any failure to comply with the instructions given herein.
Somfy cannot be held responsible for changes to norms or standards occurring after the publication of these instructions.
General safety instructions
This product is not designed to be used by persons (including children) with reduced physical, sensory or mental capacities, or persons lacking in experience or knowledge, unless they have received, from a person responsible for their safety, monitoring or prior instruction regarding the use of the product.
Do not knock or drop the product, expose it to flammable materials or sources of heat or moisture, or splash or immerse it. Do not attempt to repair it.
Operating conditions
Do not use this product outdoors. The radio range is limited by radio appliance control standards. The range of the io IZYMO ON-OFF RECEIVER is heavily dependent on the environment in which it is used: interference may be caused by having large-scale electrical equipment near the installation and by the type of material used in the walls and partitions (metallic surfaces). The use of radio appliances (e.g. a set of Hi-Fi radio headphones) operating on the same radio frequency might be detrimental to the product’s performance.
Conformity
Somfy hereby declares that the radio equipment covered by these instructions is in compliance with the requirements of Radio Directive 2014/53/EU and the other essential requirements of the applicable European directives. The full text of the EU declaration of conformity is available at www.somfy.com/ce.
We care about our environment. Do not dispose of the appliance with the household waste. Take it to an approved collection point for recycling.
Warranty
This product is guaranteed for 5 years from the date of purchase.
Compatibility
Loads
| Type | Power |
|---|---|
| LED, 220-240V AC | Max. 150W |
| Fluo compact | Max. 150W |
| Halogen or resistive* | Max. 2,000W |
| Electronic or ferromagnetic transformer | Max. 500W |
* examples of loads: boiler, electric radiator, etc.
Fixtures (such as a switch)
- Any push-button (one or more in parallel via INPUT A)
- Any toggle switch (one or two in each INPUT, A and B)
- Without equipment. Controlled using one or more io transmitters only.
io-homecontrol transmitters
- io IZYMO TRANSMITTER
- io Smoove Lighting
- TaHoma
- io Connexoon
- Energeasyconnect box (Rexel)
- io-homecontrol remote controls
Description
| Designation | Cable | Mark |
|---|---|---|
| Input A | Violet | A |
| Input B | Orange | B |
| Output C | Black | C |
| Live power supply L | Brown | D |
| Neutral power supply N | Blue | E |
| PRG button | – | F |
| CFG button | – | G |
| Multi-coloured LED | – | H |
Installation
Before installing, switch the mains power supply off at the electrical panel.
Connect the product in accordance with the electrical installation standards and directives in force in the country in which the appliance is being installed.
The wires of inputs A and B are isolated from the mains.
The io IZYMO ON-OFF RECEIVER must be supplied with a mains voltage of 220-240V AC, 50Hz with the live and neutral.
The io IZYMO ON-OFF RECEIVER must be installed in:
- a housing box (min. 50 mm deep or with a micromodule pocket).
If the live and neutral are available, it can be installed behind:
- a switch
- an electrical socket (max. 2,000W-10A)
- a centre pot around the lighting or a junction box
Wiring
- With one or more push-buttons
- With one or two toggle switches
- Without equipment
Unconnected wires must be insulated using an insulating sleeve or an insulating terminal lug.
Checking the wiring
- Briefly press the PRG button on the micromodule to activate (switch on) the load.
- Press again to deactivate (switch off).
Set-up
Configuration
Switch the io IZYMO ON-OFF RECEIVER to configuration mode by pressing the CFG button for 2 seconds until the red LED comes on.
The red LED is lit during the entire configuration process.
Configuration mode is active for 5 minutes.
Adjusting the different settings
The CFG button must be pressed very briefly (<0.5 s).
| Number of times CFG is pressed | Parameters | Possible values | Colour of the LED | Number of flashes |
|---|---|---|---|---|
| 1 | Type of control point connected to INPUT A and B | Push-button (1) | Blue | 2 flashes |
| 2 | Toggle switch | Blue | 3 flashes | |
| 3 | Return after power cut | OFF (1) | Purple | 2 flashes |
| 4 | Status memory | Purple | 3 flashes | |
| 5 | Timeout | Timeout deactivated (1) | Red | 2 flashes |
| 6 | 30 seconds | Red | 3 flashes | |
| 7 | 1 minute | Red | 4 flashes | |
| 8 | 3 minutes | Red | 5 flashes | |
| 9 | 5 minutes | Red | 6 flashes | |
| 10 | 10 minutes | Red | 7 flashes | |
| 11 | 30 minutes | Red | 8 flashes |
(1) Default values
Description of the different settings
a- Type of control point
The controls can be push-buttons or toggle switches (one single type at a time).
b- Return after power cut
After a power cut, the micromodule may remain deactivated (OFF) or return to the same status as before the cut (status memory).
c- Timeout
The timeout corresponds to the lighting time. If a timeout is configured:
| Push-button — Timer function | Toggle switch — Oversight function |
|---|---|
| Every time it is pressed, the timeout is activated and reset. Automatic switch off after the timeout. | Each changeover reverses the command: ON/OFF. Automatic switch off after the timeout. |
Exit from configuration mode
- Press the CFG button for 2 seconds until the red LED button goes out, or
- From the control point: press the push-button or flick the toggle switch.
Reinitialising the configuration
Press the CFG button for 7 seconds until the red LED button flashes several times then goes out. The micromodule returns to the default values indicated in the previous table.
Pairing
Switch the io IZYMO ON-OFF RECEIVER to pairing mode
There are 5 ways to switch the micromodule to pairing mode (see diagram A):
- Via the micromodule
- Via a push-button
- Via a switch
- Via a new transmitter
- Via a transmitter already paired
The green LED is lit for 10 minutes: the micromodule is in pairing mode for this entire period.
Pairing or deleting an io transmitter
After having switched the io IZYMO ON-OFF RECEIVER to pairing mode (see diagram B): Procedure to be carried out via a transmitter to be added or deleted. The green LED flashes then goes out when the procedure is complete.
Pairing with TaHoma / io Connexoon
- Click on the icon on the TaHoma/io Connexoon io interface then on the configuration menu.
- Select the io-homecontrol tab (on TaHoma only) then click on “Add”.
- Then follow the procedure shown on the screen.
Deleting from TaHoma / io Connexoon
- Click on the icon on the TaHoma/io Connexoon io interface then on the configuration menu.
- Select the io-homecontrol tab (on TaHoma only) then click on “Delete”.
- Then follow the procedure shown on the screen.
Exit the io IZYMO ON-OFF RECEIVER pairing mode
- Via the micromodule: Briefly press the PRG button on the micromodule.
- Via the switch: press the push-button or flick the toggle switch.
Reinitialising the io IZYMO ON-OFF RECEIVER
This procedure reinitialises the configuration and deletes all the paired transmitters.
1st method (with access to the micromodule): Press (>7s) the PRG button on the io IZYMO ON-OFF RECEIVER until the micromodule sends two luminous feedbacks.
2nd method (without access to the micromodule): Press the PRG button of a paired transmitter for a long time (>7s) until the product sends two luminous feedbacks.
Operation
- Replacing a toggle switch with no neutral (see diagram 1)
- Replacing a toggle switch with neutral (see diagram 2)
FAQ
| Observations | Possible causes | Solutions |
|---|---|---|
| The io IZYMO ON-OFF RECEIVER only works every other time. | The product is connected to a toggle switch but is configured for a push-button. | Change the control point configuration. See “Commissioning” then adjust the different settings. |
| The battery in the io IZYMO TRANSMITTER paired with the io IZYMO ON-OFF RECEIVER is low. | Consult the instructions to change the battery. | |
| The io IZYMO ON-OFF RECEIVER stays out (on) and comes on (goes out) when the push-button is activated. | The product is connected to a push-button but is configured for a toggle switch. | Change the control point configuration. See “Commissioning” then adjust the different settings. |
| The io IZYMO ON-OFF RECEIVER does not work. | Wiring error. The product is fitted with a protection against wiring errors. | Check that the wiring is correct. |
| The equipment is connected to the neutral. | Change the wiring to connect the equipment to the live. |
Technical data
| Power supply | 220/240V, 50Hz, 10A max (DDR 10A curve C mandatory upstream) |
|---|---|
| Pollution | Cat II |
| Power supply cable section | Min: 0.75 mm² — Max: 1.5 mm² |
| Degree of protection | IP 20 |
| Protection class | Double insulation with no earth |
| Dimensions | 43 x 43 x 18 mm |
| Frequency range and effective radiated power | 868.000MHz - 868.600MHz e.r.p. < 25 mW ; 868.700MHz - 869.200MHz e.r.p. < 25 mW ; 869.700MHz - 870.000MHz e.r.p. < 25 mW |
| Range in open space | 200 m |
| Range between two concrete walls | 20 m |
| Number of io-homecontrol control points | 1-way: 10 remote control devices ; 2-way: Unlimited |
| Operating temperature | 0°C to + 55°C |
| Humidity | 85% HR at 25°C |
| Altitude | < 2,000 m |
Deutsch — IZYMO ON-OFF RECEIVER io F/CE/NE/SE — UP-Empfänger Licht An/Aus io
Einleitung
Das Mikromodul IZYMO ON-OFF RECEIVER io ist ein Funkempfänger, der die Ansteuerung von Beleuchtung und die Ein-/Ausschaltung von Lastgeräten erlaubt. Die Bedienung erfolgt über io-homecontrol-Funksender und/oder Kipp- bzw. Taster.
Allgemeines
Lesen Sie diese Installationsanleitung und die Sicherheitshinweise aufmerksam durch, bevor Sie mit der Installation dieses Somfy Produkts beginnen. Befolgen Sie alle Anweisungen dieser Anleitung und bewahren Sie diese auf, solange Ihr Produkt in Betrieb ist. Überprüfen Sie vor der Montage, ob dieses Somfy-Produkt mit den dazugehörigen Ausrüstungs- und Zubehörteilen kompatibel ist.
Die Anleitung beschreibt die Montage und Benutzung dieses Produkts. Für Schäden und Mängel, die durch nicht bestimmungsgemäße Anwendung oder Nichtbeachten dieser Anleitung entstehen, ist die Haftung von Somfy ausgeschlossen.
Somfy kann für Norm- und Standardänderungen, die nach Veröffentlichung dieser Anleitung vorgenommen wurden, nicht zur Verantwortung gezogen werden.
Allgemeine Sicherheitshinweise
Achtung! Die elektrische Installation darf nur durch eine zugelassene Elektrofachkraft (nach DIN VDE 1000-10) ausgeführt werden, sonst besteht die Gefahr eines elektrischen Schlages oder eines Brandes.
Setzen Sie das Produkt keinen Stößen aus und lassen Sie es nicht fallen. Bringen Sie es nicht in Kontakt mit brennbaren Stoffen, Wärmequellen, Feuchtigkeit und Spritzwasser. Tauchen Sie es nicht in Flüssigkeiten. Versuchen Sie nicht, das Gerät zu reparieren.
Installationsbedingungen
Dieses Produkt darf nicht im Freien verwendet werden. Die Funkreichweite wird durch die Regulierungsnormen für Funkgeräte eingeschränkt. Die Reichweite des IZYMO ON-OFF RECEIVER io hängt stark von den Umgebungsbedingungen ab: Große stromführende Geräte in der Nähe des Installationsorts oder die für die Erstellung der Mauern und Wände verwendeten Materialien (Metallflächen etc.) können zu Störungen führen. Die Verwendung von Funkgeräten (z.B. eines Hifi-Funkkopfhörers) mit derselben Frequenz kann die Leistungen des Produkts einschränken.
Konformitätserklärung
Somfy erklärt hiermit, dass das in dieser Anleitung beschriebene Funkgerät die Anforderungen der Funkanlagenrichtlinie 2014/53/EU sowie die grundlegenden Anforderungen aller anderen anzuwendenden europäischen Richtlinien erfüllt. Der vollständige Text der EU-Konformitätserklärung ist unter der Internetadresse www.somfy.com/ce verfügbar.
Wir wollen die Umwelt schützen. Entsorgen Sie das Gerät nicht mit dem Hausmüll. Geben Sie dieses bei einer Recycling-Sammelstelle ab.
Garantie
Es gilt die gesetzliche Gewährleistungsfrist von 2 Jahren.
Kompatibilität
Lasten
| Typ | Leistung |
|---|---|
| LED 220-240 V AC | Max. 150 W |
| Energiesparlampe | Max. 150 W |
| Halogen oder Ohmsche Last* | Max. 2000 W |
| Elektronischer oder ferromagnetischer Transformator | Max. 500 W |
* Beispiele für Ohmsche Last: Warmwasserbereiter, elektrischer Heizkörper etc.
Bedieneinheiten (Art des Schalters)
- Alle Taster (einer oder mehrere parallel geschaltete Taster am Eingang INPUT A)
- Alle Schalter (ein oder zwei Schalter an den Eingängen INPUT A bzw. B)
- Ohne fest verdrahtete Bedieneinheiten. Die Ansteuerung erfolgt dann ausschließlich über einen oder mehrere io-Funksender.
io-homecontrol-Funksender
- Unterputz-Sender io
- Smoove Lighting io
- TaHoma
- Connexoon io
- Box Energeasyconnect (Rexel)
- io-homecontrol-Funkhandsender
Beschreibung
| Bezeichnung | Kabel | Position |
|---|---|---|
| Eingang A (INPUT A) | Lila | A |
| Eingang B (INPUT B) | Orange | B |
| Ausgang C (OUTPUT) | Schwarz | C |
| Spannungsversorgung Phase L | Braun | D |
| Spannungsversorgung Neutral N | Blau | E |
| PRG-Taste | – | F |
| CFG-Taste | – | G |
| Mehrfarbige LED | – | H |
Installation
Vor der Installation muss die Spannungsversorgung an der Schaltanlage getrennt werden.
Einbau und Montage elektrischer Geräte dürfen nur durch Elektrofachkräfte (nach VDE 0100) erfolgen. Bei unsachgemäßer Montage sind schwere Verletzungen, Brand oder Sachschäden möglich.
Die Kabel der Eingänge A und B sind nicht von der Spannungsversorgung isoliert.
Der IZYMO ON-OFF RECEIVER io muss über ein lokales Stromnetz mit einer Spannung von 220–240 V AC, 50 Hz, mit Phase und Neutralleiter versorgt werden.
Der IZYMO ON-OFF RECEIVER io muss installiert werden in:
- einem Gehäuse (mindestens 50 mm Tiefe oder mit einer Nische für ein Mikromodul).
Wenn Phase und Neutralleiter verfügbar sind, kann er installiert werden hinter:
- einem Schalter
- einer elektrischen Steckdose (max. 2000 W-10 A)
- einer Anschlussdose für die Beleuchtung oder einer Abzweigdose
Achtung! Die so angeschlossene Steckdose unterstützt eine maximale Last von 2000W – 10A.
Verkabelung
- Mit einem oder mehreren Tastern
- Mit einem oder zwei Schaltern
- Ohne fest verdrahtete Bedieneinheiten
Die nicht angeschlossenen Kabel müssen mit einer isolierenden Schutzhülle oder einer Lüsterklemme isoliert werden.
Überprüfung der Verkabelung
- Drücken Sie kurz die PRG-Taste des Mikromoduls, um die Stromversorgung zu aktivieren (ein).
- Drücken Sie die Taste erneut, um sie zu deaktivieren (aus).
Inbetriebnahme
Konfiguration
Schalten Sie den IZYMO ON-OFF RECEIVER io in den Konfigurationsmodus, indem Sie 2 Sekunden die CFG-Taste drücken, bis die rote LED aufleuchtet.
Die rote LED leuchtet während der gesamten Konfiguration durchgehend.
Der Konfigurationsmodus bleibt für 5 Minuten aktiv.
Einstellung der verschiedenen Parameter
Um Parameter zu ändern drücken sie die CFG-Taste entsprechend der Liste jeweils schnell (<0,5s).
| Zahl der Betätigungen der CFG-Taste | Parameter | Mögliche Werte | Farbe der LED | Zahl der Blinksignale |
|---|---|---|---|---|
| 1 | Typ der an INPUT A und B angeschlossenen Bedieneinheiten | Taster (1) | Blau | 2 Signale |
| 2 | Schalter | Blau | 3 Signale | |
| 3 | Wiederherstellung nach Netzausfall | AUS (1) | Lila | 2 Signale |
| 4 | Letzter Zustand | Lila | 3 Signale | |
| 5 | Automatische Abschaltung | Automatische Abschaltung (1) | rote | 2 Signale |
| 6 | 30 Sekunden | rote | 3 Signale | |
| 7 | 1 Minute | rote | 4 Signale | |
| 8 | 3 Minuten | rote | 5 Signale | |
| 9 | 5 Minuten | rote | 6 Signale | |
| 10 | 10 Minuten | rote | 7 Signale | |
| 11 | 30 Minuten | rote | 8 Signale |
(1) Voreingestellte Werte
Beschreibung der verschiedenen Parameter
a- Typ der Bedieneinheit
Als Bedieneinheit kommen Taster- oder Schalter infrage (entweder der eine oder der andere Typ).
b- Wiederherstellung nach Netzausfall
Nach einem Netzausfall kann das Mikromodul abgeschaltet bleiben (OFF) oder wieder zum Zustand vor dem Netzausfall zurückkehren (Zustandsspeicher).
c- Automatische Abschaltung
Die Zeitschaltung legt fest, wie lange die Beleuchtung eingeschaltet bleibt. Wenn eine Zeitschaltung konfiguriert ist:
| Taster — Zeitschaltfunktion | Schalter — Funktion Anti-Vergessen |
|---|---|
| Jeder Druck betätigt die Zeitschaltung und startet den Zeitraum neu. Automatische Abschaltung mit Ende der Zeitschaltung. | Mit jeder Betätigung wechselt der Befehl: ON/OFF. Automatische Abschaltung mit Ende der Zeitschaltung. |
Konfigurationsmodus beenden
- Drücken Sie 2 Sekunden die CFG-Taste, bis die rote LED erlischt, oder
- Von der Bedieneinheit aus: Drücken Sie den Taster oder schalten Sie den Schalter um.
Rücksetzen der Konfiguration
Drücken Sie 7 Sekunden die CFG-Taste, bis die rote LED mehrmals blinkt und dann erlischt. Das Mikromodul wird auf die angegebenen voreingestellten Werte aus der Tabelle oben zurückgesetzt.
Zuweisung
IZYMO ON-OFF RECEIVER io in den Programmiermodus schalten
Es gibt 5 Möglichkeiten, um das Mikromodul in den Programmiermodus zu schalten (siehe Graphik A):
- Vom Mikromodul aus
- Von einem Taster aus
- Von einem Schalter aus
- Von einem neuen Funksender aus
- Von einem bereits zugewiesenen Funksender aus
Die grüne LED leuchtet 10 Minuten: Das Mikromodul ist während dieser Zeit im Programmiermodus.
io-Funksender hinzufügen oder löschen
Nachdem der IZYMO ON-OFF RECEIVER io in den Programmiermodus geschaltet ist (siehe Graphik B): Verfahren vom Funksender, der hinzugefügt oder gelöscht werden soll. Die grüne LED blinkt und erlischt, wenn der Prozess abgeschlossen ist.
TaHoma / Connexoon io verbinden
- Wählen Sie auf der TaHoma/Connexoon io-Benutzeroberfläche und dann die Systemeinstellungen.
- Wählen Sie die Registerkarte io-homecontrol (nur TaHoma) und klicken Sie auf „Hinzufügen“.
- Befolgen Sie die Anweisungen auf dem Bildschirm.
TaHoma / Connexoon io löschen
- Wählen Sie auf der TaHoma/Connexoon io-Benutzeroberfläche und dann die Systemeinstellungen.
- Wählen Sie die Registerkarte io-homecontrol (nur TaHoma) und klicken Sie auf „Löschen“.
- Befolgen Sie die Anweisungen auf dem Bildschirm.
Den Programmiermodus des IZYMO ON-OFF RECEIVER io verlassen
- Vom Mikromodul aus: Drücken Sie kurz die PRG-Taste des Mikromoduls.
- Von der Bedienstelle aus: Drücken Sie den Taster oder schalten Sie den Schalter um.
Zurücksetzen des IZYMO ON-OFF RECEIVER io
Mit diesem Verfahren wird die Konfiguration zurückgesetzt und alle zugewiesenen Funksender werden gelöscht.
1. Methode (mit Zugriff auf das Mikromodul): Drücken Sie (>7 s) die PRG-Taste des IZYMO ON-OFF RECEIVER io, bis das Mikromodul zwei Blinksignale abgibt.
2. Methode (ohne Zugriff auf das Mikromodul): Drücken Sie lang (>7 s) die PRG-Taste eines zugewiesenen Funksenders, bis das Produkt zwei Blinksignale abgibt.
Bedienung
- Flurschaltung ohne Neutralleiter ersetzen (siehe Graphik 1)
- Flurschaltung mit Neutralleiter ersetzen (siehe Graphik 2)
FAQ
| Problem | Mögliche Ursachen | Lösungen |
|---|---|---|
| Der IZYMO ON-OFF RECEIVER io funktioniert nur bei jeder zweiten Betätigung. | Das Produkt ist an einen Schalter angeschlossen, aber für einen Taster konfiguriert. | Ändern Sie die Konfiguration der Bedieneinheit. Siehe „Inbetriebnahme“ und dann „Einstellung der verschiedenen Parameter“. |
| Die Batterie des IZYMO TRANSMITTER io-Funksenders, der dem IZYMO ON-OFF RECEIVER zugewiesen ist, ist schwach. | Tauschen Sie die Batterie aus und beachten Sie dabei die Bedienungsanleitung. | |
| Der IZYMO ON-OFF RECEIVER io bleibt ausgeschaltet (eingeschaltet) und schaltet ein (schaltet aus), wenn der Taster gedrückt wird. | Das Produkt ist an einen Taster angeschlossen, aber für einen Schalter konfiguriert. | Ändern Sie die Konfiguration der Bedieneinheit. Siehe „Inbetriebnahme“ und dann „Einstellung der verschiedenen Parameter“. |
| Der IZYMO ON-OFF RECEIVER io funktioniert nicht. | Verkabelungsfehler. Das Produkt ist mit einem Schutz für Verkabelungsfehler ausgestattet. | Stellen Sie sicher, dass die Verkabelung korrekt ist. |
| Die Geräte sind an den Neutralleiter angeschlossen. | Ändern Sie die Verkabelung, um die Geräte an die Phase anzuschließen. |
Technische Daten
| Spannungsversorgung | 220/240 V, 50 Hz, 10 A max. (RCD 10 A, Kennlinie C muss vorgeschaltet sein) |
|---|---|
| Schutz | Kat. II |
| Querschnitt des Netzkabels | Min.: 0,75 mm² — Max.: 1,5 mm² |
| Schutzart | IP 20 |
| Schutzklasse | Doppelt isoliert ohne Erde |
| Maße | 43 x 43 x 18 mm |
| Frequenzband und maximale Leistung | 868,000 MHz - 868,600 MHz ERP < 25 mW ; 868,700 MHz - 869,200 MHz ERP < 25 mW ; 869,700 MHz - 870,000 MHz ERP < 25 mW |
| Reichweite im Freifeld | 200 m |
| Reichweite durch zwei Betonwände | 20 m |
| Anzahl der io-homecontrol-Funksender | Unidirektional: 10 Funkhandsender ; Bidirektional: unbegrenzt |
| Betriebstemperatur | 0 °C bis + 55 °C |
| Luftfeuchtigkeit | 85 % rel. Luftfeuchtigkeit bei 25 °C |
| Höhe über NN | < 2000 m |
Figures / Schémas
SOMFY ACTIVITES SA, 50, avenue du Nouveau Monde, F-74300 CLUSES — www.somfy.com