Notice BENINCA PUPILLA
Produit concerné

PUPILLA — Fotocellula rotante 180° da parete
Apertura fotocellula
Fare leva nella parte inferiore centrale come indicato nella Fig.A.
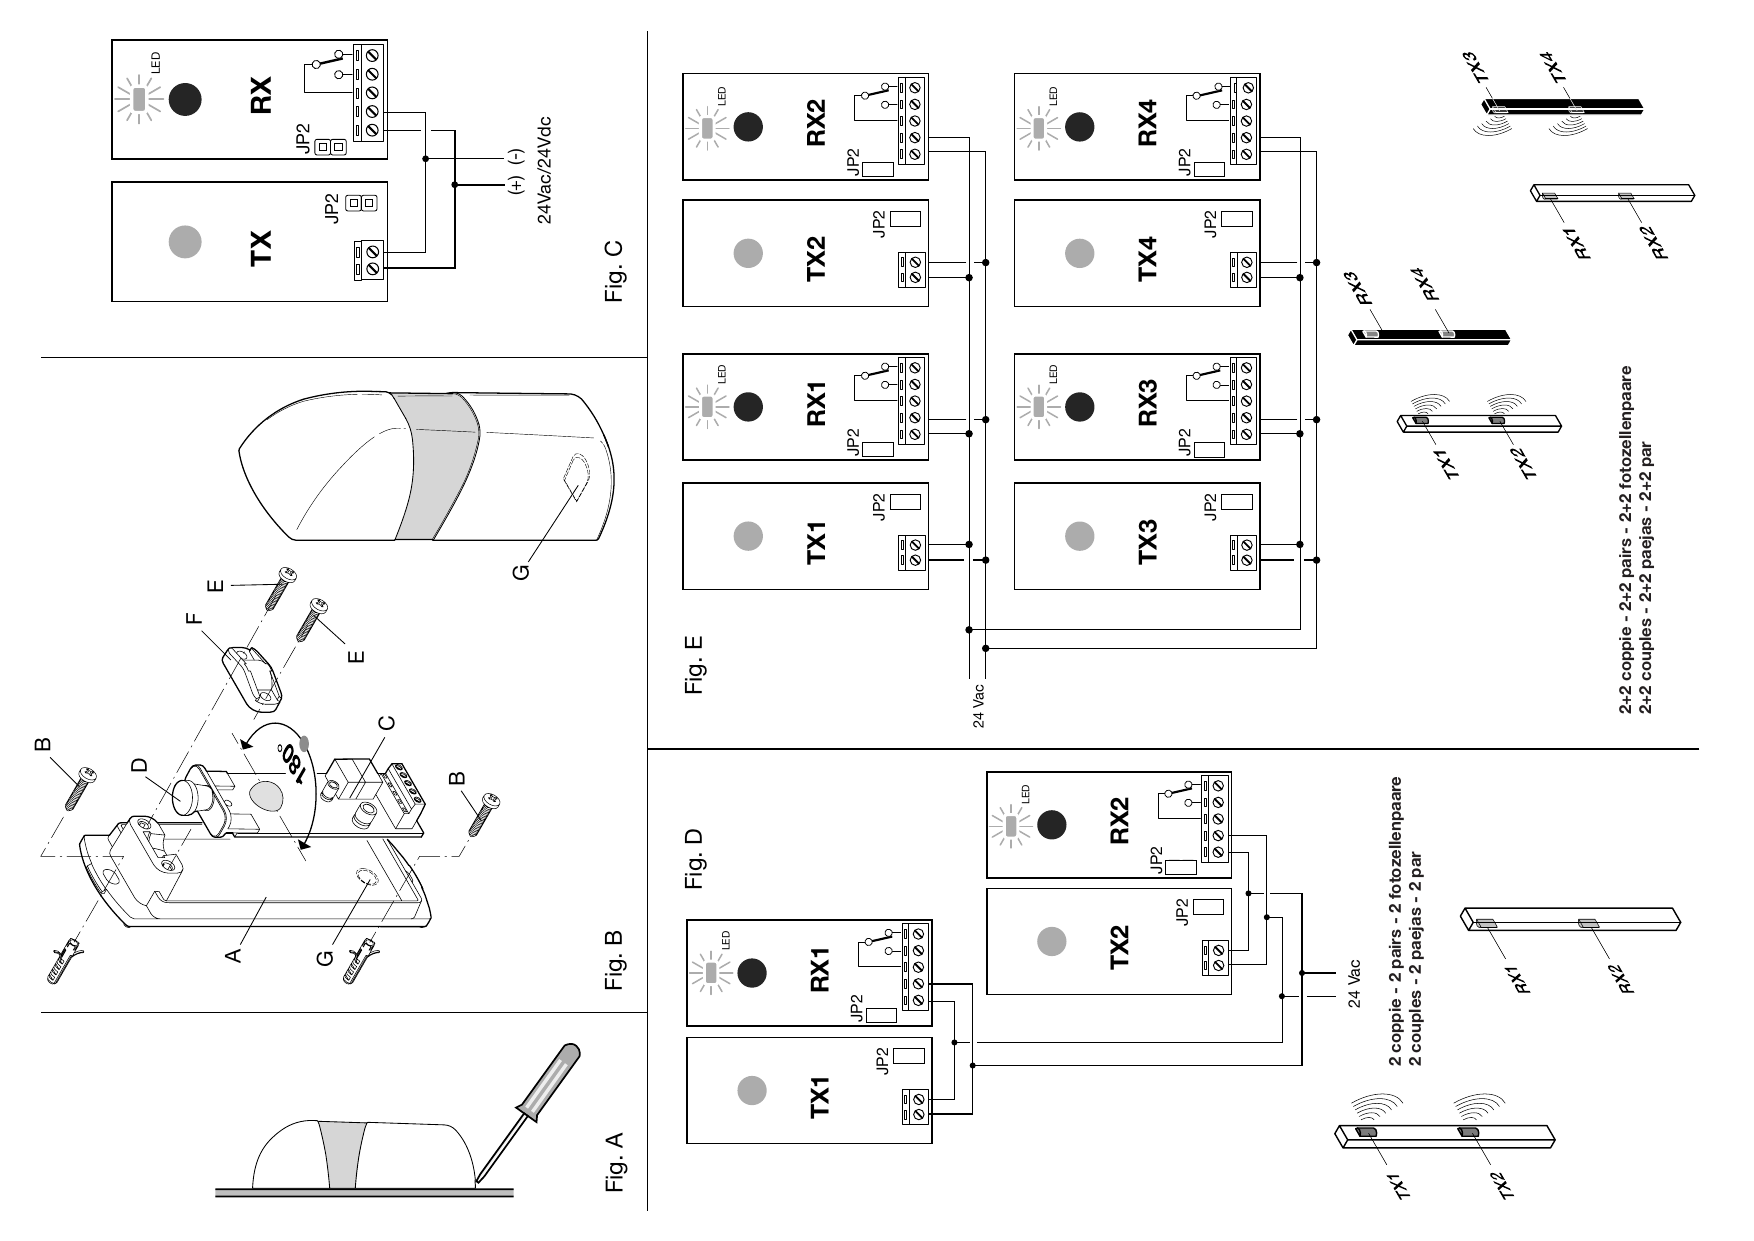
Fissaggio (fig.B)
- A Fondo
- B Viti fissaggio a parete
- C Circuito stampato
- D Supporto per circuito stampato
- E Viti fissaggio blocco rotazione
- F Blocco rotazione
- G Predisposizione passaggio cavi
Caratteristiche Tecniche
| Alimentazione | 22÷30Vac o 20÷28Vdc |
|---|---|
| Portata | 20-25 m |
| Grado di protezione | IP 44 |
| Temperatura funzion. | -20°C/+70°C |
| Assorbimento TX | 20mA |
| Assorbimento RX | 50mA |
Collegamento (fig.C)
| TX M1 | 24Vac (+24Vdc) |
|---|---|
| TX M2 | 24Vac (-24Vdc) |
| RX M1 | 24Vac (+24Vdc) |
| RX M2 | 24Vac (-24Vdc) |
| RX M3 | Comune, COM. |
| RX M4 | Contatto normalmente aperto, N.O. |
| RX M5 | Contatto normalmente chiuso, N.C.* |
*Con fotocellule alimentate e allineate.
Regolazione del centraggio
La regolazione del centraggio della fotocellula si effettua allentando le viti E. Il LED indica il livello di ricezione:
- Lampeggio del LED lento: ricezione debole
- Lampeggio del LED veloce: ricezione buona
- LED acceso: ricezione ottimale.
Sincronismo
Per evitare interferenze nel caso di utilizzo di due coppie di fotocellule ravvicinate, attivare il sincronismo chiudendo i jumper JP2 sia sui trasmettitori sia sui ricevitori. Il sincronismo funziona esclusivamente con alimentazione 24Vac con polarità invertita tra le due coppie come indicato in Fig. D/E.
PUPILLA — Rotating photocell, 180°, fitting to wall
Opening of the photocell
Lift the cover be levering at the center of the lower part, as shown in Fig. A
Fitting (fig.B)
- A Bottom
- B Wall fitting screws
- C Printed circuit
- D Support for printed circuit
- E Fitting screws, rotation lock
- F Rotation lock
- G Presetting for the passage of cables
Specifications
| Power supply | 22÷30Vac or 20÷28Vdc |
|---|---|
| Range | 20-25 m |
| Protection level | IP 44 |
| Oper. temperature | -20°C/+70°C |
| Consumption TX | 20mA |
| Consumption RX | 50mA |
Wire connections (fig. C)
| TX M1 | 24Vac (+24Vdc) |
|---|---|
| TX M2 | 24Vac (-24Vdc) |
| RX M1 | 24Vac (+24Vdc) |
| RX M2 | 24Vac (-24Vdc) |
| RX M3 | Common, COM. |
| RX M4 | Normally open contact, N.O. |
| RX M5 | Normally closed contact, N.C.* |
*With powered and aligned photocells.
Adjustment of the alignment
The photocells are aligned by loosening the screws E. As regards the reception LED:
- LED flashes slowly: scarce reception
- LED flashes quickly: good reception
- LED on: optimal reception.
Synchronization
To avert any interference when using two pairs of photocells mounted close together, activate the synchronization function by closing the jumpers J2 on both transmitters and receivers. The synchronization operates only with 24Vac power supply and reversed polarity between the two pairs, as shown in Fig. D/E.
PUPILLA — Um 180° schwenkbare Fotozelle für die Wandmontage
Öffnen der Fotozelle
Den unteren Teil der Einheit anheben wie in der Abb. A gezeigt.
Befestigung (Abb. B)
- A Boden
- B Wandbefestigungsschrauben
- C Platine
- D Platinenhalterung
- E Befestigungsschrauben
- F Schwenkbarer Block
- G Kabeldurchführung
Technische Eigenschaften
| Speisung | 22÷30Vac oder 20÷28Vdc |
|---|---|
| Tragweite | 20-25 m |
| Schutzklasse | IP 44 |
| Betriebstemperatur | -20°C/+70°C |
| Stromaufnahme TX | 20mA |
| Stromaufnahme RX | 50mA |
Anschluss (Abb. C)
| TX M1 | 24Vac (+24Vdc) |
|---|---|
| TX M2 | 24Vac (-24Vdc) |
| RX M1 | 24Vac (+24Vdc) |
| RX M2 | 24Vac (-24Vdc) |
| RX M3 | Gemein, COM. |
| RX M4 | Arbeitskontakt, N.O. |
| RX M5 | Ruhekontakt, N.C.* |
*Bei gespeisten und angereihten Fotozellen
Regelung der Zentrierung
Die Regelung der Zentrierung der Fotozelle erfolgt durch Lockern der Schrauben E. Die LED zeigt das Empfangsniveau an:
- LED blinkt langsam: schwacher Empfang
- LED blinkt schnell: guter Empfang
- LED ein: optimaler Empfang
Synchronismus
Falls zwei nahliegende Fotozellenpaare verwendet werden, den Synchronismus aktivieren, um Störungen zu vermeiden. Dazu die Jumpers JP2 an den Sendegeräten und an den Empfängern schließen. Der Synchronismus funktioniert ausschließlich mit einem Netzgerät 24Vac mit umgetauschten Polenpaaren, wie in Abb. D/E gezeigt.
PUPILLA — Photocellule tournante 180° à paroi
Ouverture photocellule
Faire pression sur la partie inférieure centrale comme indiqué dans la Fig.A
Fixage (Fig.B)
- A Fond
- B Vis de fixage à paroi
- C Circuit imprimé
- D Support pour circuit imprimé
- E Vis de fixage système de rotation
- F Système de rotation
- G Prédisposition passage des câbles
Caractéristiques Techniques
| Alimentation | 22÷30Vac ou 20÷28Vdc |
|---|---|
| Débit | 20-25 m |
| Degré de protection | IP 44 |
| Température fonct. | -20°C/+70°C |
| Absorption TX | 20mA |
| Absorption RX | 50mA |
Branchement (Fig.C)
| TX M1 | 24Vac (+24Vdc) |
|---|---|
| TX M2 | 24Vac (-24Vdc) |
| RX M1 | 24Vac (+24Vdc) |
| RX M2 | 24Vac (-24Vdc) |
| RX M3 | Commune, COM. |
| RX M4 | Contact normalement ouvert, N.O. |
| RX M5 | Contact normalement fermé, N.F.* |
*Avec photocellules alimentées et alignées.
Réglage du centrage
Le réglage du centrage de la photocellule a lieu en desserrant les vis E. Le LED indique le niveau de réception:
- Clignotement du LED lent: réception faible
- Clignotement du LED rapide: bonne réception
- LED allumé: réception optimale.
Synchronisme
A fin d'éviter toute interférence en cas d'utilisation de deux couples de photocellules rapprochées, activez le synchronisme en fermant les jumpers JP2 soit sur les transmetteurs, soit sur les récepteurs. Le synchronisme marche exclusivement avec alimentation 24Vac avec polarité inverse entre les deux couplet comme indiqué dans la Fig. D/E.
PUPILLA — Fotocélula giratoria 180° para pared
Apertura fotocélula
Hacer palanca en la parte inferior central, como mostrado en la Fig.A
Fijación (fig.B)
- A Fondo
- B Tornillos de fijación en pared
- C Circuito impreso
- D Soporte para circuito impreso
- E Tornillos de fijación del bloque rotación
- F Bloque Rotación
- G Preparación para el paso de cables
Características Técnicas
| Alimentación | 22÷30Vac o 20÷28Vdc |
|---|---|
| Alcance | 20-25 m |
| Grado de protección | IP 44 |
| Temperatura funcion. | -20°C/+70°C |
| Absorción TX | 20mA |
| Absorción RX | 50mA |
Conexión (Fig.C)
| TX M1 | 24Vac (+24Vdc) |
|---|---|
| TX M2 | 24Vac (-24Vdc) |
| RX M1 | 24Vac (+24Vdc) |
| RX M2 | 24Vac (-24Vdc) |
| RX M3 | Común, COM. |
| RX M4 | Contacto normalmente abierto, N.O. |
| RX M5 | Contacto normalmente cerrado, N.C.* |
*Con fotocélulas alimentadas y alineadas.
Ajuste del centrado
El ajuste del centrado de la fotocélula se realiza aflojando los tornillos E. El LED indica el nivel de recepción:
- Parpadeo lento del LED: recepción débil
- Parpadeo rápido del LED: recepción buena
- LED encendido fijo: recepción óptima.
Sincronismo
Para evitar interferencias, si se utilizan dos parejas de fotocélulas cercanas, activar el sincronismo cerrando los puentes JP2 tanto en los transmisores como en los receptores. El sincronismo funciona exclusivamente con alimentación de 24Vac, con polaridad invertida entre las dos parejas, como mostrado en la Fig. D/E.
PUPILLA — Fotokomórka obrotowa 180° mocowana na ścianie
Otwarcie fotokomórki
Podważyć w środkowej części dolnej tak, jak wskazano na Rys.A.
Umocowanie (rys.B)
- A Dno
- B Śruby mocowania do ściany
- C Obwód drukowany
- D Uchwyt obwodu drukowanego
- E Śruby mocowania blokady obrotu
- F Blokada obrotu
- G Przygotowanie przejścia przewodów
Dane Techniczne
| Zasilanie | 22÷30Vac lub 20÷28Vdc |
|---|---|
| Zasięg | 20-25 m |
| Stopień zabezpieczenia | IP 44 |
| Temperatura działania | -20°C/+70°C |
| Pochłanianie TX | 20mA |
| Pochłanianie RX | 50mA |
Połączenia (rys.C)
| TX M1 | 24Vac (+24Vdc) |
|---|---|
| TX M2 | 24Vac (-24Vdc) |
| RX M1 | 24Vac (+24Vdc) |
| RX M2 | 24Vac (-24Vdc) |
| RX M3 | Wspólny, COM. |
| RX M4 | Zestyk normalnie otwarty, N.O. |
| RX M5 | Zestyk normalnie zwarty, N.C.* |
*Przy fotokomórkach zasilanych i uliniowanych.
Regulacja środkowania
Regulacji środkowania fotokomórki dokonuje się przez poluzowanie śrub E. LED wskazuje poziom odbioru:
- Błyskanie LEDu wolne: odbiór słaby
- Błyskanie LEDu szybkie: odbiór dobry
- LED świeci się: odbiór optymalny.
Synchronizm
W celu uniknięcia zakłóceń w przypadku używania dwu par fotokomórek znajdujących się blisko siebie należy uaktywnić funkcję synchronizmu poprzez zamknięcie jumperów JP2 zarówno w nadajnikach, jak i w odbiornikach. Synchronizm działa wyłącznie przy zasilaniu na 24Vac przy biegunowości odwróconej między obiema parami tak, jak wskazano na Rys. D/E.
Dichiarazione CE di conformità
Dichiarazione CE di conformità — EC declaration of confirmity — EG-Konformitatserklarung — Déclaration CE de conformité — Declaracion CE de conformidad — Deklaracja UE o zgodności
AUTOMATISMI BENINCÀ SpA — Via Capitello, 45 - 36066 Sandrigo (VI)
Con la presente dichiariamo che il nostro prodotto / We hereby declare that our product / Hiermit erklaren wir, dass unser Produkt / Nous déclarons par la présente que notre produit / Por la presente declaramos que nuestro producto / Niniejszym oświadczamy że nasz produkt PUPILLA è conforme alle seguenti disposizioni pertinenti:
89/336/CEE, 93/68/CEE
Data/Firma: 05/10/2006